Showing posts with label Tutorial. Show all posts

Tutorial Tuesday: Glitter Aztec Nail Art

Hey everyone! Today I have another tutorial tuesday that you'll have to head over to Divine Caroline for. After posting the nails I did at Pastille nail bar (which you can see here) I was a few times to do a tutorial for them, so here you go! Don't forget to check out the full tutorial here


What do you think? Let me know in the comments
Alice

Tutorial Thursday: Pink Checkers Stripe

Hey everyone! Because this week's Tutorial Tuesday was done by the lovely Amelia (see here), I decided I'd post my usual tutorial today instead! I'm so excited to show you this design, after seeing this image by Madeline Poole on Instagram I just knew I had to recreate it. The design itself is pretty simple but I think the simplicity is what makes it stand out so much. I definitely got a lot of comments on my nails whilst I was wearing these, and as they're so easy to do I think I'll be recreating them with quite a few colours! 

I didn't actually intend to do this design in pink, I had meant to do it with a nude base, but for some reason I picked up the pink and painted my nails with it without even thinking, and I didn't want to remove it after that so I just decided to go with it. I'm so glad I did because I think it works really well with the pastel colour. I guess my hand knew what I wanted more than my head! Tutorial will be after the jump.


The base for these nails is OPI - Mod About You, then I used striping tape from Born Pretty Store, MASH - White, and MASH - Black, but you can also use acrylic paint if you'd prefer! Then I finished off with a coat of Seche Vite


Step 1: Paint your nails with your chosen base colour
Step 2: Apply two strips of striping tape to the centre of your nail
Step 3: Paint in between the strips with the brush from the white polish
Step 4: Using a small brush and black nail polish or acrylic paint, paint on the black stripes leaving equal gaps for the white. You can either do this step with or without the striping tape
Step 5: Remove the striping tape. If you left the tape on when applying the black, do this very quickly or the black will be stringy and will ruin the design.
Step 6: Once your design is dry, finish off with topcoat to seal in your design.

What do you think? Let me know in the comments!
Alice

Tutorial Tuesday: Romance Isn't Dead for Divine Caroline

Hey everyone! Today's tutorial tuesday is going to be a little different. From now on, the steps for every other tutorial tuesday will be available to view on Divine Caroline, but I will only be posting the finished design look on here. The first tutorial I've done for DC is this cute heart design, which you can find on DC here. I knew I wanted to do some form of pattern within hearts, and I originally thought I'd do a tutorial for this design I did a while ago but once I started I realised I wanted to go for something a bit more cutesy. 


Don't forget to go check out the steps for this design HERE

What do you think? Let me know in the comments!
Alice

Tutorial Tuesday: Cosmo Swirls

Hey everyone! I've been super busy with revision and essays because I have a load of deadlines/exams coming up and I'm stressing a bit so apologies for not posting tonnes. I promise this isn't a sign of things to come in 2014, I just want to get my exams out of the way and then I'll be back to posting more regularly. I have a couple of nail art posts for you, a couple of reviews, and a couple of tutorials so I'll spread them out over the next 3 weeks until the end of exams just so you're not missing out! 

Anyway, today I have another tutorial tuesday for you. You might remember these nails from when I went to the Cosmo awards, and as they're clearly lucky because I won an award, I thought I'd do a tutorial for them. I actually created this tutorial for Nail It! so I wont be writing the steps down here because I think it's only fair that you head over there to see, (look HERE) but I will post the picture steps just so you have something to look at! 


As with my original post, the base for these nails was 2 coats of Alessandro - Midnight Black*, and 3 coats of Alessandro - Glitter Queen*. I then applied a layer of China Glaze - Fairy Dust to the black. Once that was dry I used a thin brush (this one) and white acrylic paint for the swirls, and finally I added the black studs (which I unfortunately cannot remember the origin of but they're most likely from Born Pretty Store). Finished off with a coat of Seche Vite

  
Don't forget to check out the steps HERE

I also wrote a post for Nail It! about photographing your nails with a few other bloggers which you can see here if you're interested.

What do you think? Let me know in the comments!
Alice

Tutorial Thursday: Vintage Wallpaper

Hey everyone! Welcome to my first post of 2014. I hope you had a good new year, mine was going to be just a quiet night in but we had a few odd goings on in my house involving weird noises, a santa hat that appeared from nowhere and some missing coal. Sounds vague but that's all I know, it was very weird! Nevertheless it was a good night and I'm slightly sad to see the back of 2013, but excited to see what this year will bring. You may notice that this should have probably gone up on tuesday (for tutorial tuesday) but as I did my favourites of 2013 post I decided I'd put the tutorial up today instead, hope you don't mind! Today's tutorial is the fourth and final tutorial that I created for Barry M, and I decided to do it based on these nails by Dressed Up Nails. Mine are absolutely nowhere near as good as hers (as can be expected as she is awesome) but I hope I've still done them justice, and I can't wait to see your recreations. 


Step 1: Start with 1 thin layer of Barry M - Countess
Step 2: Mark out using striping tape where you want your crosses to be
Step 3: Paint over the striping tape using Barry M - Duchess
Step 4: Remove the striping tape
Step 5: Using a thin brush and Barry M - Countess, paint hearts in the gaps
Step 6: Finish off with a topcoat to seal in your design

What do you think? Let me know in the comments!
Alice

Tutorial Thursday: Candy Canes

Hey everyone! I have another christmas tutorial for you today, there's only one more left after today and then it's CHRISTMAS. I can't believe how quickly it's come around this year, I know I probably say that every year but December really has flown by. And I should definitely have got further with my essay, whoops! I really liked the idea behind this tutorial but you might notice that I made a bit of a mistake and finished the design on one finger, and my perfectionist nature really can't stand the images. Hopefully you can all still follow the tutorial without too much confusion!


The base for these nails was Barry M - Bright Red, and the white is MASH - White, all topped off with a coat of Seche Vite


Step 1: Paint your nails with both red and white polish
Step 2: Place striping tape or tape cut in to pieces diagonally on your nail, spread them out differently to create different width stripes
Step 3: Paint over the tape with red polish
Step 4: Remove the tape
Step 5: Using a small brush or Barry M White Nail Art Pen paint on the candy canes on the other nails
Step 6: Finish off with a topcoat to seal in your design

What do you think? Let me know in the comments!
Alice

Tutorial Tuesday: Christmas Lights

Hey everyone! Just a quick tutorial tuesday today for these cute christmas light nails. I'm so excited that it's nearly christmas, and I've somehow managed to actually get all the presents I need to get. None of which I had got this time last year, so it's definitely an improvement! Tutorial steps will be after the jump

I used a base of MASH - White, then I used the Barry M - Black Nail Art Pen for the wire, then I used Barry M - Bright Red, OPI - The It Colour, and OPI - Green-wich Village for the lights, and white acrylic paint for the reflections. All topped off with a coat of Seche Vite


Step 1: Paint your nails with a base colour of white
Step 2: Using a Barry M - Black Nail Art Pen paint on lines for the wire
Step 3: Using a small brush and Barry M - Bright Red paint on the lights spaced out across the wire
Step 4: Do the same as above with green
Step 5: Do the same as above with yellow
Step 6: using white acrylic paint or nail polish and a small brush, paint on the reflections of the lights. Then finish off with a topcoat to seal in your design!

What do you think? Let me know in the comments!
Alice

P.S. If you haven't already, I'd be so grateful if you would vote for me in China Glaze's holiday nail art competition here

Tutorial Thursday: Santa

Hey everyone! Just a quick tutorial post today for these cute Santa nails that I did for Barry M. As I mentioned on tuesday, I have too many tutorials to only post on tuesdays before Christmas so I'm going to do both tuesday and thursday tutorials until Christmas day.  I'm so tired after having been doing nails for the past 8 hours (!!!) and editing photos. It's now 2:40am and I desperately want to go to bed, I need to learn to stop leaving my posts until the last minute! Anyway, the full post will be after the jump


And now for the tutorial!


Step 1: Paint your nails with Barry M - Lychee
Step 2: Using Barry M - Bright Red and a small brush or toothpick, paint red on the top third of your nail
Step 3: Using a toothpick or dotting tool, line the red using Barry M - Matt White
Step 4: Using the Barry M - White Nail Art Pen, paint on Santa's beard
Step 5: Using the Barry M - Black Nail Art Pen paint on the eyes
Step 6: Paint on a nose using Barry M - Dragon Fruit and finish off with a coat of topcoat to seal in your design, and you're done!

What do you think? Let me know in the comments
Alice

Tutorial Tuesday: Christmas Trees

Hey everyone! This post has been such a nightmare to get sorted. All my applications seemed to be crashing and I couldn't get anything sorted, and I almost gave up, but I wanted to get Tutorial Tuesday up on time and luckily I have! I'm going to be posting tutorials every Tuesday and Thursday before Christmas as I have quite a few to show you. I'm excited for you to see them all, and I also love to see what you do with the tutorials. Don't forget to tag me on Instagram or Twitter, or post on my Facebook, with any designs you do so I can see! The first one for this week is this sparkly christmas tree design on a base of Barry M - Crush from the Classic Matte collection. The rest of the post will be after the jump!


As mentioned before, the base for these nails is Barry M - Crush. For the tree I used Barry M - Emerald Green, and the glitter on the tree is a mixture of Barry M - (Limited Edition) Silver Lights and Barry M - Majesty for the top of the tree from the Royal Glitter collection. The glitter on the finger is again Barry M - Silver Lights, and it's all topped off with a coat of Barry M - All in One Nail Paint.


Step 1: Paint your nails with a base of Barry M - Crush
Step 2: Using striping tape, or normal tape cut into thin strips, make a triangle shape on your nails
Step 3: Fill in the triangle with more tape placed diagonally
Step 4: Paint over the tape using Barry M - Emerald Green
Step 5: Remove the tape
Step 6: Using a dotting tool, brush, or toothpick, paint glitter on the tree for the lights
Step 7: Paint the rest of your nails using Barry M - Silver Lights
Step 8: Finish off with a topcoat to seal in your design, and you're done!

What do you think? Let me know in the comments!
Alice

Daisy Nail Art + TUTORIAL for Clothes Show Live

Hey everyone! So, as you may remember me mentioning, last week I went to London to film some tutorials for Clothes Show Live. The first tutorial is now live and I can't wait for you to see it! I've also done my own nails to accompany the tutorial. I absolutely love the simplicity of these nails, they're easy to create yet they really stand out. I definitely think this is a design to do if you're in a rush but you still want something that looks good.


For these I started off with a base of MASH - Black, then I used acrylic paint for the white flowers and dots, and then I used Butter LONDON - Jasper for the yellow centres of the flowers, all topped off with a coat of Seche Vite


And here's the tutorial on Clothes Show Live TV:


What do you think? Let me know in the comments!
Alice

Tutorial Tuesday: Christmas Pudding

Hey everyone! Today's Tutorial Tuesday happens to be on a Wednesday, as you may notice. I was working on a super exciting project last night (which you shall see in January) and completely forgot to write the post, I'm sorry! Nevertheless, you shall still get a tutorial, and this weeks tutorial is for these Christmas puddings. Many of you requested that I start doing Christmas tutorials, and now it's finally December I don't feel like I'm betraying my scrooge-ness too much by doing so. I have quite a few Christmas tutorials for you this year, so I might start posting more than one a week, would that be okay? Anyway, the rest of the post, including the steps, will be after the jump.


I created today's tutorial exclusively for Barry M, and it uses all Barry M colours. I started with a base coat of Barry M - Mocha, from the recent Classic Matte collection. I then used a Barry M - White Nail Art Pen, and the holly is done with Barry M - Emerald Green, and Barry M - Red Glitter. Then I finished off with a layer of Barry M - All in 1 Nail Paint


Step 1: Start off with a base coat of Barry M - Mocha
Step 2: Using a Barry M - White Nail Art Pen draw the outline for the pudding
Step 3: Fill in the nails using the nail art pen, alternatively you can use Barry M - Matt White and a brush/toothpick to fill in the space.
Step 4: Using a dotting tool or a cut down toothpick, add the holly berries using Barry M - Red Glitter
Step 5: Using a small brush or toothpick, draw the holly leaves. Start at the berries and draw one side first, then draw the other side and the middle should fill in automatically.
Step 6: Finish off with a topcoat to seal in your design and you're done!

What do you think? Let me know in the comments!
Alice

P.S. Dont forget to enter my giveaway to win all 3 of the nail wraps I designed for Scratch!

Tutorial Tuesday: Saran Wrap Nails

Hey everyone! Super quick post, it's late and I have to be up early to go to London tomorrow. I'm off to do something exciting, which you shall see very soon. Today's tutorial isn't a very original one, in fact I think the idea originated from Nailed It, but hopefully you will appreciate it nonetheless. I have a load of christmas tutorials coming your way, but they wont start until December, I'm a strict scrooge!

Step 1: Paint your nails with a base colour, I used Barry M – Dragon Fruit
Step 2: Once your base layer is dry paint a layer of a contrasting colour over the top, (I used Barry M - Blueberry Ice-Cream) do your nails one at a time with this and the next step - and be quick
Step 3: Roll up some cling film in to a ball and dab it onto the wet blue nail varnish
Step 4: Finish off with a topcoat (I use Seche Vite) to seal in your design, and you're done!

What do you think? Let me know in the comments!
Alice

P.S Have you entered my giveaway yet?

Tutorial Tuesday: Bows

Hey everyone! It's 1am here in the UK, and I just got in to bed and turned out the light, only to remember that I'd completely forgotten to do a tutorial tuesday! So the light is back on and I'm going to be super quick in writing this so I can go to sleep, second time around. This week's tutorial is for these glitter bow nails, which you might remember from here. This time I used a base of the gorgeous Shimmer Polish - Kim*, which you can see swatches of below. I'm going to include the rest of the post after the jump otherwise it might be too long!


Here I used 3 thin coats of Shimmer Polish - Kim, with 2 coats of Seche Vite topcoat.


And now for the tutorial:

Step 1: Paint your nails with a glitter base coat
Step 2: Using a brush, toothpick or dotting tool, paint the shape of a bow in a corresponding crème colour. (For instance, because the glitter is blue, the bow is blue too)
Step 3: Using a dotting tool, or a cut down toothpick, paint white dots on the bow shape
Step 4: Using a Black Barry M nail art pen, outline the bow shape. Start with the centre circle and then do the edges of the bow itself.
Step 5: Using the nail art pen again, draw the creases of the bow coming out from the centre
Step 6: Finish off with a topcoat to seal in your design and you’re done!

What do you think? Let me know in the comments!
Alice

Tutorial Tuesday: Rose Polka Dots

Hey everyone! Today I have a brand new Tutorial Tuesday for you, this time for this gorgeous rose polka dots that you might remember from here. I had originally intended to post a tutorial for these bow nails today, because I was absolutely certain that I'd posted this tutorial already. However, after discovering (and double checking) that I hadn't, I decided to push the bow nails back a week and post these instead, considering I promised you a tutorial 'soon' over 3 months ago!  I can only apologise for my idiocy.


I wont bombard you with pictures as you've already seen these before, but just as a reminder for the colours I used 2True - Sienna for the base, 2True - Taylor for the roses, MASH - White, Barry M - Key Lime, and these studs from Born Pretty Store.


Step 1: Paint your nails pink
Step 2: Using a dotting tool and white polish draw dots on alternate nails
Step 3: Using a larger dotting tool paint on darker pink spots, more loosely than the white dots
Step 4: Using a thin brush paint on the shapes of the inside of the roses. For this shade I mixed the base colour and the white together to create a more opaque light pink
Step 5: Using the same brush paint on the leaves in green. 
Step 6: Finish off with a topcoat to seal in your design, and you’re done! You can also add studs whilst the topcoat is still drying if you wish

What do you think? Let me know in the comments!
Alice

Tutorial Tuesday: Glitter Jellyfish

Hey everyone! Today I have a brand new tutorial tuesday for you, this time for some cute little glittery jellyfish. Don't forget to check out the tutorials tab at the top of my blog to see my previous tutorials! I've wanted to do jellyfish for ages, and I was really tempted to do them with needle dragging but I was in one of those 'it will probably fail so I wont even try' moods, and I'm quite glad because I like how these turned out. Perhaps I'll try needle dragging some time in the future instead. I'm starting to run out of ideas for tutorials, what would you'd like to see on future tuesdays? I only have a couple more tutorials left to post before I need to make some new ones, so any suggestions are welcome. Just don't ask for Christmas tutorials, I'm one of those spoil sports who doesn't even like the mention of Christmas before December begins. Anyway, the rest of the post will be after the jump! I've seen a few of you saying that you prefer it that way, as you can scroll through my blog much easier


The base for these nails was 2 coats of the gorgeous Orly FX - AquaPixel*, from the Pixel FX collection. As you can see in the difference in the photos above and below, topcoat transforms this polish, but it is also as equally as beautiful on its own. This polish is vaguely textured, but not to an extent that it's irritating. I really love this polish, and I think it really suits the underwater look too.


And now for the tutorial...

Step 1: Paint your nails with your base colour, preferably blue.
Step 2: Paint semi-circles in white, this can be either acrylic paint or white nail varnish, and fill them in for the top of your jellyfish
Step 3: Using a thin brush, paint wiggly lines down from the semi-circle for the tentacles
Step 4: Paint on eyes using a thin brush or dotting tool, I used acrylic paint but you can also use polish if you'd prefer
Step 5: Finish off with a topcoat to seal in your design

What do you think? Let me know in the comments!
Alice

Then and Now: Frankenvamp + Tutorial

Hey everyone! I have the last of my 4 halloween tutorials for you today, don't forget to check out the tutorials tab at the top of my blog if you want to see the previous 3! This post is also another Then and Now post just like last week. I was so sad that I had to take these nails off for work, but at least with a blog I'm able to document my designs so I don't feel quite as bad when they have to go. Anyway, the tutorial and the 'now' nails will be after the jump!


The base for these nails was OPI - My Vampire is Buff (quite fitting), and Barry M - Key Lime, the black is acrylic paint, as is the white, and the red is Barry M - Bright Red, all topped off with a coat of Seche Vite


And these were what these looked like 2 years ago, I definitely prefer the Frankenstein nails now, the state of my cuticles, and my use of topcoat! Oh and also definitely my nail shape, what do you think?

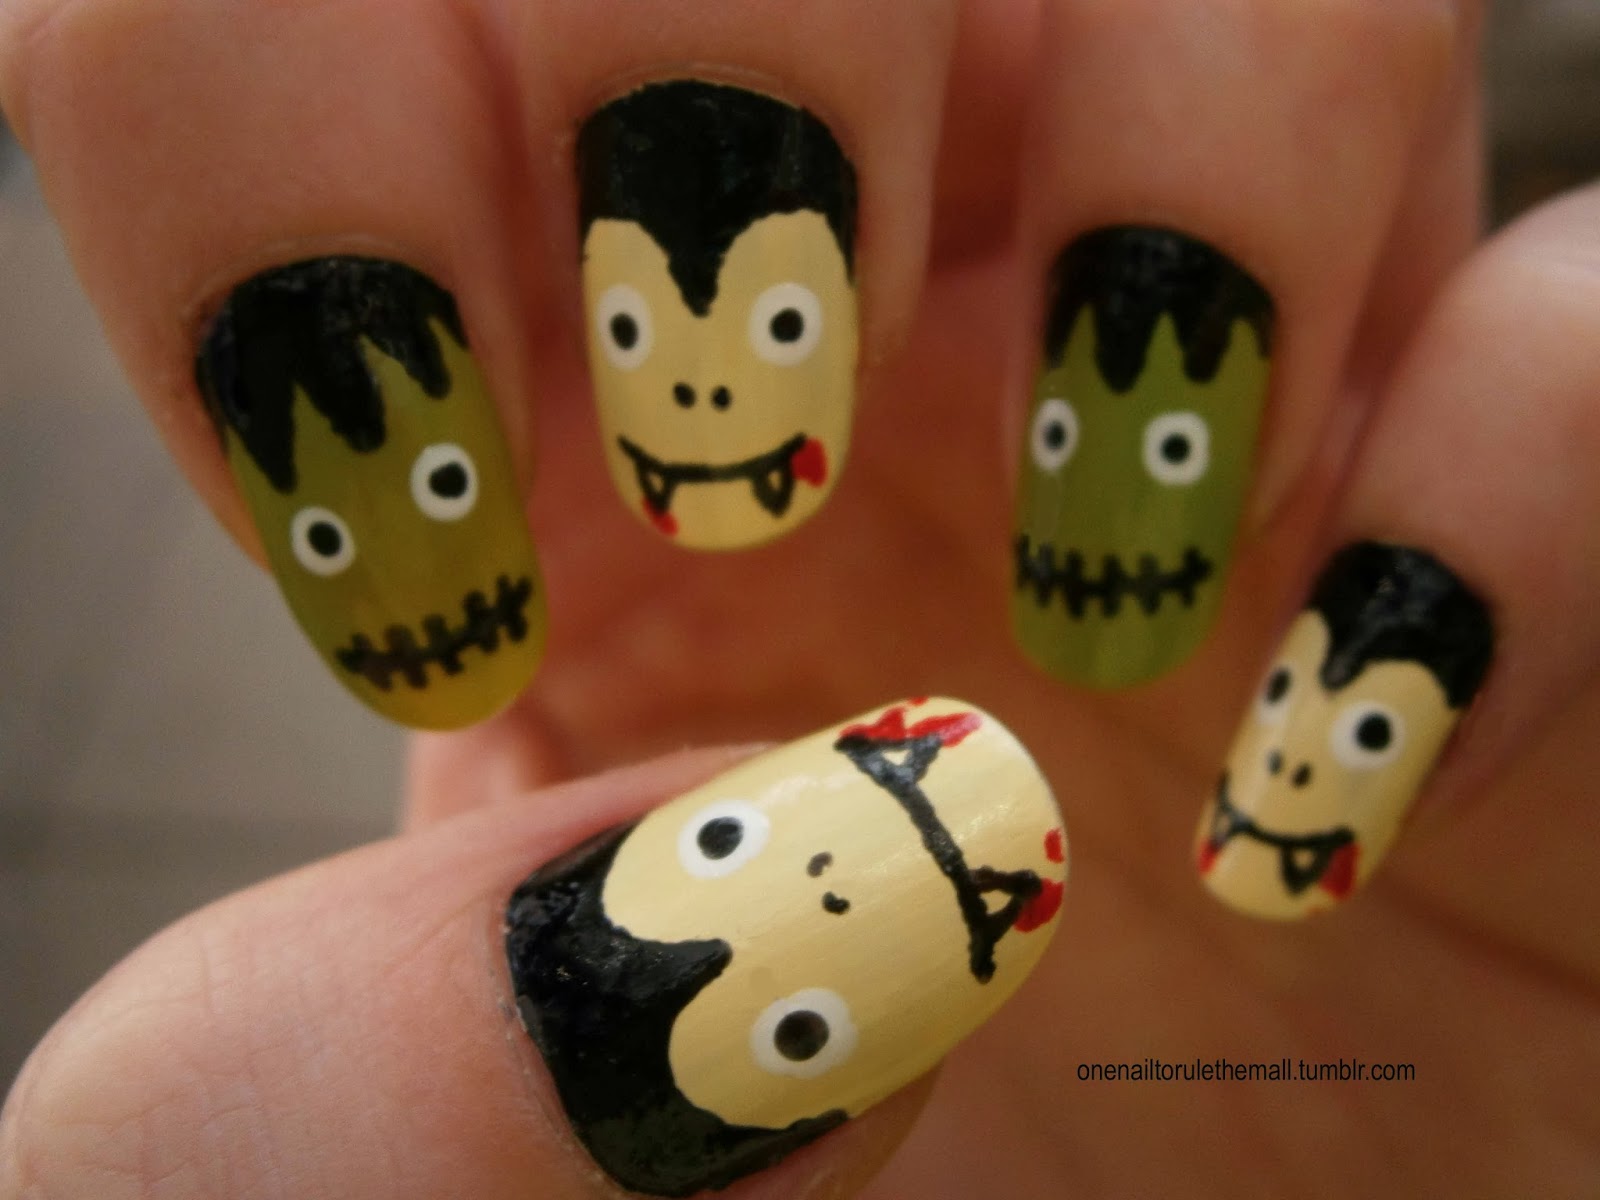
Step 1: Paint your nails with your basecoat colours
Step 2: Using a thin brush and black nail polish or acrylic paint, paint on the hairline for both Frankenstein and Dracula, start at the tip of the hair and work your way up to the top to ensure neatness
Step 3: Using a thin brush paint lines for both monster’s mouths
Step 4: Then paint the teeth for Dracula and the lines for Frankenstein’s mouth using the same brush
Step 5: Using a dotting tool or cut down toothpick, paint on the eyes using white acrylic paint or nail varnish. You can also add a bit of blood using red around Dracula’s mouth at this stage
Step 6: Using either a dotting tool, brush or toothpick, paint on the centre of the eyes in black
Step 7: Draw on the noses of the monsters using your chosen tool
Step 8: Finish off with a topcoat to seal in your design and you’re done!

What do you think? Let me know in the comments!
Alice