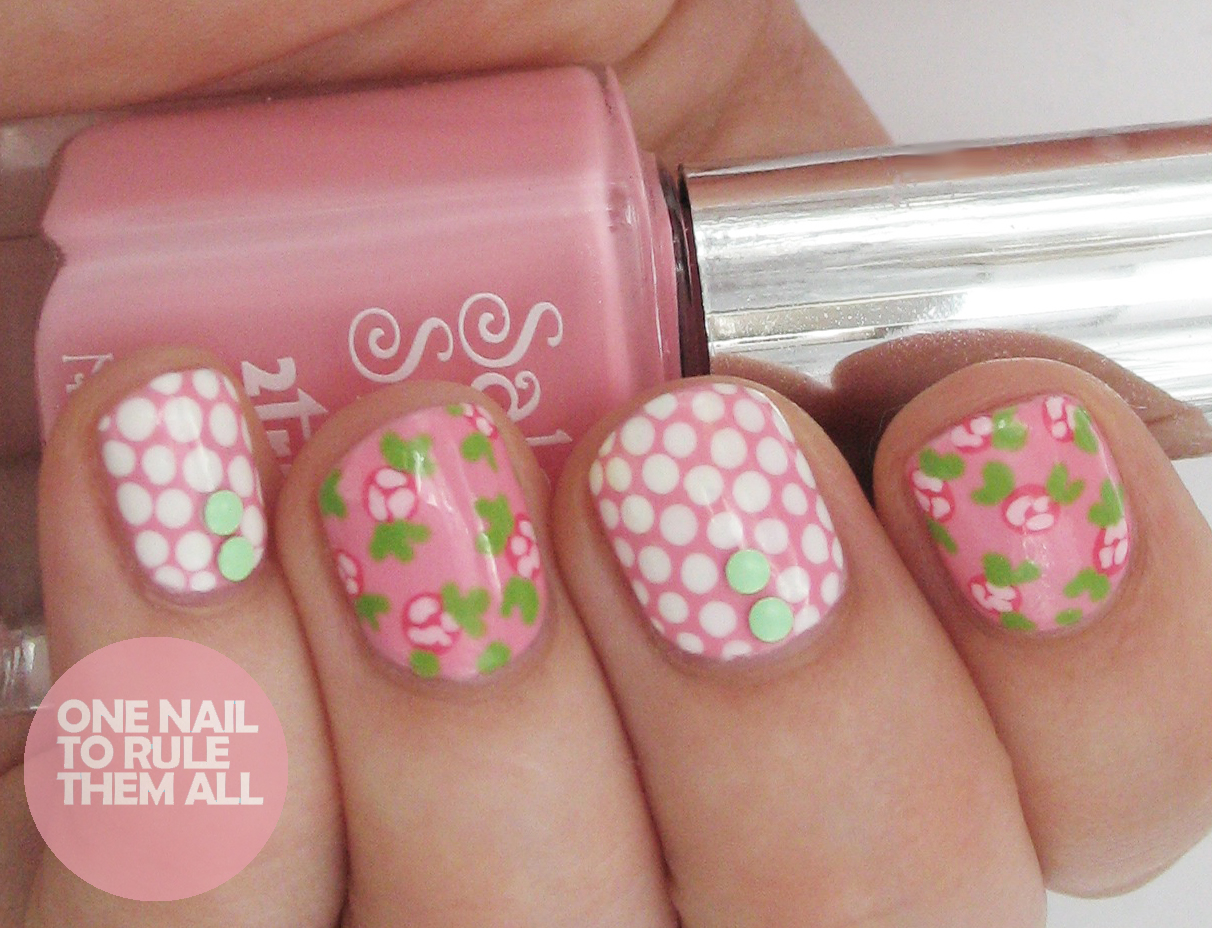
Hey everyone! Today I have a brand new Tutorial Tuesday for you, this time for this gorgeous rose polka dots that you might remember from
here. I had originally intended to post a tutorial for
these bow nails today, because I was absolutely certain that I'd posted this tutorial already. However, after discovering (and double checking) that I hadn't, I decided to push the bow nails back a week and post these instead, considering I promised you a tutorial 'soon' over 3 months ago! I can only apologise for my idiocy.
Step 1: Paint your nails pink
Step 2: Using a dotting tool and white polish draw dots on alternate nails
Step 3: Using a larger dotting tool paint on darker pink spots, more loosely than the white dots
Step 4: Using a thin brush paint on the shapes of the inside of the roses. For this shade I mixed the base colour and the white together to create a more opaque light pink
Step 5: Using the same brush paint on the leaves in green.
Step 6: Finish off with a topcoat to seal in your design, and you’re done! You can also add studs whilst the topcoat is still drying if you wish
What do you think? Let me know in the comments!
Alice
Hey everyone! Today I have an exciting new colour by Essie to show you called 'Then and Now'*. I hope I didn't confuse you too much with the title, I know some of you were probably expecting one of my comparison posts between my old work and new work, but alas, today is just some new work, which hopefully you shall enjoy just as much! Essie have teamed up with
Then and Now to create this gorgeous grey/brown shade. You can buy it
here on their website but I will also be giving away a bottle to one lucky reader, you can enter using the Rafflecopter widget below.
For these nails I started off with 2 extremely easy coats of Essie - Then and Now* and I used Nicole by OPI - Spring Break* and Nicole by OPI - Selena* for the roses, along with Rimmel - Misty Jade* for the leaves, all topped off with a coat of Seche Vite.
 |
| Giveaway image |
a Rafflecopter giveaway
The rules of the giveaway are under the 'Terms and Conditions' part of the widget, please make sure to read all the rules before entering but for those who are reading for those all important words, it is open internationally.
What do you think? Do you like the colour/nail art?
Let me know in the comments!
Alice
*some of the products in this post were provided to me for review but all opinions are entirely my own and were not influenced in any way
Hi everyone! I'm sorry it's been a while since I posted, I tried to post this last night but the internet just would not work and I was super tired so I decided to call it a night. Last week I received an amazing bundle of Born Pretty Store goodies in the post, which some of you may have seen on Instagram. As soon as I opened the parcel I just couldn’t wait to use them, so I decided to try out a variety of looks on the rose nails I had on at the time. I thought it would be a nice change to show you one look but a few different ways to accessorise it. So I hope you like it!
First up is the look alone. For these nails I used 2 True ‘Taylor’* (dark pink) and 2 True ‘Sienna’* (light pink). Which I should have a full review of coming in the next week or so. I also have a tutorial for these nails coming up soon too so keep an eye out for that.
Next up is using
these* gorgeous green studs. I can predict that all these gorgeously coloured studs will be used regularly because I’m absolutely in love with them!
The second look is just adding to the previous look. I didn’t want to take off the studs straight away so I decided to add
these* gorgeous flowers. They’re not exactly practical but they definitely look great!
The final look is using
these* rose studs, if you can call them studs. I was pleasantly surprised to find these (and the previous flowers) were rubbery rather than hard, which certainly makes them more practical as they don’t painfully rub on your skin or catch on things quite as much as they would if they were hard.
There you go! What do you think? Let me know in the comments
Alice
*some of the products in this post were provided to me for review but all opinions are entirely my own
Hey everyone! I've decided to post the tutorial for the manicure I entered into e.l.f. Cosmetics' Vintage vs. Rock nail art competition. I've managed to make the shortlist for the contest, so I am very excited! (You can find the shortlist
here). I know I've previously created tutorials for both polkadots and roses, however this manicure has received so much positive feedback that I think it's worthwhile to show you the step-by-steps. To be honest, I didn't think much of this mani originally, but it's one of those that grows on you as time passes! Anyway, here's the tutorial...
The equipment:
Sinful Colors 'Easy Going'
Natural Collection 'White'
Models Own 'Grape Juice'
Models Own 'Pastel Pink'
W7 'Purple'
Barry M 'Shocking Pink'
Models Own 'Jade Stone'
Sinful Colors 'Pistache'
No. 7 'Totally Teal'
Medium dotting tool
Fine nail art paint brush
Essie 'Good To Go' rapid dry top coat
My base is Sinful Colors 'Easy Going', which I reviewed in a previous post. I applied 3 coats to ensure a really neat, opaque finish. This shade is perfect for vintage or floral nails, and makes a nice alternative to plain white or cream bases. It is slightly pink but still very subtle, and looks extremely pretty and summery.
Once 'Easy Going' was dry, I used a middle-sized dotting tool (I have a pack of five, all varying in size, which can be found on Amazon with a tiny price tag!), and created white polkadots. I didn't worry too much about uniform sizes and spacing, as I knew I'd be adding more designs over the top.
When I was happy with my polkadot base, I began the roses. I splodged (yes, this is a technically term now :p) the block colours onto my nails, again not worrying too much about shapes, sizes and spacing. Sometimes nail art looks better if it's not too perfect! The pale pink shade is Models Own 'Pastel Pink' and the purple is 'Grape Juice' from their scented collection.
When my splodges were dry I took my fine nail art paintbrush and added petal details. I used the technique that I've blogged about recently, which can be found
here. I used Barry M 'Shocking Pink' for the pink roses, and W7 'Purple' for the purple ones.
Finally I added leaves. I used both Models Own 'Jade Stone' and Sinful Colors 'Pistache' for the bases, and then added No. 7 'Totally Teal' which is a darker green. Once completely dry, I used my brand new Essie purchase, 'Good To Go', which is a fantastic quick-drying top coat. As you probably know, I don't like to spend too much on my nail supplies, but it's aways worthwhile to invest in decent top coats to avoid smudging, chipping or peeling!
 |
| *Sourced from Google Images |
I bought my 'Good To Go' from Boots for £8.99, which surpassed my usual limit of no-more-than-eight-British-pounds-for-nail-stuff, but I got some points on my Boots card which lessened the blow :)
What do you think of my polkadot & rose nails? I'm crossing my fingers that I win e.l.f.'s competition, however there are quite a few amazing designs in the shortlist so it will be a long shot!
You can see the colours I used for the roses within my
tutorial but the base is OPI - My Vampire is Buff and then I used 2 coats of
Nubar Black Polka Dot*, with a bit of placement for the bigger pieces. I absolutely LOVE this glitter, and if you dont own it, you should. You can get it
here
Please let me know what you think of my
tutorial, I tried something a little different this time around by not using my full hand, so let me know if you still think it's okay!
Alice
*some of the products in this post were provided to me for review but all opinions are entirely my own and were not influenced in any way
Hi guys! Today I decided to do a very simple girly manicure, and I love the fact that I only used Models Own products (my favourite brand, in case you hadn't noticed!) I researched rose nail art yesterday, and decided to adapt a few different techniques into my own style. I can't remember precisely which blogs/pictures I looked at, but there is an abundance of them out there, so just Google 'rose nail art' and you will definitely find a technique that suits you :)
The equipment:
Models Own 'Blueberry Muffin'
Models Own 'Feeling Blue'
Models Own 'In The Navy'
Models Own 'Jade Stone'
Models Own 3-in-1 clear coat
Fine nail art paint brush
I started out with my bases. I used two coats of navy on my thumb nail and ring finger nail, and then applied 'Blueberry Muffin' to my other nails (this took about 3 coats, like most pale varnishes).
Once my bases were dry, I used my paint brush and started painting the roses. I used 'Blueberry Muffin' first, and formed the flowers by interlocking little comma shapes with space in between.
Next, I used 'Feeling Blue' to apply slightly darker roses. I kept them towards the corners of my nails, as I didn't want them to overwhelm the lovely base colours.
Here's a close-up of my thumb nail... Can you see my pink penguin phone case reflection?! This just goes to show what a smooth, shiny finish Models Own polishes have! Anyway, I repeated the whole process on my pale blue nails, using 'Feeling Blue' and 'In The Navy' for the roses. I also added little leaves using 'Jade Stone'. For most of the leaves I painted a comma shape with a tiny dot beside it, but there's a bit of variety throughout.
I finished off the manicure with a clear top coat. I absolutely love these nails, they're so dainty and cute! It's a nice twist on traditional rose designs too, as I steered clear of pinks and whites. What's more, the whole mani smells of blueberry muffins thanks to Models Own's gorgeous scented collection! What do you think? How do you paint your rose nail art?
Hey everyone! I'm back (finally) with a new then and now post. I know a lot of you said in the comments of my giveaway that you'd like to see a few more then and now posts so I thought I'd bring it back. Although, I wont be doing it every week like before, just when I feel like it. This week I'm redoing a stripes and roses combination that a few of you may remember as it was probably around a year ago that I did it, in fact you can actually see it on my blog here, but the difference in nail size is huge. I actually cut my nails a bit too short this time around, so the difference is even bigger than it should have been, but oh well! As always the 'then' picture will be after the jump.
Look at the length of those nails! I can hardly believe it's the same hand.
I completely forgot to add polka dots to the rose nails and I really wish I had because I think they really add to the design.
This time I started with a base of Barry M - Berry Ice Cream and used striping tape along with MASH - white, rather than freehanding the stripes like before. I got the idea to use tape
here from The Nailasaurus. In fact I got the idea to recreate this design from her because I really wanted to try it out using tape. The roses are Barry M - Passion Fruit and Barry M - Bright Pink, with Barry M - Key Lime, all topped off with a coat of my favourite top coat in the world,
Seche Vite.
What do you think? Which do you prefer? Let me know in the comments!
Alice
I dont really know what to call these so I'll just go with 'rose curtains'. I've this design around quite a bit and I've wanted to recreate it for ages, so I decided to do so in line with an exciting project I have lined up. If it all works out you'll see in a couple of months! I'm not going to write much because I want to go to bed, so enjoy!
What do you think? Let me know in the comments!
Alice
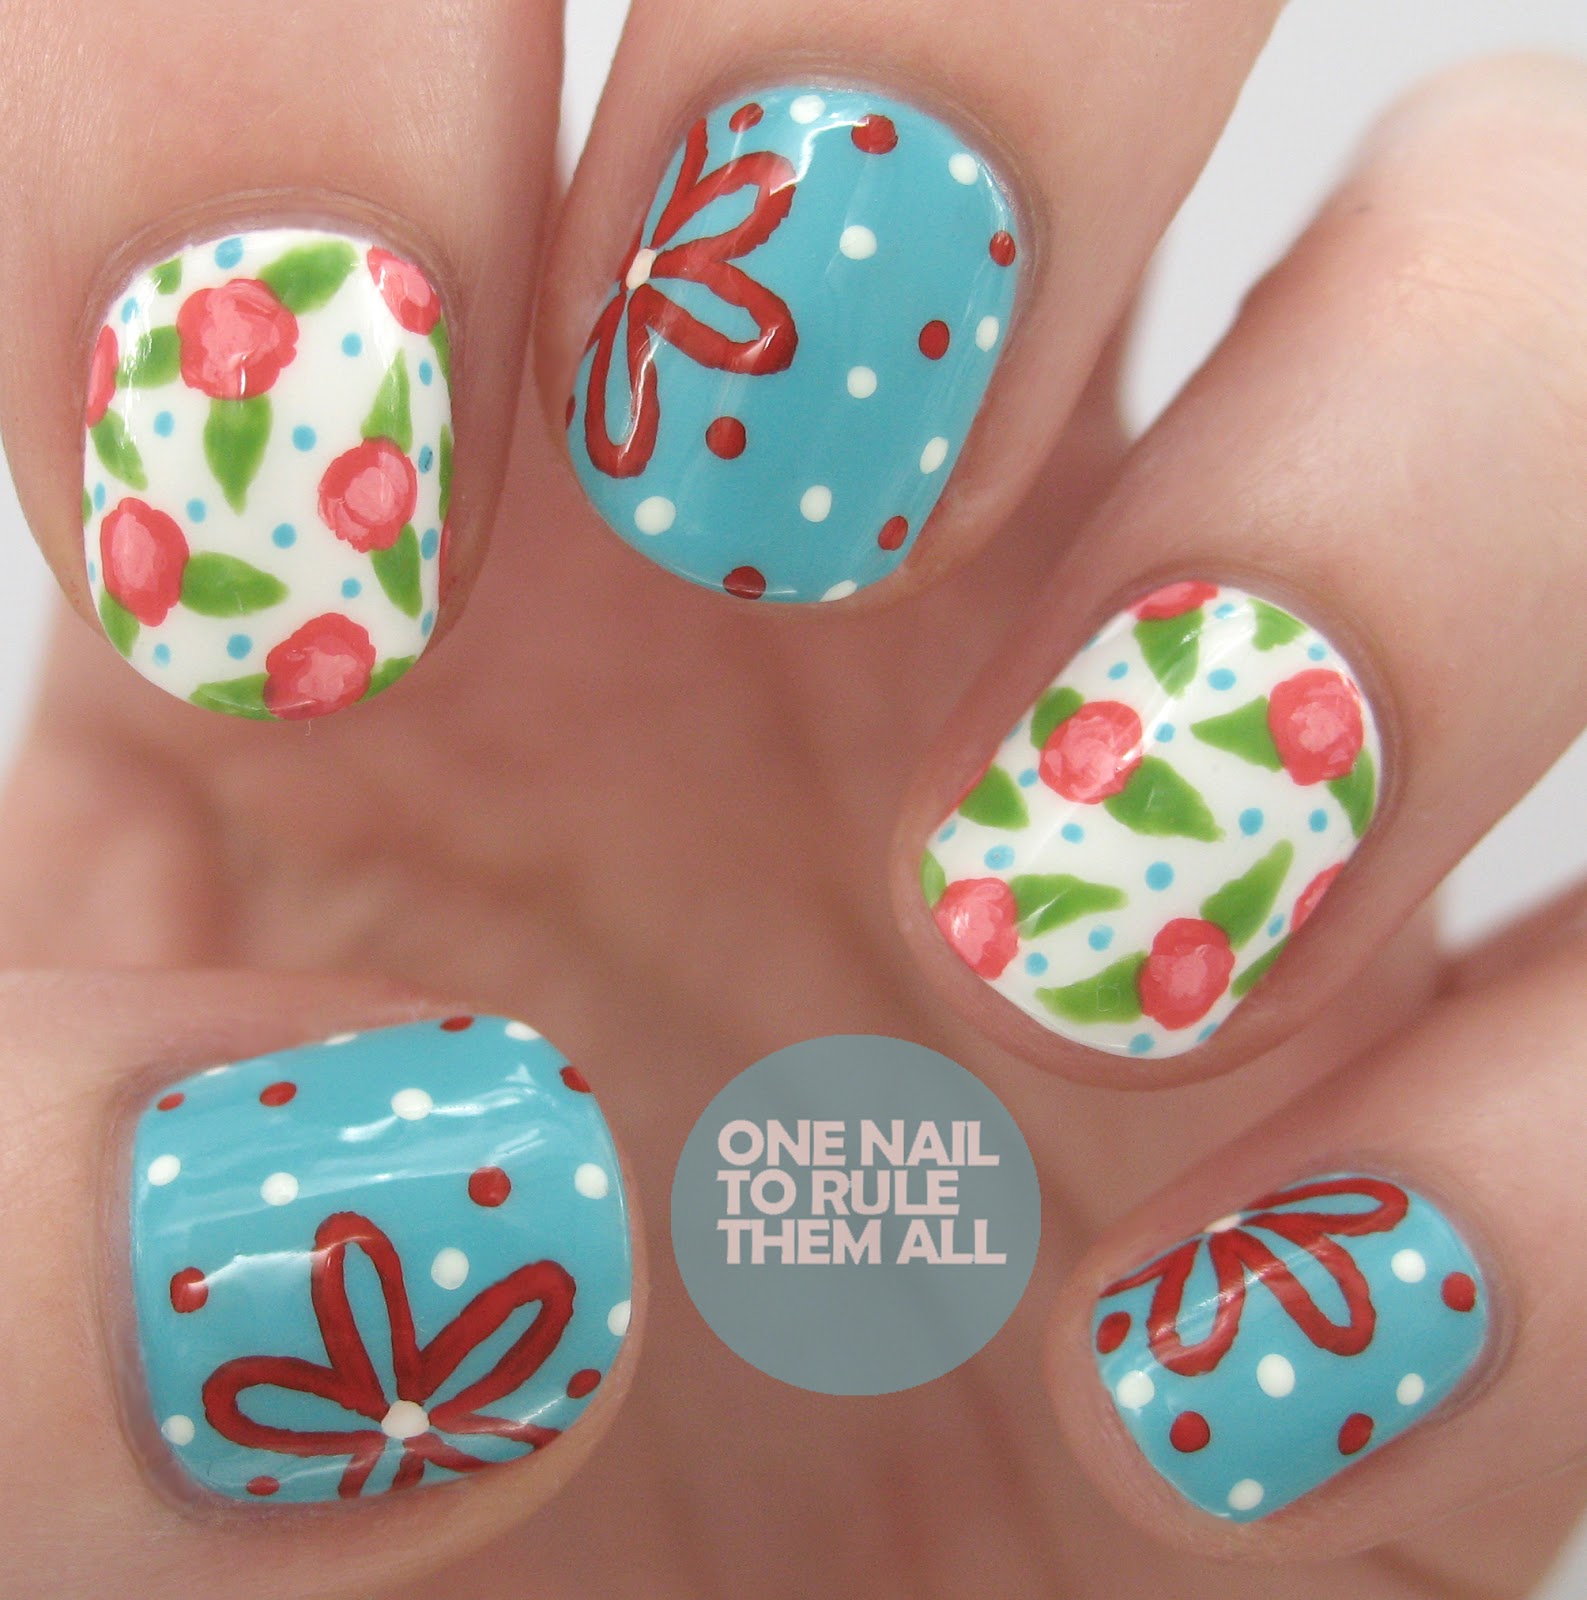
Hey everyone! Just a quick post today, I did these a couple of weeks ago before my old laptop broke and then I completely forgot about them. If you follow me on instagram (@onenailtorulethemall) then you will have seen these partly already, but here's the full thing!
I can't remember the base colour and I'm in a different county to it at the moment so I cant check, but the white is acrylic paint, the blue is Barry M - Blueberry and the green is Sally Hansen - Spring Green, topped off with Seche Vite
What do you think? Let me know in the comments!
Alice
Hey everyone! So, as I mentioned in my last post, I currently don't have a laptop. :( I have about 10 posts done for you but I can't edit them and I can't get them off my old laptop just yet. I was meant to be starting a nail challenge this week but unfortunately I can't, so I will hopefully be catching up next week if I can somehow get photoshop!
I've decided instead then that ill post the only thing I can from my phone, and that's other people's nails, ones from my Instagram or ones about to go on my Instagram (@onenailtorulethemall) so here's a collection:
I really enjoy doing other people's nails, I know some people prefer to stick with their own but i'd love to do it professionally! If you want to know any colours just ask :)
Hope you like them! Let me know what you think in the comments.
Alice
Hey everyone, today's then and now post is a little different from previous posts as I actually have two examples of what these looked like 'then'. There's probably a years difference between all the posts so you can see how much I've improved each time (I also apparently was incapable of keeping my nails a similar length previously). As usual, the 'then' posts will be after the jump
Both times previously the blue was Barry M - Blueberry but it's unfortunately still missing, so I had to use Barry M - Turquoise instead this time around. Originally everything would have been done with a dotting tool and nail varnish, but this time I mainly used acrylic paint except for the base colour and leaves, and a small brush. The white base colour is Essie - Blanc, and previously would have been Barry M - Matt White
As you can see I actually mattified the second mani, but for once when I mattified these nails they didn't look good (I feel betrayed) so I had to stick to a shiny finish. I actually remember taking the above picture, because I did it in the centre of town and my friends were yelling at me to hurry up, but that was in the days before I had a lightbox and I knew the light was about to run out (blogger problems), this time I had no such issues.
What do you think? I actually think I prefer the centre of the roses from the second time around, and I'd have rather done it in Barry M - Blueberry, but otherwise I'm pretty please with how these came out. Let me know your thoughts in the comments!
Alice
P.S. the giveaway winner was chosen on the 14th, but unfortunately did not reply in time, I'm now awaiting reply from the re-draw so please check your emails and spam to see if it's you!






.jpeg)


