Influenster Holiday VoxBox — Goody Quikstyle Paddle Brush

I just received the email from Influenster letting me know the Holiday VoxBox survey was up, and I realized I never posted a review for my Goody Quikstyle brush! This is definitely not a review I want to forget.


As you can see, I received the Paddle Brush version of the Quikstyle. It's not the one I would have bought for myself, but it's all I'll buy now! There's just something about it that I like better than the Half-Round Styler Brushes.

The Quikstyle is made up of the regular ball tipped bristles with the addition of absorbent microfiber bristles. They remind me of those microfiber hair wrap towels of the same color. The microfiber is antimicrobial so the brush stays fresh. I recommend hitting it with a bit of hot air from your blow-dryer if you use it on wet hair since they will start to smell a bit like mildew if you put them away wet. The vents along the sides of the brush will pull the air deep into the microfiber bristles and direct it out so don't worry about ruining the brush or causing overheating! The brush is also lightweight with a textured ergonomic handle for better grip.

The packaging tells us that these microfiber bristles are super absorbent and will help reduce water by 30% to help hair dry faster. My hair is fairly thin and dries well on its own, so I really didn't notice any difference in my dry time.

What I did notice was the brushes ability to detangle every knot on my head and leave behind frizz free hair! My hair is always somehow managing to tie itself into knots. Honest to goodness, tied in knots — sometimes big knotted bows that are literally impossible to unknot. I either have to attempt to unknot them, but really only end up yanking the hair from my head, or trim the knots out. Seriously, I would buy this brush for its seemingly magical detangling ability if nothing else!!


I'm loving my new knot-free, frizz-free, perfect hair day every time hair. There will be no other brush for me unless Goody comes out with a better version of the Quikstyle, but I'm not sure that's possible. I'm pleased with it just the way it is.

This will be my last Influenster Holiday VoxBox review since I wasn't one of the lucky few who received one of the Montagne Jeunesse Face Masques, and I still haven't tried the EBOOST. After much debating with myself, I really can't bring myself to try the Pink Lemonade energy/immunity dietary drink supplement I received. I would love to try it, but I really hate lemonade. It would likely be a really unfair review.

*All products were sent to me for testing purposes, completely complimentary, from Influenster.

0 comments:

New Barry M Textured Nail Effect 2013 swatches and review

Hey everyone! I'm back with another Barry M swatch-fest after yesterday's post. Today's post is about the new textured polishes that they've brought out, which I'm sure many of you have heard about. I expected them to be a lot like OPI's sand polishes, which I didn't much like the look of, but as you'll see they're completely different as they dont have any glitter and mainly because they're so much nicer all round. I really didn't expect to like these polishes but I absolutely love them, and you'll see some nail art coming up with one of them in the next few days! More information and swatches after the jump. 


First up is Ridley Road, which is a lovely lovely mint colour. I wore this around London for the day and I couldn't stop staring at it as it's really vivid. Each polish is apparently inspired by the streets where mr Barry M himself used to work. This is probably my favourite polish of the lot and this was 3 coats. Like yesterday, I'll sum up my thoughts on all polishes at the end.


Next is Kingsland Road which is a lovely baby pink. In the bottle this looked pretty watery and in need of a lot of coats, but I managed to do it in an easy 3 coats just like Ridley Road


This is Atlantic Road, which I really love, unsurprisingly, as it's blue. I'm still wearing this now, albeit with nail art, and it really is a lovely colour. This again was 3 coats. 


Finally, is Station Road, the name holds a place in my heart as my dad grew up on a road called Station Road, and my grandma currently lives on another Station Road, but I must admit I'm not a fan of the colour. Yellow isn't a very exciting colour but I guess every collection needs a yellow for a bit of brightness. This colour actually had a slight shimmer to it, it's more noticeable in the bottle than on the nails, and not noticeable in pictures, but nevertheless it's still there. This again was 3 coats. 


So, what did I think overall?

Pros:
  • Although these polishes were each 3 coats, it doesn't matter as each coat dries so fast! 
  • They're matte (duh)
  • Great range of colours for a starting collection
  • Looks great 
  • Easy application, no streaking etc. 
  • Cheap - only £3.99 per nail varnish is really not bad compared to the price of OPI's
  • Easy removal, nothing like normal glitter polish but not quite as easy as normal polish, you just have to push down a bit more

Cons: 
  • Showing time, whilst these polishes do dry and the effect does come through within a minute or so, the full effect isn't noticeable as in these pictures for a good 20 minutes. But dont let that put you off, there is still a very noticeable effect after a minute, and if you hadn't worn them for the full amount of time before you wouldn't know that it wasn't enough. 
Overall, I absolutely love this collection and I can't wait to see if Barry M come out with any more colours.

I also want to give a mention to their new waterproof gel eyeliners. I know this is primarily a nail art blog, hence why I have sneaked in a preview of tomorrow's nails, but I am genuinely impressed by these eyeliners, and as they were sent to me for review I felt it only fair to ... well review them.


I remember very well from my hormonal teenage years that when something claims to be waterproof, it normally isn't. But these are. They are genuinely awesome. I wore this on my hand (and on my eyes like you're supposed to) all day yesterday and there was still some left on my hand today. After two showers, washing up, washing my hands and me trying to rub it off with water, I can assure you these are 100% waterproof! 

They are releasing 3 brand new shades alongside the new nail varnishes and a new mascara. The three colours are (in descending order) Champagne, Silver and Black and each retails for £4.59, which I would definitely say is worth it. Each comes in a tiny pot, but a little goes a long way, and the brush is great. The new 'Lash Vegas' mascara will also be released at a price of £6.49 at the same time. I unfortunately don't have the set up to take pictures of my eyes as my student halls are pretty dark, but, alongside the rest of the new releases, it's awesome!

These will all be available in Superdrug and on the Barry M website from February 13th, and in Boots from the 20th. You can get updates on this on their Facebook and on their Twitter.

What do you think? Will you be buying any of this polish or makeup? Let me know in the comments. 

Alice

Also, dont forget to enter my giveaway!

This product was sent to me for review but any opinions included are entirely my own and were not affected in any way by anyone else

0 comments:

Saran Wrap Valentine's Day Nail Art Tutorial

Hello again everyone! I missed my post yesterday, but I have a really great excuse! It was mentioned in an answer to one of the 1st Blogiversary Giveaway entries that one of you wanted to see a Saran Wrap tutorial. There were more than a few of you who wanted to see video tutorials. So, I was spending all day yesterday editing my first real nail art video. I have a whole new level of respect for video bloggers!

nails nailart nail art polish mani manicure Spellbound Lacquer holiday Valentine's Day Valentine Valentines tutorial Sally Hansen Pink Blink white saran wrap tutorial video

Here are the nails I'll be showing you how to create in the video. This is a very easy mani to do, and with pink and white polish it is perfect for Valentine's Day!


I don't really have the set up or the best software/know-how for this, but I gave it my best shot. Enjoy!

0 comments:

My first giveaway!

Hey everyone! Today I'm starting my first ever giveaway, kindly sponsored by Born Pretty Store. I would like to give them a huge thankyou for doing this for my blog!

Giveaway rules:
  • There will be one prize - a $20 gift card to spend on whatever you want at bornprettystore.com (and remember, they have free international shipping!)
  • Entrants must be 18 years or older, or have parental permission in order to enter
  • The winner will be chosen randomly using Rafflecopter, which uses random.org
  • Whoever wins must respond within 48 hours of me choosing, otherwise I will pick another winner
  • The closing date is 14th Feb at 12am 
  • This giveaway is open internationally
  • EDIT: The option to 'leave a blog post comment' must state which post of mine you like most and/or what you would like to see more of on my blog
  • Good luck everyone!


I decided that I would make this giveaway for a gift card, rather than choosing your prizes for you, as I know that most of you will probably prefer that! Here are a few options of what you could get with your prize:


a Rafflecopter giveaway
I want to thank you all so much for supporting my blog, and I want to thank Born Pretty Store for allowing me to do so!

In the meantime, remember you can use my code KHL91 to get 10% off your order.

Alice

0 comments:

New Barry M Gelly Nail Paint 2013 swatches and review

Hey everyone! As promised, I have a review of the new Barry M gelly nail varnishes to show you today. I was SO excited to receive these for review. I'm sure many of you have realised by now that Barry M is my number one love over any other brand, so I'm completely in awe that I'm now a blogger for them! Anyway, they have released 4 new gelly nail varnishes to add to the 9 that they released last year. I haven't tried any of them, but from what I've heard the only thing different is the colours, which I must say I absolutely LOVE. Swatches and information after the jump.


First up is Greenberry, I had a hard time capturing the colour of this, and both photos show it to be slightly more blue than it is. I would call it the perfect turquoise. In the following photo it looks an even lighter blue, which I didn't notice when editing but nevertheless it's not that either. I'd say the above picture is the more accurate of the two. This is 3 coats. I'll sum up at the end what I think of the polishes.


Next up is Papaya which is a lovely coral colour. One thing I think about this collection is that Barry M have introduced all the polishes that really complete their overall selection, and that's certainly true of this polish, and the nude 'Lychee'. I really love this colour, the picture is pretty accurate. This is 3 coats again. 


Next is Dragon Fruit which is a gorgeous pink. Some of you may remember that a while back I posted on my instagram looking for a dupe of an old unnamed pink polish that I really didn't want to run out, and this is pretty much a dupe, so I'm very happy about that! I would describe this as a 'Nicki Minaj' pink, I'm not her greatest fan but I'm sure you all know what I mean! This was 3 coats. For some reason this was quite difficult to photograph without it seeming excessively bright but this is still pretty accurate.


Last but definitely definitely not least is my favourite polish of the whole collection: Lychee. This is an absolutely gorgeous nude and I have already created some nail art with it, which you will see on friday. The formula is also a lot better than the rest of the polishes and although I used 3 coats again I could have probably got away with 2. 


So... what is my verdict?

Pros:
  • Gorgeous colours 
  • Great formula
  • The usual brilliant brush and bottle shape
  • Only 3 coats and with good application you could get away with 2
  • Long-lasting, I wore these throughout the day on a trip to London, where lots of rummaging through bags and purses was involved and there wasn't even a mark on them!
  • No staining from any of these polishes
Cons:
  • These were pretty slow to dry, but possibly only because I'm a naturally impatient person and I didn't really wait between layers for them to dry. 
These will be available in Superdrug and on the Barry M website from February 13th, and in Boots from the 20th. You can get updates on this on their Facebook and on their Twitter.

What do you think? Will you be buying any of these polishes? Let me know in the comments!
Tomorrow I will have Barry M's new textured polishes to show you so make sure to have a look!

Alice


This product was sent to me for review but any opinions included are entirely my own and were not affected in any way by anyone else


0 comments:

Candy Coated Collection — Frosting Coated Sprinkles

Welcome to the last swatch of my Candy Coated Collection.

Update: This polish and the rest of the collection are now up for sale in my Etsy shop.


nails nailart nail art polish mani manicure Spellbound Lacquer Candyland Candy Land Candy Coated Collection Frosting Coated Sprinkles glitter jelly pink red square hex shimmer

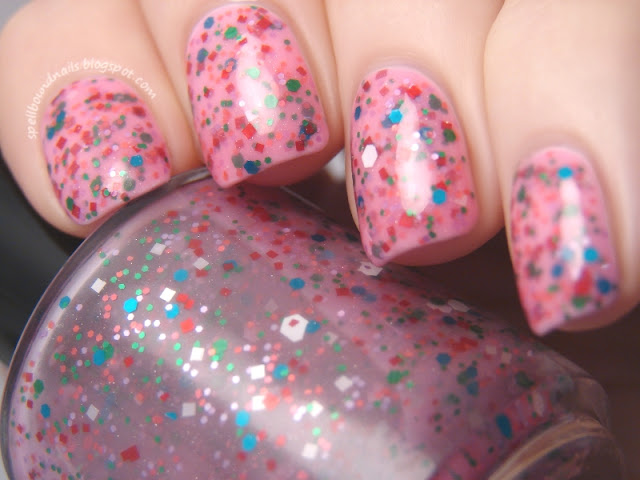
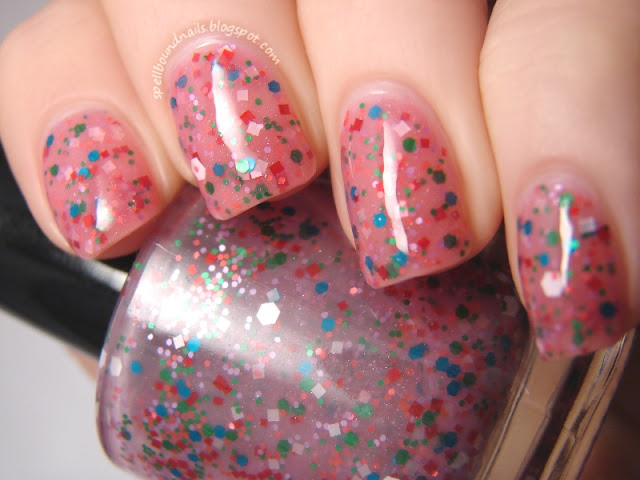
This is Frosting Coated Sprinkles inspired by the Candy Castle. Depending on which version of Candyland you look at you'll find some of the Castles with frosting, some with ice cream, and some with both. This polish was mixed up to look like the bright pink frosting decorating the Castle.

nails nailart nail art polish mani manicure Spellbound Lacquer Candyland Candy Land Candy Coated Collection Frosting Coated Sprinkles glitter jelly pink red square hex shimmer

Contained in this bright pink shimmery frosting is 'sprinkles' of various colors and sizes in squares and hexes. I think this polish is the essence of Candyland melted down and bottled. :)

nails nailart nail art polish mani manicure Spellbound Lacquer Candyland Candy Land Candy Coated Collection Frosting Coated Sprinkles glitter jelly pink red square hex shimmer

This is two coats of Frosting Coated Sprinkles over white. You'll have no trouble getting glitter on your nails with this polish!

nails nailart nail art polish mani manicure Spellbound Lacquer Candyland Candy Land Candy Coated Collection Frosting Coated Sprinkles glitter jelly pink red square hex shimmer

This is two coats of Frosting Coated Sprinkles over bare nails. You can really see the shimmer contained in the polish in this picture.  Both pictures were taken after I applied top coat. There is so much glitter in this polish that it does have a rough finish when dry ... top coat really is a must with this one.

0 comments:

Spun Sugar Gradient

Hey everyone! Sorry about the non-nail art related posts yesterday. There was a bit of an emergency Sunday that left me with no time to edit and type up posts. So, I went with what I did have. I do really hope to see a few of you joining me in the Blogs to Love Friday linkup. That said, today's post really is nail art!!


nails nailart nail art polish mani manicure Spellbound holiday Valentine's Day Sugar Spun Gradient Sally Hansen Pink Blink Fuchsia Power Wet n Wild I Red A Good Book Sinful Colors Beautiful Girl L.A. Colors white red Energy Source

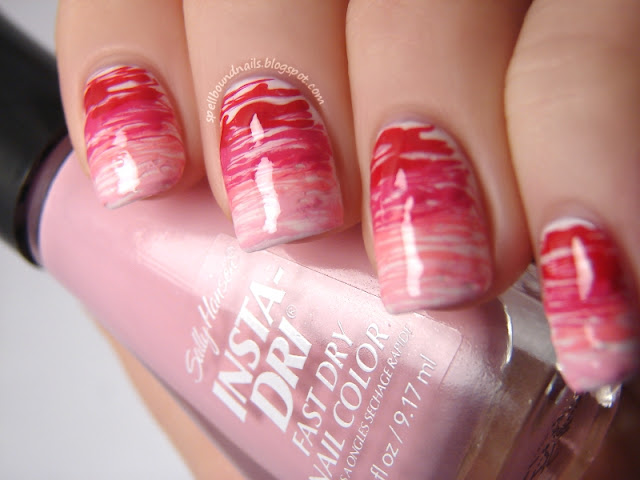
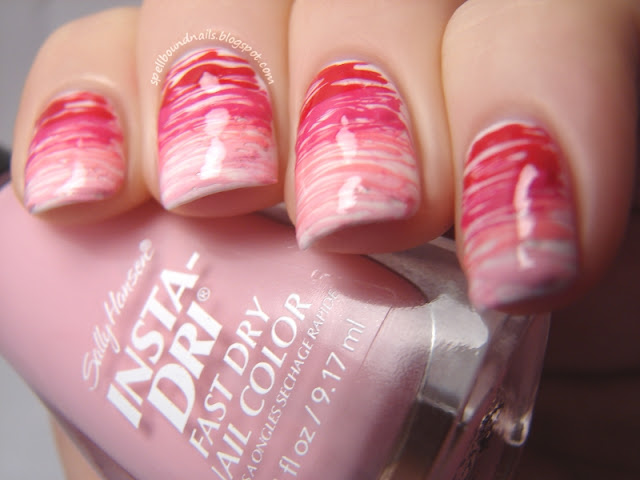
I have a few ideas for Valentine's Day nails and this was one of the first I thought of — spun sugar Valentine's Day nails done as a gradient.


nails nailart nail art polish mani manicure Spellbound holiday Valentine's Day Sugar Spun Gradient Sally Hansen Pink Blink Fuchsia Power Wet n Wild I Red A Good Book Sinful Colors Beautiful Girl L.A. Colors white red Energy Source

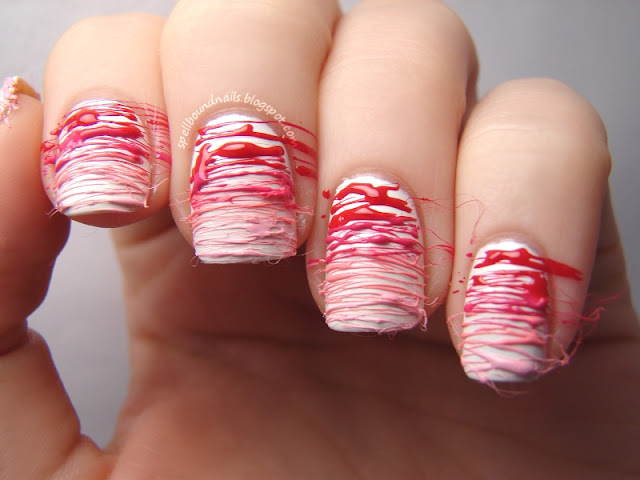
Spun sugar nails are really easy. They are a bit messy but the wispy strings make it easy to clean up. I started with a base of two coats L.A. Colors white. This is Energy Source now that L.A. Colors started naming their polishes. The next step is probably the hardest and it's not hard at all! It just takes a bit of patience. I started at the tips of my nails and worked up using Sally Hansen Pink Blink first. Put a drop or two of your first color on a piece of paper, using a pin or a dotting tool mix the polish until it's thick. You can speed this along by blowing on it as you stir. You can start as soon as it's thick enough to start forming strings when you lift the pin out of the polish. I didn't wait long enough with my red polish and got some drips instead of strings, so make sure it's thick enough not to drip.

Once strings start to form you'll need to get your nail very close to the thick polish. Lay your finger on it's side angled towards the polish if you're having trouble getting the strings on your nail. Use your pin or dotting tool to quickly but smoothly pull strings across your nails, doing one nail at a time.


nails nailart nail art polish mani manicure Spellbound holiday Valentine's Day Sugar Spun Gradient Sally Hansen Pink Blink Fuchsia Power Wet n Wild I Red A Good Book Sinful Colors Beautiful Girl L.A. Colors white red Energy Source

Continue doing the tips of each nail with Pink Blink. You may need to thicken more polish if you didn't start with enough or if it thickened too quickly. I used Sinful Colors Beautiful Girl next. I placed some of my strings over some of the Pink Blink strings to create a seamless fade of color. After Beautiful Girl, I used Sally Hansen Fuchsia Power and then finished with Wet n Wild I Red A Good Book.

Let the polish dry. It shouldn't take long! Then do a quick cleanup. I pinched off some of the wispy strings that were flying around my nails and then used some nail polish remover and a Nail Tee (a fancy pointed Q-tip) to clean up the rest.


nails nailart nail art polish mani manicure Spellbound holiday Valentine's Day Sugar Spun Gradient Sally Hansen Pink Blink Fuchsia Power Wet n Wild I Red A Good Book Sinful Colors Beautiful Girl L.A. Colors white red Energy Source

Add top coat if you like and admire your new mani. Take into consideration when deciding whether to use top coat or not that, while it will make your mani last longer, it will smooth all those strings you just worked so hard on. It will likely take more than one coat as this is a very thick mani. It may also cause some bubbling if you're not careful applying your top coat.

That said, I did use top coat, two coats ... and I did get one large bubble that popped while the top coat dried and left behind a spot bare of top coat. It's really not noticeable though, even in my close-up pictures. I did kind of miss the stringed look though.

0 comments:

Influenster Holiday VoxBox — Sole Society

Hey girlies! The month is coming to a close and the Sole Society promo code I received in my Influenster Holiday VoxBox will be expiring on the 31st. Just use the promo code INFLUENSTER25 before January 31st and you'll get $25 off your first pair of shoes from Sole Society.

I really wanted to have this code out there sooner but I searched and searched, debated and talked myself into and out of half a dozen shoes and then finally used my $25 off code last Friday. I have been posting it like crazy on my Twitter account from the start though, so I'm hoping someone got some use out of it.


Aren't they gorgeous? I love the heel! The reason I bought these when there were so many amazing shoes to choose from? I recently purchased a summer dress, had another summer dress bought for me, and remembered I already have the perfect outfit to match these shoes. Seriously? To have 3 outfits made with these shoes and to get said shoes for $24.95 after using the promo code is awesome!!


This is a picture of the dress I recently purchased for myself with an Amazon gift card I earned through Swagbucks. It is an Allegra K dress sold by uxcell. I recommend checking out their Amazon store or just doing a search for Allegra K on Amazon because they sell some really great things at wonderful prices!! These shoes also match the dress bought for me which is a really pretty flowing beach style blue dress with a brushstroke pattern. I've paired this with a thick brown stretch belt and pulling the fabric up from the belt makes it the perfect shorter length beach dress. I also have a really gorgeous tiered brown mini skirt that I pair with a simple tank top and heels in the summer.


Like I said though, before deciding on Monica, I had picked out half a dozen or more shoes. Here's the ones that got a serious second look and actually made it into my cart before I talked myself out of them. Miranda actually made it into the cart more than once. However, I live in the middle of nowhere ... the middle of nowhere that gets knee deep snow at times. And honestly, I'm just not good enough walking in wedges to risk it. As for Vida ... well, I've been told I was made for heels. I'm like an elephant in flats — an elephant that trips over nothing.

Finally, here are the shoes I think deserve a mention because they're so darn pretty listed by heel height.


Remember that my 1st Blogiversary Giveaway also ends on the 31st. This giveaway is open to both my US and international followers. Click on the link, go take a peek, and definitely enter! You can't win if you don't enter. And if you buy yourself a nice pair of shoes from Sole Society with the INFLUENSTER25 promo code and you do happen to win one of the prizes in my giveaway imagine how great you'll look opening the package I send you!!

*All products (unless otherwise stated) were sent to me for testing purposes, completely complimentary, from Influenster.

0 comments:

Rainbow gradients + paisley nails

Hey everyone! It's been a while hasn't it? (Well, a week but still!) I intended to post a then and now piece on Saturday but I didn't find any time to edit the pictures before I went home for the weekend and I didn't take my laptop in case I fell over in the snow, so here is my first chance to post. But rather than doing my then and now post I'm going to show you some different nails that you will have seen slightly already if you're following me on instagram, and I shall post my then and now nails this Saturday instead. I have quite a busy week planned in blogging, the only day there will be no post this week will probably be tuesday (aka tomorrow). I have some wonderful new Barry M nail varnishes to show you, and lots of lovely nail art ideas planned around them, and I also have other exciting products and designs to show you, so I hope you'll stick around to see!


Anyway, on to today's nails. Last time I did paisley nails I had a couple of comments that I should try them in different colours, because as you might recall I just did them as a test of gel pens on top of some glow in the dark polishes, so the colours weren't that exciting. But I couldn't really decide what colour to choose and I've been meaning to do rainbow gradients for ages, so I thought why not, and I mixed the two together. The outcome reminds me of some hippy fabric in the 60's but I quite like it! I've also included a picture of the rainbow gradient alone at the end of the post just in case you dont like the paisley! 


I used Essie - Blanc as a base and then sponged on Barry M - Lemon, Collection 2000 -Fruit Loop, Barry M - Blueberry, and China Glaze - Refresh Mint. And once that was completely dry I drew on the paisley print with a 0.38 Muji Gel Pen (seeing as though so many of you asked me what I used last time). Unfortunately I wasn't patient at all with top coat and I did smudge the pen a bit, but that's not the case usually, I was just a bit hasty. Although I dont think it looks too bad really. I decided to also add an accent nail using Born Pretty Store studs like the ones in this post.

And a bonus picture of the rainbow gradient alone:


I think my gradienting skills could probably do with a bit of improvement still but I still like how these turned out! What do you think? 
Alice


0 comments:

Blogs to Love Friday Linkup

I'm always trying to find new blogs to follow, new content to read, and new things to inspire me. So, while browsing, when I saw this post by My Beautiful, Crazy Life I knew I had to join. I also knew I had to share it with you!!


Have you ever read a blog post and wanted nothing more than to share it on your own blog? You may remember that I tried something like this before. Sadly, there was a lot of hype around that time about image theft and what one blogger was allowed to post of another blogger's work, even with proper credit given, so my posts were discontinued. However, I would love to try this again — in a slightly different way, of course.

This linkup is being hosted by My Beautiful, Crazy Life and Mrs. Monologues. I think it's the perfect way to give deserving bloggers some love and additional traffic. Who doesn't love having their blog shared or the content they worked so hard on getting a little bit of extra, well-deserved credit?

So, starting Friday, February 1st, and every Friday after, take the posts you loved or that inspired you from that week and share them with your followers. Scream about them from the rooftops if you feel the need. :)


As written by My Beautiful, Crazy Life: I encourage you to construct your posts however you want. Feel free to make it fancy or even show us images because we all love visuals, but the main objective is to share the love of your favorite posts.

Also, remember to grab the button above and include it in your post if you decide to participate. 

I will definitely try to include at least one nail related post each Friday, but that's not all the blogs I read. I love beauty blogs in general, fashion, health and fitness, and FOOD!!! So you'll definitely see a little bit of everything in my Friday posts.

Will you be participating? Will you be looking forward to my Friday posts? Here's your chance to share your blogs with me, share a friend's blog, or even just a blog you love that you think deserves some love. Post your links in the comments! :)

0 comments:

Nail art "Flowers of Diamonds"


Ricostruzione in gel con cartina...

0 comments: