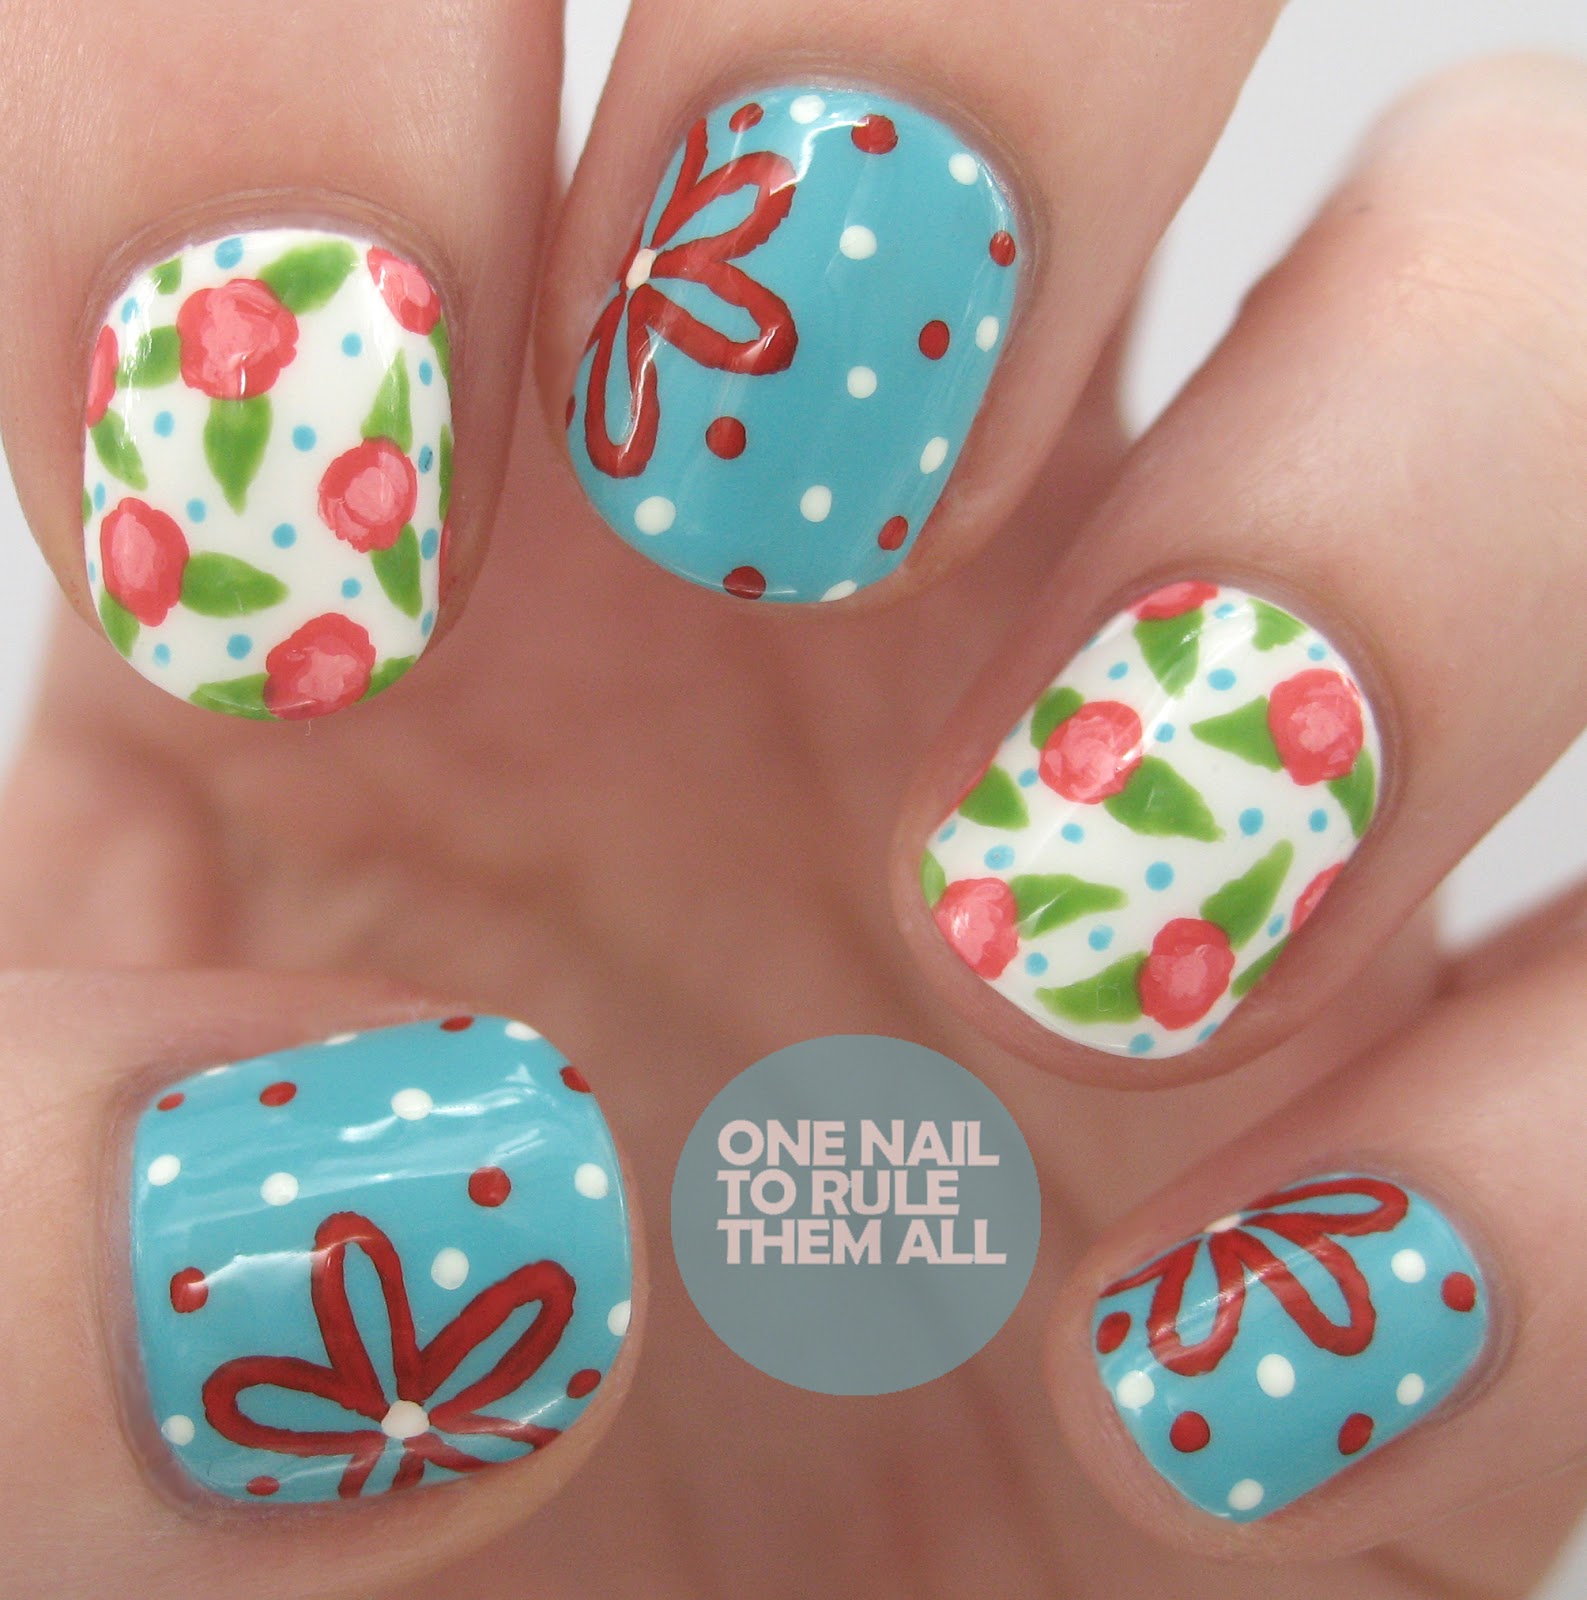
Paisley print tutorial

Hey everyone, today I'm going to show you a tutorial for my paisley print nails! All you'll need is a base colour (or more than one if you wish), a gel pen and a top coat. Everything else will be after the jump to avoid photo spamming you guys


Many of you have asked me which pen I use for my gel pen designs, I use this one, and here's a picture of the nib if you would like to try find a similar one:


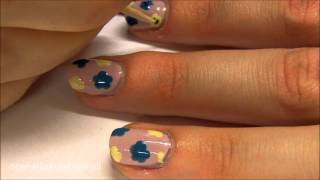
To start of with, paint your nails your chosen colour (or colours if you're indecisive like me). The colours I used for this were:
Essie - Bikini So Teeny
OPI - Gargantuan Green Grape
Barry M - Strawberry
Barry M - Turquoise 
Rimmel - Lemon Drop


Next, draw teardrop shapes using the gel pen on all of your nails, spacing them out as best you can (I probably could have done with spacing them out a bit better!)


Once that's done, outline the tear drops with a lacey pattern. Remember not to push down too hard, just lightly 'brush' the pen over the nail and try to avoid splodging it. 


Then, draw mini tear drops inside the bigger ones


You can leave it like that if you want, but I like to add dots inside the tear drops and also in any available gaps. 


Once that is dry, try to wait as long as possible, add a top coat to seal in your design (otherwise it will wash off!), I used Seche Vite, and you're done!


I hope you like this design, it's definitely one you can try if you're starting off with nail art, I know it may look complicated but I promise it isnt, and it's something that you dont need fancy tools for, and a pen isn't as hard as a brush to control.

I've decided to enter this tutorial into Money Supermarket's 'Money Smart Nail Art' competition, because it seems to fit quite well into the theme of using 'household items'. 

Let me know what you think in the comments!
Alice


0 comments:

Nail art "Magical Fantasy"


Prodotti utilizzati:


base coat
smalto blu collistar n°62
smalto celeste pupa n°715
smalto oro pupa n°800
colore acrilico lilla
top coat 


Tutorial:

Seconda versione: 


Prodotti utilizzati:

smalto arancione kiko n°280
smalto rosa/arancio pupa n°502
colore acrilico giallo
smalto oro pupa n°800

0 comments:

Gel pen doodles

Hey everyone! Today I have a post for you that some of you may have seen a sneak peak of on instagram: gel pen doodles. I've done this design repeatedly in lectures for a while, and since I discovered that I could use gel pens I've been wanting to do it on my nails. 

There's very little to say about these nails because for me they truly are just doodles! I started off with a base of OPI - My Boyfriend Scales Walls, and used a Muji 0.38 Gel Pen for the design topped off with a coat of Seche Vite when it completely dried


Hope you like it! Let me know what you think :)
Alice


0 comments:

Pimp Your Nails kilpailu + tarjouksia


Thebos.fi:llä on meneillään Pimp Your Nails kynsien stailauskilpailu!* Ajattelin ainakin itse osallistua. Vähän on nyt vain vähän valinnan vaikeutta minkälaisen lakkauksen tekisin :p Aiotteko te osallistua kilpailuun? :) Alennuskoodilla 30908 saa muuten thebos.fi verkkokaupasta ilmaisen toimituksen väh. 25€ arvoisiin tilauksiin helmikuun ajan.

CosMeryalla jatkuu vielä pari päivää -15% ystäväetutarjous (28.2.2013 asti). Alennuksen saa kaikista tuotteista, myös tarjoustuotteista! Edun saa kassalla koodilla YSTÄVÄ. Itsehän käytin näitä tarjouksia jo hyväkseni ja kävinpäs jo eilen hakemassa postista paketin, joka sisälsi mm. nämä Laveran tuotteet:

 
Lavera Wild Rose puhdistusmaito 75ml ja Wild Rose kasvovesi 50ml ovat tällä CosMeryalla hetkellä 6€, kun niiden normaalihinta on 9,90€. Päätin siis ottaa testaukseen molemmat. Oli tarvetta kasvovedelle ja tuo puhdistusmaito tuli sitten siinä sivussa. Ainakin ennen olen ollut tyytyväinen Laveran tuotteisiin, mutta lisää näistä sitten parempien kokemusten kera :)


Mitäs muuta vielä.. Sokoksella alkoi taas Kutsu Kauneuteen kamppanja (25.2.-10.3.) myymälöissä sekä verkkokaupoissa. Kamppanjan ajan verkkokaupassa on ilmaiset toimitukset. Olen kyllä melkein joka vuosi Sokoksella käynyt näihin aikoihin metsästämässä kosmetiikkalöytöjä. Saas nähdä käynkö tänäkin vuonna :)

*Ensimmäinen kuva thebos.fi:ltä

0 comments:

First Blog Post!

I honestly have no clue how to work this so bear with me. I felt it was appropriate for this to be my first post because these are probably the most intricate nails I've done thus far.
 These are "Charro Days Fiesta" themed. I'm not too familiar with the festival or the traditions so I apologize if anything is incorrect. I did them for a contest on Instagram. I'm determined to win my first contest. Here's a picture of my index and middle finger.
These two are my favorite. I'm not very good at painting people but I'm happy with these. Lastly, here's a better picture of my thumb. I started with a gradient and used black acrylic paint on top.
I'm not sure how to end this, so yay! First blog post!

0 comments:

Then and Now: Week 13

Hi everyone! Firstly I just want to start with an apology, firstly for not posting for a few days and secondly for not posting these yesterday like usual. Everything has been a bit hectic for the past few days and I've had bare nails for ages, so I hope you'll forgive me! I try to post as much as possible but sometimes it's difficult to balance everything. 

So back on to today's post, due to my lack of time at the moment I chose a really simple design from my 'archives' to redo: Yin Yang nails! So it's probably one of the least original designs you'll see the whole time in this series from me, but it's the best I could do in an hour. There's not really much explaining to be done so as usual the 'then' post will be after the jump with colours used :)


The base for these nails is Essie - Blanc, and the black is China Glaze - Liquid Leather, they were the only colours used except for a couple of touchups with acrylic paint, and I topped it all off with a coat of Seche Vite. 

I'm sorry there's only the one picture today, I barely had time to edit one and post this but I can assure you that I have some great posts coming up next week for you (one of which you may have seen a sneak peak of on my instagram)

If you like these nails, I've been selling a set of these in my (newly restocked) Etsy store on false nails for £7!

What do you think? Let me know in the comments!
Alice


0 comments:

Blog to Love Friday #4

Hey everyone! I'm sorry for there being no new posts, and I'm sorry to say there won't be for a bit. My computer has finally, after 5 years of devoted service, died. I've put in an order for a new one, but it won't be shipped for about a week and then I'll need to get all my programs and things reloaded. Using my mom's laptop is letting me know just how much I'll need to reload when I go to open a program or a website from my fave places. Some good news is coming out of this though; it is giving me time to work on my own nail polish and store up some swatches and nail art.


Since I don't have my favorite places to work from I had to do some quick searching for my favorite posts of the week. They're not what I would have posted with my fave places, but I'm actually really glad. This forced me to branch out and search out new blogs, and I'm loving them!!

  • My first blog post has to be this Apple Pie Protein "Ice Cream" from Nutritionist in the Kitch. By God the woman is a genius! I hate bananas. There's just something about the texture of a banana that I can't eat. But I love frozen bananas, usually a cut banana with peanut butter sandwiched between the slices, so to find another way of using frozen bananas is great. To find something so delicious sounding and looking is awesome! But to find that something so sinful is healthy?? BRILLIANT! I love that this recipe takes no ice cream machine since I don't have one.
  • I've said it before and I'll say it again: I love vintage nails. Watch Marlin Note's video tutorial to learn how to do Rose Fabric Nail Art.
  • If you're looking for something new and odd to do with your hair try this Hair Bow video tutorial from MakeupWearables. I love the look of hair bows, bows actually twisted up and created with your hair, but this puts a whole new spin on this look. It's an upside down, rope braided hair bow!!
  • I've yet to try a gradient lip. I've found most of them too unnoticeable or far too noticeable! It's a very fine line that someone walks to be able to pull off a gradient lip. But I think ChassyCali finally hooked me with her Berry and Nude Gradient lip ... or maybe it was her Red and Gold lip. Both of these are stunning and just subtle enough to work.
  • Watching my weight (hopefully drop) as I am, I'm always on the lookout for healthy sweet treats. I'm not a fan of doughnuts personally; I love the taste but find them far too heavy, sitting sickeningly in my stomach for hours after I eat them, and yet finding I'm still hungry! I'm hoping these super light and fluffy (healthier) Homemade Krispy Kreme Doughnuts with Healthy Glaze Icing from Chocolate Covered Katie will give me the taste of a yummy doughnut, but not the heavy after-feeling  If you're looking for something a little less plain she also came up with Cake-Batter Doughnuts!! Seriously, where has this woman been my whole life???
  • And last but not least, Maryam Maquillage came up with these gorgeous Gems & Jewels nails. I absolutely adore the picture of her nails next to her shimmery pink lips. Am I the only one dying of jealousy over her lips?? The shape, the color, the shiny shimmery gloss. Yep, I'm totally jealous!

0 comments:

Spotty bow 'rhinestones' review


Hey everyone, today I've got some really lovely bows to show you. I know I promised a really exciting post yesterday but I didn't have time to edit them so these shall have to do. I received these from KKcentreHK to review and I absolutely love them. However, I was really struggling to think of any ideas for what to do with them, even though I've wanted bows for ages, so I just decided to do a simple design with a dotting tool, but I actually really like how this turned out. I'm sure you'll be seeing plenty more designs with these bows as they're definitely reusable. 


There's not really much to say about these as they're pretty self explanatory. I started with a base of Collection 2000 - Angel Wings, and then used China Glaze - Liquid Leather for the black dots, which I did with a dotting tool. Then I put a coat of Seche Vite on, and then a coat of Essie - Matte about You. Then I used nail glue to add the bows.


You can get these bows here for $4, and you get 2 in a pack. At first I did think that was a little bit pricey, but considering the amount of times you will be able to reuse them I think it's definitely worth it. You can also use my code 'ONTRTA' for 10% off :)

What do you think? Let me know in the comments!
Alice

0 comments:

Rainbow Gradient

Today is supposed to be my X nail art for the ABC Challenge, but I'm stumped on what to do for this letter. I'll think of something by next challenge ... hopefully. For now, check out the rainbow gradient I wore last weekend.

nails nailart nail art polish mani manicure Spellbound Lacquer fun cute sweet rainbow gradient eyeshadow applicator sponge sponged sponging red orange yellow green blue purple colorful Rimmel English Rose Sinful Colors Hazard Sally Hansen Lightening Green with Envy Wet n Wild I Need a Refresh-Mint On a Trip

I hate the claw, but it's pretty much the only position in nails that need to include the thumb. Some of you may remember the sideways rainbow gradient from my NOH8 nails. I wanted to try something different this time so I did them as a normal gradient. I found the lightest rainbow colors from my collection to use for this.

nails nailart nail art polish mani manicure Spellbound Lacquer fun cute sweet rainbow gradient eyeshadow applicator sponge sponged sponging red orange yellow green blue purple colorful

Here are my nails before clean-up. So messy!!! I usually tape around my nails before doing something this messy, but I forget. Isn't that the way things usually go? You only forget something that would speed things up when you're in a hurry!

nails nailart nail art polish mani manicure Spellbound Lacquer fun cute sweet rainbow gradient eyeshadow applicator sponge sponged sponging red orange yellow green blue purple colorful Rimmel English Rose Sinful Colors Hazard Sally Hansen Lightening Green with Envy Wet n Wild I Need a Refresh-Mint On a Trip Rimmel English Rose Sinful Colors Hazard Sally Hansen Lightening Green with Envy Wet n Wild I Need a Refresh-Mint On a Trip

I took this picture in the car. It was snowing so hard and then a little bit of sunlight peeked through, and I couldn't resist snapping a few pics. It's not up to my usual standard, but there's something I really like about this picture.

 Rimmel English Rose Sinful Colors Hazard Sally Hansen Lightening Green with Envy Wet n Wild I Need a Refresh-Mint On a Trip

I couldn't resist getting a picture of my cotton ball after I removed the gradient. I'm reminded of a clown's wig, lol.

Colors Used: Rimmel English Rose, Sinful Colors Hazard, Sally Hansen Lightening, Sally Hansen Green with Envy, Wet n Wild I Need A Refresh-Mint, Wet n Wild On a Trip

0 comments:

St. Patrick's Day Duo

Hello everyone! I'd like to introduce you to a cute little duo you can now buy in my Etsy shop.


This is the St. Patrick's Day Duo. I missed getting my Valentine's Day polish out so I'm jumping the gun on this collection. :) Meet Fool's Gold and Clover the Rainbow.


Fool's Gold has a clear base filled with small and medium matte green glitter and large gold glitter — all hex.


Here is Fool's Gold over Petites Black. I adore how this looks! Almost like a galaxy nail or a flakey ... maybe a combination of both. :)


I also tried Fool's Gold over CQ Pearls. I thought Fool's Gold would look better over the slightly shimmery, off-white color than it would over regular white.


The second half of this lucky duo is Clover the Rainbow, named by Lyssa over on my Facebook page.  Clover the Rainbow is a green jelly with small matte green hex glitter and rainbow holographic hex glitter.


With three coats over bare nails you might not get full coverage, as is typical with a jelly, but you could certainly wear this out and show your Irish pride!


If you're looking for full coverage, you can wear one coat over white for a minty, lightly glittered nail.


Two coats over white will get you this look in sunlight. Clover the Rainbow is a very versatile polish. Change it up for different looks, wear it alone or with an undie.

Remember to follow and favorite my shop on Etsy to be the first to see new polishes. :)

0 comments:

Nail It! Magazine launch

Hey everyone, just a quick post today to let you know about the launch of a new nail art magazine: Nail It! You may have seen my post here about the interview and tutorial I did for them on their website, but now they have a magazine out in the US and Canada, released today. Here's (part of) the front cover:


I'm really excited to have been part of the launch of this magazine, and I cant wait to see what else is to come. I think we will be seeing a lot more of Nail It! 

You can stay up to date on their Facebook and Twitter

What do you think?
Tomorrow I have some more nail art to share with you which I'm pretty happy with, so I hope you will all like it too!
Alice

0 comments:

Shiny Owls

I know you've already seen these nails in yesterday's post for xameliax, but I really wanted to show what these look like shiny. You all know my obsession with matte, but for once I couldn't decide which looked better, so I left it up to Amelia to decide. So considering the pictures are already edited I may as well post them, see the original post on Amelia's blog for more information, the only difference is that I used Seche Vite top coat for these instead of Essie - Matte About You 


Hope you like them! Let me know what you think in the comments :) 

Alice

0 comments:

Giveaway winner!

I'm pleased to announce that the winner of my Born Pretty Store giveaway is.....

Entry #2902Sthefannia U

Thankyou all so much for participating and being such lovely followers, and thankyou to Born Pretty Store for sponsoring this giveaway! 

Alice

0 comments:

Guest post for xameliax

Hey everyone! Second post today, do you feel special? You should! I'm afraid I'm just linking you to another post again because I've done a guest post for the lovely xameliax, so if you want to read more about these nails you can do so here


Hope you like them!
Alice

0 comments:

My first video tutorial!

Hey everyone! Today I am excited to show you my first video tutorial. I decided to start off with a simple design using things that can be found around your house as this way it can be done by everyone. For next time, I'd like to hear what you would like to see so let me know in the comments! You can view the video here 


Hope you like it! I'd love to hear what you think.
Alice

0 comments:

Then and Now: Week 12

Hey everyone, today's then and now post is a little different from previous posts as I actually have two examples of what these looked like 'then'. There's probably a years difference between all the posts so you can see how much I've improved each time (I also apparently was incapable of keeping my nails a similar length previously). As usual, the 'then' posts will be after the jump


Both times previously the blue was Barry M - Blueberry but it's unfortunately still missing, so I had to use Barry M - Turquoise instead this time around. Originally everything would have been done with a dotting tool and nail varnish, but this time I mainly used acrylic paint except for the base colour and leaves, and a small brush.  The white base colour is Essie - Blanc, and previously would have been Barry M - Matt White


As you can see I actually mattified the second mani, but for once when I mattified these nails they didn't look good (I feel betrayed) so I had to stick to a shiny finish. I actually remember taking the above picture, because I did it in the centre of town and my friends were yelling at me to hurry up, but that was in the days before I had a lightbox and I knew the light was about to run out (blogger problems), this time I had no such issues. 


What do you think? I actually think I prefer the centre of the roses from the second time around, and I'd have rather done it in Barry M - Blueberry, but otherwise I'm pretty please with how these came out. Let me know your thoughts in the comments!

Alice

P.S. the giveaway winner was chosen on the 14th, but unfortunately did not reply in time, I'm now awaiting reply from the re-draw so please check your emails and spam to see if it's you!

0 comments: