Showing posts with label nail care. Show all posts

Which is best? Comparing Cuticle Treatments

Hey everyone! Today I have another 'Which is best?' post for you, this time on cuticle care. Sorry this is a day late but I didn't get home until nearly midnight last night and I just wasn't up to posting. I will be comparing Beauty Secrets Cuticle Oil, OPI Avoplex Cuticle Oil, Burts Bees Lemon Butter Cuticle Cream, Jessica Nourish Cuticle Formula*, and LUSH Lemony Flutter Cuticle Butter


Comparison No. 1 - Smell: 
(1 being strongest 10 being the least)
  1. OPI Avoplex - 8/10 smells really nice and not that strong
  2. Beauty Secrets - 8/10 smells quite nutty, but faint and it's really nice
  3. Burts Bees - 6/10 Lemony, but more pure lemon than lemony flutter and not quite as strong
  4. Lemony Flutter - 5/10 Strong and lemony (obviously) but it's really nice
  5. Jessica - 2/10 strong and 'grannyish' (only way to describe it) very perfumed


Comparison No. 2 - Greasiness:  
(1 being very greasy and 10 being not very) - Of course they're going to be greasy as they are there for moisture, but sometimes it's a bit too much
  1. Burts Bees - 8/10 you don't need much and it's not too greasy, it doesn't leave a feeling of greasiness like lemony flutter/Jessica do
  2. OPI Avoplex - 6/10 very greasy because it's an oil but it sinks in very quickly
  3. Jessica - 4/10 probably as greasy as lemony flutter if you use too much, but a little goes a long way so it's not as greasy if you use barely any
  4. Lemony Flutter - 2/10 very greasy because of how soft it is, even if you just use a little bit
  5. Beauty Secrets - 1/10 as it's an oil its very very greasy, and you do have to wipe it with a tissue


Comparison No. 3 - Does it work:
  • Lemony Flutter - Yep, and whilst the grease does put me off as I can't do things whilst it's on, it's definitely worth having
  • Jessica - Yep, after about a weeks use you will definitely notice a difference, and a little goes a long way
  • OPI Avoplex - Yes, it soaks in to the skin and really moisturises as a result
  • Beauty Secrets - Not really, it's just permanently greasy until you wash it off and I really wish I'd never bought it
  • Burts Bees - Yep, there's a reason that it's a favourite of the bloggers!

Overall thoughts
  1. OPI Avoplex - works well and is easy to apply, and doesn't smell too strong
  2. Jessica - it works and a little definitely goes a long way so the size of the tube should definitely not bother you, although the smell is a bit offputting for me
  3. Burts Bees - As I said before, there's definitely a reason that this is a favourite with bloggers, I haven't been using it enough to see whether it truly works for me, but I used to use it a lot during my high school years and I love it then, the smell isn't too strong and it isn't too greasy
  4. Lemony Flutter - I love it when I'm not in a rush, it's great to apply before bed, but I find it's not very practical if I'm just about to type a blogpost for example as it stays quite greasy for a while, but it definitely works
  5. Beauty Secrets - I dont like it and I wish I hadn't bought it, the only nice thing about it is the smell but it's way too greasy for me

Of course, different things work for different people, so I'd love to know what your favourite is. Let me know in the comments!
Alice


*some of the products in this post were provided to me for review but my opinions are entirely my own and were not influenced in any way

Naked Nails... Eeeeek!

Recently I've been on the receiving end of lots of nail related questions, whether it's about how I achieve my designs (this is also answered with LOOK AT MY BLOG!), what brands I use (a variety, but Models Own is a firm favourite), and where I get my stuff from (I always find Amazon, Direct Cosmetics and Nail Polish Direct reliable and extremely purse friendly). I'm also approached for general advice on nail queries, and although I am by no means a nail care professional, I think it's about time that I dedicate a post to the basics! 

I spend a good long while on each manicure I create: thinking up the design, picking out colours, making mistakes, swearing, removing it all and starting again, spilling nail varnish remover everywhere... You get the picture. Anyway, it takes bloody ages to achieve my most detailed stuff (Pastel Butterflies, Chinese Porcelain and Big Cats, to name a few), and although I'm generally happy with the results and love receiving compliments, I feel no sense of sorrow when scrubbing back to a blank canvas for my next design. Removing one manicure just makes room for the next, and means I can spend some time pampering my hands and nails prior to the next round of nail art!
So before the nail varnish, paint brushes and glitter come out, these are the products I turn to. I use a Boots own nail polish remover which, despite being acetone based, is enriched with moisturising oil and stops my nails from drying out. I have to use this remover because acetone-free just doesn't seem to the job properly, especially with all the layering up of colours in some of my designs. 3 or 4 cotton wool pads tend to do the job for both hands, and are much easier to use than cotton balls!

Once my nails are free of nail varnish, I use my Sally Hansen Gel Cuticle Remover. I got this from Direct Cosmetics for an amazing £1.99 - it came with a double ended tool for pushing back and smoothing ridges, but since I don't tend to suffer from uneven nails, I stick to my little pink and white cuticle tool. I leave the gel on for a few minutes, then push back and neaten up any raggy bits. I then trim and file my nails (how cute is my zebra print glass nail file?!), and use the tweezers to clean beneath my nails (a bit gross, yes, but when you have long nails it can be a problem...)

When I'm happy with the shape of my nails and neatness of my nail beds, I wash the remaining cuticle gel off my hands, and start moisturising! Palmer's is one of my favourite brands and I swear by their products. As you can see, my Skin Therapy Oil is running out, but I've had it for a couple of months and use it every day. I think it was about £3.00 from Wilkinson's, so definitely a worthwhile buy. I rub it into my cuticles, and because it's a quick absorbing formula, it leaves my fingers feeling fresh and moisturised without any grease. I also use this oil for dry skin on my arms and legs, and it works like a charm :)

I don't always use a specific 'hand' cream, just any good moisturiser that I have lying around (there are quite a few, it's a bit of an addiction). I got the Palmer's butter in my Cosmopolitan freebie bag the other day (see here for details), and it was perfect timing since I've only just run out of my other bottle. It's so important to keep your hands moisturised, especially if, like me, you take A LOT of photos of your nails! Once my paws are smooth and soft, I finish off with a coat of Sally Hansen Age Correct Strength  Dry & Brittle Nail Care, which is also courtesy of Direct Cosmetics and was amazingly cheap. My nails aren't naturally strong, so I have to make sure I keep them topped up to avoid any breakages. I try to use this product a couple of times a week at least, and it's really making a difference. If you're prone to snaps and tears, give it a go!

Ok so I'm going to be really brave now and actually show you my bare nails... For some reason this feels really wrong, but at least it's proof that I only paint on my natural nails (I have been accused of falsies in the past!) Like anyone who wears nail varnish every day, they're slightly more yellow than I'd like, but overall they're in pretty good condition apart from a pesky cuticle or two!
I love spending time pampering my hands and getting my nails into good condition before the next manicure. But I must admit, the sight of naked nails makes me feel slightly uneasy, so it won't be long until my next design!

My Nail Care Routine

I've been asked many times how I keep my hands/nails/cuticles looking so nice. Well, after taking off my latest polish I realized it's that time of the month — the time when my nails are starting to look a little long and ragged and I have to do a complete work over on them. I do this once, maybe twice a month, and do multiple smaller touch-ups between. So, I decided to snap a few pictures and attempt a short video in an attempt to explain how I keep my nails in shape. You guys asked for it!! :)


nails nailart nail art polish mani manicure Spellbound My Nail Care Routine tutorial non-acetone non acetone nail polish remover born pretty store clippers cutters Aveeno Daily Moisturizing hand lotion Revlon Shape n Buff file OPI matte Nail Envy nail strengthener biotin video

Here are the main things you'll need. I use non-acetone nail polish remover and a cotton ball to remove all my nail polish. I use so much of this stuff that I go for the cheaper Equate option. It works just as well as name brand and costs less! I bought the nail trimmer from the Born Pretty Store over a year ago, and I still love this thing! I recommend getting a six (or seven) sided file; I prefer my Revlon Shape 'N' Buff six sided file. And, the only lotion I will ever use is Aveeno, usually Daily Moisturizing. If you use something else make sure it is not water based. Check the list of ingredients and make sure water is near the end of the list. Water dries out your skin and nails, so I have never understood why you would want to use a water based lotion in an attempt to cure said dry skin. Aveeno Daily Mouisturizing has a dimenthicone skin protectant (a breathable barrier that locks in moisture) and is natural colloidal oatmeal based (which will help soothe and soften dry skin). You'll also need to have a sink and some soap nearby.

nails nailart nail art polish mani manicure Spellbound My Nail Care Routine tutorial non-acetone non acetone nail polish remover born pretty store clippers cutters Aveeno Daily Moisturizing hand lotion Revlon Shape n Buff file OPI matte Nail Envy nail strengthener biotin video

This is my elusive right hand immediately after removing polish and washing my hands. It needs a lot of TLC, right? Sadly, by the time I made the decision to do this tutorial I had already done my (prettier) left hand. What this means is that this hand will be a lot more ragged. Since I am right handed this hand takes all the damage. This also means the results of my overhaul will be a little less perfect since I'm cutting and filing with my non-dominant hand. Here is what I start with: dry skin, long nails that are growing out of their squared shape, peeling tips, and hideous cuticles. The end results will be a drastic change!


nails nailart nail art polish mani manicure Spellbound My Nail Care Routine tutorial non-acetone non acetone nail polish remover born pretty store clippers cutters Aveeno Daily Moisturizing hand lotion Revlon Shape n Buff file OPI matte Nail Envy nail strengthener biotin video

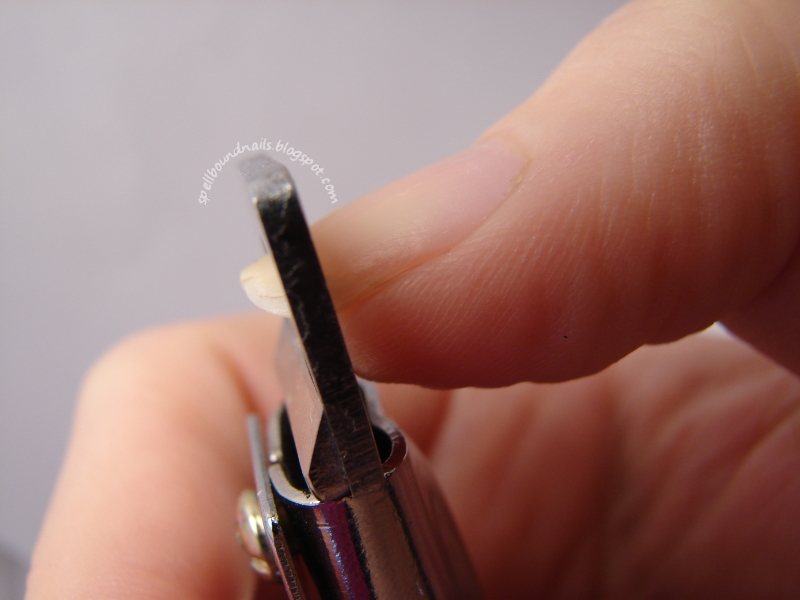
There will be no editing in these pictures (except light quality if needed) so you can see the true, unaltered nail makeover. The first thing to do, after washing and drying your hands, is to trim your nails.


nails nailart nail art polish mani manicure Spellbound My Nail Care Routine tutorial non-acetone non acetone nail polish remover born pretty store clippers cutters Aveeno Daily Moisturizing hand lotion Revlon Shape n Buff file OPI matte Nail Envy nail strengthener biotin video

Be careful after cutting your nails as they will be extra sharp. :)


nails nailart nail art polish mani manicure Spellbound My Nail Care Routine tutorial non-acetone non acetone nail polish remover born pretty store clippers cutters Aveeno Daily Moisturizing hand lotion Revlon Shape n Buff file OPI matte Nail Envy nail strengthener biotin video

Here is where the file comes in.


nails nailart nail art polish mani manicure Spellbound My Nail Care Routine tutorial non-acetone non acetone nail polish remover born pretty store clippers cutters Aveeno Daily Moisturizing hand lotion Revlon Shape n Buff file OPI matte Nail Envy nail strengthener biotin video

I use the previous pictures white side to file some extra length off my nails, creating the squared shape I like, and then round out the edges a bit. After that, I use the blue side to even out my nails. The pink end is used to smooth both the tips of my nails and the ridges on my nails.


nails nailart nail art polish mani manicure Spellbound My Nail Care Routine tutorial non-acetone non acetone nail polish remover born pretty store clippers cutters Aveeno Daily Moisturizing hand lotion Revlon Shape n Buff file OPI matte Nail Envy nail strengthener biotin video

You're nails will start to look worse before they look better. Be very careful if you have ridges that need filing. You never want to file too much off the tops of your nails!!


nails nailart nail art polish mani manicure Spellbound My Nail Care Routine tutorial non-acetone non acetone nail polish remover born pretty store clippers cutters Aveeno Daily Moisturizing hand lotion Revlon Shape n Buff file OPI matte Nail Envy nail strengthener biotin video

Next I use the purple and dark blue sides to lightly buff and shine my nails.


nails nailart nail art polish mani manicure Spellbound My Nail Care Routine tutorial non-acetone non acetone nail polish remover born pretty store clippers cutters Aveeno Daily Moisturizing hand lotion Revlon Shape n Buff file OPI matte Nail Envy nail strengthener biotin video

They look pretty bad, right? They'll look a little better after you wash off some of the dust and dandruff left behind by filing. Use some soap and water and be extra gentle.


nails nailart nail art polish mani manicure Spellbound My Nail Care Routine tutorial non-acetone non acetone nail polish remover born pretty store clippers cutters Aveeno Daily Moisturizing hand lotion Revlon Shape n Buff file OPI matte Nail Envy nail strengthener biotin video

Next up: lotion, lotion, and more lotion. It's far better to have too much than have not enough. Put a large dollop in your palm and cover your hands in lotion; then focus on massaging the lotion into your nails and around your cuticles. See the video below.


Forgive me, I really hope this works. This is my first video, and I really don't have the setup for this. I had to balance my camera on my knee and hope I didn't knock it over while filming. It's a bit out of focus in some parts, but it gets the point across. Don't forget to get some lotion under your nails too.

Let the lotion sink in for a few minutes before even thinking of touching your cuticles. The lotion will soften them and make pushing them back easier. After a few minutes go ahead and push your cuticles back. GENTLY!! If they don't move easily use more lotion and wait a bit longer. Better to wait a few extra minutes than to tear your cuticles attempting to push them back. Not only would that be painful, but there's always the risk of infection with damaged cuticles.


nails nailart nail art polish mani manicure Spellbound My Nail Care Routine tutorial non-acetone non acetone nail polish remover born pretty store clippers cutters Aveeno Daily Moisturizing hand lotion Revlon Shape n Buff file OPI matte Nail Envy nail strengthener biotin video

Finally, after the lotion has all sunk in and your hands are silky smooth but dry, apply a base coat. I just got this OPI Matte Nail Envy in the mail (bought with an Amazon gift card I received from Swagbucks.com) so I decided to give it a try. This is two coats. I really love how it's not truly matte but more the matte of your natural nails. It leaves a bit of shine behind that looks really nice. It also left my nails so strong and with a nearly perfectly arched shape after about an hour on my nails! This will certainly contribute to their overall strength. It does leave me wondering if I'm supposed to use my usual base coat over this or if this subs as a base coat. The big question is: will it protect against staining on its own?

My daily routine between these overhauls usually consists of lots of lotion and some less frequent filing between old and new polish. I use nothing but non-acetone remover, and I never trim or in any way remove my cuticles. Really, nothing too intensive.

What do you guys think? Definitely easy enough that anyone can do, right? There's no reason not to have beautiful hands and nails. Give it a try and let me know if this works for you. :)