Showing posts with label CoverGirl. Show all posts

Covergirl Glosstinis Swatch & Review

Today I have two polishes to swatch for you, from Covergirl's Glosstinis line of polishes. The collection I picked from were "limited edition" and were called Tropical Glosstinis. This line contains mini polishes in tropical cocktail inspired shades.
I don't know how "limited" this collection really is, I think "limited edition" is just a great tagline for selling polishes fast. I have seen them in many stores, and for a long period of time, so who knows... Maybe instead of having a stock of 5 million polishes, for this one they only have 4 million. :p
Obviously this is not a "seasonal" thing, because it is almost November, and I saw a whole stock of them at Ulta.

Anyway! Whatever the reason may be, they are limited edition, and they are cute! So I managed to walk out of my local drugstore with only two -How, I don't know.- to swatch & review for you today!

Covergirl Appletini - $4
They sell at my local drugstore for $4 each. While I do think that is steep for such a little thing,  I did have a coupon, so that made me feel a bit better about it.


As you can see, they are total baby polishes. Luckily, they have pretty good coverage, so I think they will last a bit in my collection. They are definitely not good for nail art, they would be gone in no time flat. But for simple plain mani's they will survive for a while. Also, since it is Fall currently, they won't get much use right now. I like to break out my darker, "Autumn" colors once the weather starts to turn frosty.

First up for review is Appletini. This is a creme formula, with a slightly matte shade of pea green. It reminds me of baby food, but I weirdly still like it... It's on the thin side, not as much as the second shade I bought, but still needed an extra coat. It has a hint of gloss, even more so once I applied my top coat.
I got nice coverage after three coats. Much better coverage than the second polish. I prefer this shade, it's my favorite out of the two, but I still enjoy both shades.

Close up of Appletini.
In sunlight.
Under lamp.

With flash.

For both polishes I applied a base of white polish, and finished them with a coat of my old top coat, Sally Hansen Double Duty base & top coat in one.

Next is Bahama Mama. Which I must say, has the best name ever. I just love saying it. Anyway, this shade has a creme formula, and is a peachy, soft shade of orange, with a silver shimmer. The shimmer is not too childish, it's more of a mature, subtle shimmer. In sunlight and shade, the small iridescent silver particles shine nicely. It's thin. Thinner than Appletini. But I was still able to get OK coverage with three coats. It does streak, and even after my three coats a hint of my free-edge still showed through. I wish it was thicker, so I wouldn't have to go so thick with the layers.
Drying time was a pain! To get the coverage I was able to required my coats to be a little thick. I could have applied the polish thinner, and just added more coats, but I was impatient.
Bahama Mama close up.
Under lamp.

In sunlight.
With flash.
I do like the peachy/orange shade of Bahama mama, I usually don't like orange nail polish, but this one is a baby step towards a brighter orange. I don't like the formula though. I hate when polish on the lighter side gets streaky.

I think covergirl's tropical collection is really cute, and great for testing out shades without having to buy a full sized bottle. I don't really think the shades are "special" enough to really be called limited edition, I feel I could find these shades in any polish line. But I still think they're cute, and I like the idea and look of the Glosstinis collection.

Thanks for reading! To check out my past Swatch & reviews click here.
Brittany

Have you tried Covergirl's Glosstinis? What were your thoughts? Let me know in the comments!

Sidenote: I realized I haven't done a haul post in forever! So be on the look out soon, I have a big haul coming with all the clothes and beauty products I've bought recently, including a trip to Ulta, where I picked up some pretty awesome nail polishes to review!


Follow on Bloglovin


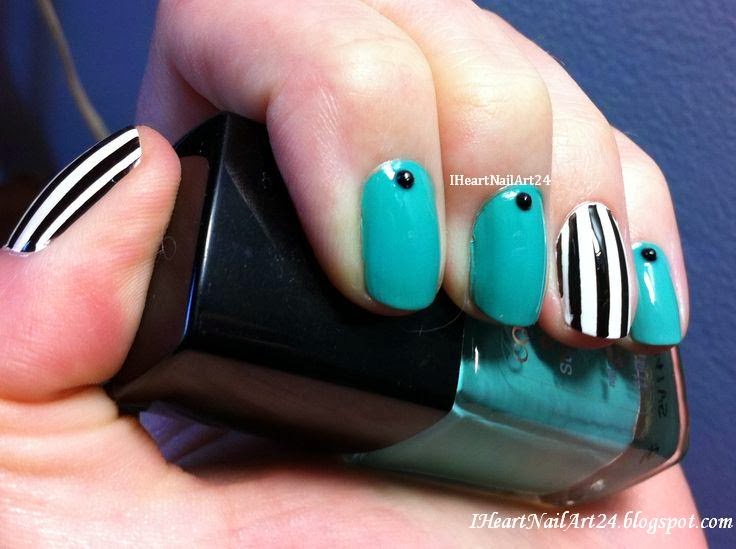
Mint and Black & White Stripes

Yes, I finally have a new nail design up, and yes, I am still obsessed with my nail art striping tape. Though unlike my previous design using it (here), I wasn't up to the task of striping every nail.

For this weeks design, I was, weirdly enough, inspired by a vintage table I saw - And wanted so badly!-. Inspiration comes in weird places I guess. Anyway, the table had mint legs, with a thick striped black and white table top. It was beautiful. So, since I couldn't have the actual table, I thought the next best thing was to make a design based on it!


For my design I used two coats of CoverGirl Mint Mojito as the base on most of my nails. Then I painted two coats of NYC French White Tip on my accent nails, a coat of my top coat, then let it dry completely. Afterwards, I used my striping tape and created the thicker stripes by placing two tape pieces side by side, painted two coats of NYC Black Lace Creme, then quickly removed the tape. For the look I was going for - And my sanity.-, I only placed stripes on my ring fingers and thumbs.

Maybe I read way too much Nailasaurus - I love her blog, I read it daily.-, but I still thought the design was missing something, and wasn't as cohesive as I wanted. So I dug out my nail gems, and applied black gems on the half moons of my mint nails -Nailasaurus style.- using tweezers and dipping the gems in clear nail polish beforehand. I think it really ties everything together.

After everything was finished drying, I applied a coat of Sally Hansen Double Duty base & top coat in one. Normally I won't apply a top coat on top of gems, since it can cause bubbles, but now that I'm working, I wanted to protect them from damage. Once the top coat was dry, I used acetone based polish remover, Q-tips, and an angled nail art brush to clean up my edges and cuticles.


Thanks for reading! To check out all of my nail art looks, click here.
Brittany

What do you think of this design? What surprising things have inspired your nail designs lately?
Let me know in the comments!

Follow on Bloglovin

CoverGirl Swatch and Review

As you can see I've changed my blogs layout. I was sick of the orange birds. I am not the best page designer, but I like the simple look now. And I tried to incorporate my favorite colors mint, pale pink, and dark brown. I would love to make a banner for my header but I am clueless in that department, so I'm going to leave it as it is for now.

Time for another swatch & review!
Unknown to anyone reading this, - except my mother, who is a fan of my blog and knows how crazy I am.- I have a serious polish collection. I have officially lost count on how many I own, but the collection takes up a whole wall shelf and half of my nail design table. So I would say it's pretty big. Because of this I feel like I don't use all the polish I have, even when I'm doing designs. So I've decided as well as swatch & reviewing new polishes, I am going to also do all my current collection. My hope is that I'll help any other nail polish addict reading this by sharing my experiences with each brand, as well as helping me by reminding myself why I bought it, and maybe inspire some new designs. I also want to check if some of them are still viable or have just turned into goo.

Today I am reviewing a new color I picked up recently at my local CVS for $6.00. It's from a new polish line by Covergirl called Outlast Stay Brilliant, and the second I saw this one I had to have it! I love mint nail polishes. I own three different mint shades already but I couldn't help myself!
Covergirl Mint Mojito, $6.00
This is a creamy formula, with a gloss finish. I like that it doesn't contain any shimmer because sometimes I think it takes away from the color. My other mint shades have shimmer so I was happy to add a more matte polish to my collection.
When it dried it was slightly matte, with a hint of gloss. I used Sally Hanson Double Duty base & top coat in one as my topcoat, which added a bit more gloss, but not too much.
In natural light.
I was happy to see it has really good coverage. Normally with pale colors like this it takes extra coats to cover. Because of this I applied a base of white polish, but I don't think I even needed it. I was pleasantly surprised that I had to use only 2 coats to cover.
The polish was also easy to apply thanks to the brush. It's a little small but when I applied the polish to my nails it spread out really nicely so I didn't have to go over it too many times. I wish it wasn't so squared off, I prefer more domed brushes, but this brush did its job well.
In sunlight.
 One problem I have is that it took forever to dry! Even with my top coat. I had to touch up three different nails because I kept smudging! That drives me crazy, so it loses a few points for that.
With Flash.
I love how it looks with my more vintage looking outfits and jewelry. And I love the coverage and glossy finish. I am just going to have to leave plenty of time for it to dry. I'm so impatient that that is going to be very hard to do, but the final results are worth it. It is my favorite shade of mint out of my collection.

Thanks for reading!
What do you think of this polish? Could you deal with the long drying time?

Brittany