Hey everyone! Today's tutorial tuesday is going to be slightly different because rather than a tutorial from me, I have an amazing guest post in the form of a video tutorial from my lovely friend Amelia, who runs xameliax. After mentioning to her that I was struggling due to exams she kindly said she would do a guest post for me, and the nails she has done are absolutely gorgeous! I can't wait to see your recreations. So without further ado I'll pass you on to Amelia...
Hi Everyone! I'm Amelia the beauty and lifestyle blogger behind xameliax.com and I, like Alice and probably most of you reading this have a little obsession with nail polish! So when Alice asked if I'd like to guest post for her while she was beavering away revising for her exams (go you super clever girl) I took it as the perfect opportunity to do one of my favourite nail looks - Tortoise Shell!
This effect is so easy to re-create as you can see in my Youtube Tutorial! They took me less than an hour to do and i think they look amazing. With just three polishes and some cling film you can create this beautiful tortoise shell effect and with a few studs ontop it comes together to make this simple but stunning manicure!
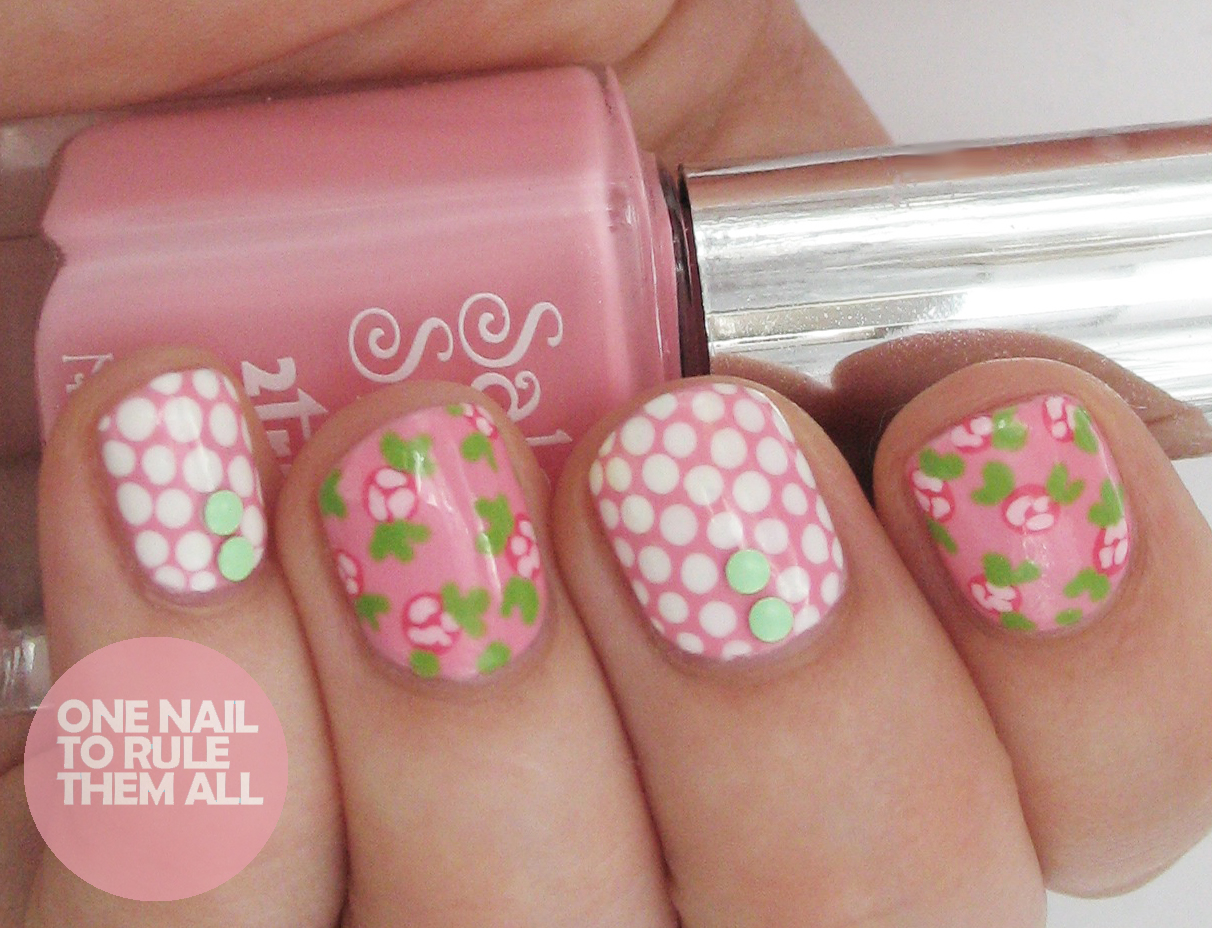
Hey everyone! Today I have a brand new Tutorial Tuesday for you, this time for this gorgeous rose polka dots that you might remember from here. I had originally intended to post a tutorial for these bow nails today, because I was absolutely certain that I'd posted this tutorial already. However, after discovering (and double checking) that I hadn't, I decided to push the bow nails back a week and post these instead, considering I promised you a tutorial 'soon' over 3 months ago! I can only apologise for my idiocy.
Step 2: Using a dotting tool and white polish draw dots on alternate nails
Step 3: Using a larger dotting tool paint on darker pink spots, more loosely than the white dots
Step 4: Using a thin brush paint on the shapes of the inside of the roses. For this shade I mixed the base colour and the white together to create a more opaque light pink
Step 5: Using the same brush paint on the leaves in green.
Step 6: Finish off with a topcoat to seal in your design, and you’re done! You can also add studs whilst the topcoat is still drying if you wish
Hey everyone! I have some super exciting news for you all today. Some of you may remember that a month or so ago I was asking you all to vote for me for Best New Beauty Blog 2013 in the Cosmopolitan blog awards, and this week was the awards ceremony. I went with the intention of meeting up with some amazing bloggers (aka The Nailasaurus, xameliax, Brit Nails and Lucy's Stash) and with absolutely no expectation of coming away with a prize. So imagine my surprise when I won! I'm still not sure it's entirely sunk in but I'm absolutely honoured to have been chosen and voted for, and I have all you amazing readers to thank, so thankyou. I still cannot believe that I run a successful blog, let alone a prize-winning one, and it is purely down to you, and I really cannot thank you all enough.
I of course couldn't attend without doing my nails, and although I wanted something that I could do on both hands, I also wanted it to be something that stood out, and so I finally settled on this glitter/swirl/stud combo. The base for these nails was 2 coats of Alessandro - Midnight Black*, and 3 coats of Alessandro - Glitter Queen*. I then applied a layer of China Glaze - Fairy Dust to the black. Once that was dry I used a thin brush and white acrylic paint for the swirls, and finally I added the black studs (which I unfortunately cannot remember the origin of but they're most likely from Born Pretty Store) I've also included a few pictures of the event and whatnot after the jump!
My drink of choice throughout the evening, I think I'll definitely be recreating this at home sometime soon! Photo credit to Amelia
Whilst there were adventured into the photobooth, producing some ridiculous photos that I will most certainly treasure forever
I couldn't quite believe my eyes with the amazing goody bags we were given. Unfortunately I forgot to take a picture of mine but here's one from the lovely Amelia
We loved the night so much that we actually ended up being the last to leave. After the event we adventured into London, feeling that the night wasn't quite ready to end. I had an amazing time and we topped off a perfect evening at midnight in Trafalgar square. Photo credit to Amelia
Overall I had one of the best nights of my life. Aside from my awe at winning such an amazing award, I also had a fantastic time with some amazing ladies, and I really hope we get the chance to meet up again soon!
Hey everyone! Here's the promised second post of today, this time a review of some gorgeous Models Own Ice Neon shades*. I know these aren't new shades but I wanted to review them for you anyway. I've also included some of the gorgeous new pastel studs* from Born Pretty Store for a bit of contrast.
This was an idea that I'd had in my head for quite a while but it didn't turn out at all like I'd imagined and I was quite disappointed, but nevertheless I do kind of like the effect. These were a heck of a lot brighter in person but as always it was difficult to capture properly on camera.
This was one coat of both Luis Lemon* and Toxic Apple* over white, I originally tried applying them on their own but they were way too sheer and it was just getting too thick, and I think the effect over white is much brighter anyway.
If you like the look of the studs* you can buy them here in shades #3 and #8
What do you think? Let me know in the comments!
Alice
*some of the products in this post were provided to me for review but all opinions are entirely my own
Hey everyone! Sorry for not posting for a few days, but today I have some exciting news. Next month, I will be the featured nail artist for Scratch nail wraps! This is probably one of the (if not the) most exciting projects I've been part of since starting my blog and I'm incredibly excited for September to begin. My wraps will become available on September the 3rd, but you can pre-order the monthly mani box now here. That includes all 3 wraps (which you can see in the images below) and a bunch of other goodies, including a nail polish, studs, nail file and a secret addition, which even I don't know about! If you like the sound of that you can order it here before the 31st August for just $25
The three designs I will be including are:
- My Scrabble Love nails, but rather than having a nude background it's translucent and you are therefore able to include any colour you wish underneath, including the colour in the Monthly Mani box.
- My owl nails which you can see here, these are some of my favourite nails that I've ever created and I'm so excited that you can now all have this design too!
- My floral stud nails. Of course the studs can not be part of the wrap, so they are included in the Monthly Mani box instead.
I really hope that you're all as excited about this as I am. If you would like the monthly mani box you can sign up for it here for just $25 before the 31st August. Or if you like the look of just a single nail design, they will be available on the Scratch website on the 3rd September
Hey everyone! Today I have the final post of the digital dozen does fashion week today, albeit a day late. It was inspired again by a La Moda bag, this* one, which is currently on sale!
For these I used a base of Barry M - Green Berry, and Barry M Gold Foil Special Effects, then I used striping tape from MASH and MASH Black polish. Then I used drops of Seche Vite to add the studs, and then topped off all nails with Seche Vite.
What do you think? Let me know in the comments
Alice
*some of the products in this post were provided to me for review but all opinions are entirely my own
Hi everyone! I'm sorry it's been a while since I posted, I tried to post this last night but the internet just would not work and I was super tired so I decided to call it a night. Last week I received an amazing bundle of Born Pretty Store goodies in the post, which some of you may have seen on Instagram. As soon as I opened the parcel I just couldn’t wait to use them, so I decided to try out a variety of looks on the rose nails I had on at the time. I thought it would be a nice change to show you one look but a few different ways to accessorise it. So I hope you like it!
First up is the look alone. For these nails I used 2 True ‘Taylor’* (dark pink) and 2 True ‘Sienna’* (light pink). Which I should have a full review of coming in the next week or so. I also have a tutorial for these nails coming up soon too so keep an eye out for that.
Next up is using these* gorgeous green studs. I can predict that all these gorgeously coloured studs will be used regularly because I’m absolutely in love with them!
The second look is just adding to the previous look. I didn’t want to take off the studs straight away so I decided to add these* gorgeous flowers. They’re not exactly practical but they definitely look great!
The final look is using these* rose studs, if you can call them studs. I was pleasantly surprised to find these (and the previous flowers) were rubbery rather than hard, which certainly makes them more practical as they don’t painfully rub on your skin or catch on things quite as much as they would if they were hard.
There you go! What do you think? Let me know in the comments
Alice
*some of the products in this post were provided to me for review but all opinions are entirely my own
Hey everyone! I know you're probably expecting the last of my 'Which is Best?' series today, which would have been about matte top coats. I shall be doing it next weekend instead due to some technical difficulties so keep an eye out for that. Today's post is a little different. As you will see, these are not my nails. I have a tonne of posts lined up for you, so don't panic that I'm not doing my nails or anything like that. My lovely friend Natalie wanted to make an appearance on my blog, and help me out with some of my product reviews. You may recognise her nails from my YouTube tutorials, as she is often my guinea pig. It's a bit like a guest post, except I actually did the nails!
To do this design I used Born Pretty Store's Sweet Color nail polish in Shade #105* on the alternate nails. This was 2 easy coats. Unlike the picture on their website shows, this is actually a very opaque creme polish, rather than a translucent one.
Once that was dry I applied some Fake Tattoos* (see picture above) to the nail. I've never used nail tattoos before and I'm surprised at how simple they are to apply. All you have to do is cut, peel and apply some wet kitchen roll to your nail to transfer the design and you're done! I used the hearts and the bows from the bottom middle set.
I then applied Elegant Touch Patterned Colour Wash Wraps* (see picture above) to the remaining nails. This was my first experience using nail wraps and I was expecting to absolutely hate it. I've actually had this wraps for months because I was so wary of using them. Luckily I was proved completely and utterly wrong. These are super easy to apply, super easy to remove creases from, and they last well too. I would 100% recommend these for those of you who want nail art but don't have the time or confidence to do it yourself. You can get them here for just £5!
Finally, once I was done applying the nail wraps, I applied these gorgeous peach studs* (#5) from Born Pretty Store. They've recently just got in a tonne of new coloured studs and I ordered pretty much all of them. They're just so irresistible! And they definitely lived up to expectations. These are not only a brilliant size but also the colour doesn't come out when you apply topcoat as is often the case with coloured studs.
What do you think? I hope you didn't mind seeing some different nails today!
If you fancy some of the Born Pretty Store products, don't forget to use my code KHL91 for 10% off
Alice
*Some of the products in this post were provided to me for review but the opinions provided are entirely my own and were not influenced in any way.
Hey everyone! Many of you will know that I'm not American, so I wont be celebrating the 4th of July, and I've always felt that it would be a bit odd if I were to do 4th of July nails. However, after having seen many of my fellow British bloggers doing just that, I decided that it was time for me to jump on the bandwagon. I'm sure you're all getting sick of seeing 4th of July nails by now, but I really really wanted to use Nichole by Shimmer Polish, because I knew it would be absolutely perfect for this design.
Hey everyone! I'm finally back with my own nails, have you missed me? This design is very similar to this one I did previously but is a lot more neon. I received these studs from Born Pretty Store to review and this nail art pen from Models Own and knew instantly that they had to go together!
I chose to apply the studs using dotting tools from MASH, which can be found here, by applying an extra coat of OPI - My Boyfriend Scales Walls and before it was dry placing the studs on. I love these studs, as you can see from the awful quality of the pictures my camera had a hard time picking up the neon on these because they're super bright, and they're also a great size. Remember you can use my code KHL91 to get 10% off these too!
Next, I used the nail art pen to draw random swirls all over the rest of my nails, I started on my thumb and as I'd never used them before it went a bit thicker, but I quickly picked up how to use them and the rest of the nails were easy to control, I definitely preferred doing this design with a pen rather than a brush due to the control, and it's really opaque (and again, super neon!)
What do you think? Let me know in the comments, and dont forget to use my code KHL91 to get 10% off your order at Born Pretty Store!
Alice
Some of the products in this post were provided for review, my opinions were not influenced in any way and are entirely my own.
Hey everyone! I'm super super super tired so please forgive me if this post isn't too long. Today I'm reviewing some more studs for you, this time in the form of 3mm stars, again from KKcentreHK. I wasn't going to include these stars with this manicure because I had the idea for the hearts seperately, but I got the idea that the gold together might work, although I'm not sure it's exactly how I pictured. These were inspired by some fabric I saw, minus the stars.
I really like these studs, and I'm sure you'll be seeing them in a few more posts yet. You get about 50 in a pack which is easily enough.
The base for these nails was OPI - Ski Teal We Drop, with Barry M - Gold Foil used for the hearts with a small detailing brush.
You can get these studs here for $5 and with my code 'ONTRTA' you can get 10% off!
What do you think? Both of the mani and the studs? Let me know in the comments!
Alice
There's only half an hour left to enter my GIVEAWAY! So be quick :)
This product was sent to me for review but any opinions included are entirely my own and were not affected in any way by anyone else
Hey everyone! I totally forgot to post last night, I spent most of my night doing nails, not just my own, and didn't have the energy to post when I finally remembered at 1am. So here I am today, which means you'll probably get 3 posts in a row this week. (Surely that's a bonus?)
So today's post is a review of some awesome 6mm heart shaped studs that I recieved from KKcentreHK. I decided to create a valentines design with them (duh) but I probably should have chosen a different colour for the flowers because they're not very clear as you can see!
I actually really liked these studs, they're not very practical as they dont lay completely flat, but for the many of you who wear bows and studs and whatever else on your nails I really dont think that will be in an issue. I'd love it if they were miniscule but even at the size they are I cant wait to use them again.
They come in a small packet with around 40-50 studs inside. But that's actually a lot considering that you can easily reuse these multiple times. The base for these nails was OPI - Gargantuan Green Grape, and I used OPI - My Boyfriend Scales Walls for the 'white' and Essie - Beyond Cozy for the glitter.
I know a lot of you come here for nail inspiration, so for those of you who anxiously waiting the arrival of your 6mm heart studs that you just realised you wanted, here is an alternative design for valentines day:
The studs sell here for $5, which I think is actually really good value for money. especially when you can use my code 'ONTRTA' to get 10% off!
What do you think? Will you be buying these studs? And which manicure do you prefer? Let me know in the comments!
Alice
Tomorrow is also the last day to enter my GIVEAWAY so dont forget!
This product was sent to me for review but any opinions included are entirely my own and were not affected in any way by anyone else