Showing posts with label Drips. Show all posts

Painting Other People's Nails

Hey everyone! It's almost a year since I did one of these posts and as I'm doing nails at Pastille nail bar in Leeds tomorrow (14th December) I thought it would be a good time to post all the nails I've been doing on other people. These are only over the past couple of months because I'm not very good at documenting it but hopefully you still get an idea! Don't forget you can come in tomorrow for walk-in appointments and I'll be there from 10-4 if you'd like any of my designs, or if you'd like christmas nails! I'll put the rest of the nails after the jump otherwise it'll be a bit long.

Above: Hebi's matte drip nails.
Below: Hebi's geometric nails


Above: Heidi's red and gold Christmas nails
Below: Lauren's christmas trees and christmas puddings


Above: Louise's glitter fade nails
Below: Natalie's dog nails (which you can see the tutorial for here)


Above: Nicole's floral heart nails
Below: Nicole's pink polka dot roses. (Can you guess what her favourite colour is?)


Below: Heidi's glitter triangle nails


What do you think? Which design of mine would you like me to do on you? Let me know in the comments!
Alice

Tutorial Tuesday: Drips

Hey everyone! Today I'm starting a new feature called 'Tutorial Tuesday,' I have a tonne of tutorials to show you but I never seem to post them. I've added a tutorial tab to the top of my blog due to Sarah's fabulous suggestion, but it made me realise that I just don't have enough tutorials. So for at least the next 10 weeks I will be doing a tutorial every tuesday for you all, I hope you like it!

Today's tutorial is for my drip nails, I did these quite a while ago and a tutorial was requested, so to whoever requested it I'm very sorry it has taken so long


You will need:
·      Barry M – Lychee (or a cream/nude polish)
·      Barry M – Blueberry ice-cream (or a blue polish)
·      Barry M – Berry Ice Cream (or a lilac polish)
·      Barry M – Dragon Fruit (or a pink polish)
·      Barry M – Black and White nail art pens
·      Small brush
·      Top Coat


Step 1: Paint your nails with a base of Barry M – Lychee
Step 2: Using a small brush paint a basic outline for your drips, this doesn’t need to be perfect
Step 3: Colour in the lines from the previous step
Step 4: Using the black Barry M nail art pen, outline the drips
Step 5: Using the white Barry M nail art pen, draw the reflections for the drips
Step 6: Finish off with a topcoat to seal in your design, a matte topcoat is great for making the drips really stand out

And that's it! What do you think? Let me know in the comments
Alice

Patriotic Drips Nail Art Tutorial

Hello everyone!! It's been forever since I posted anything. I knew running a nail polish business was going to take time, but I guess I never realized just how much of my blogging time it would eat into. I'm working really hard to keep up with orders, restocks, and developing new releases. Any free time I manage to grasp is spent storing up nail art and swatches so I can start posting again - hopefully within the next few months.

nail art Spellbound Nails Patriotic 4th of July red white blue stripes stars glitter America Independence Day

My patriotic nail art has been getting a ton of stardom lately. My nails can even be found in the July issue of People StyleWatch magazine! If you don't have a subscription to this magazine I recommend getting one. It's one of the best magazines I've read in a long time! I didn't have to search and skim, skipping large portions of the magazine, because every page had something interesting to me.

Spellbound Nails People Style Watch StyleWatch patriotic 4th of July Independence Day red white blue

Now, onto the nails!!! With all that interest for my patriotic nails I decided to try something different. I won't claim that I created this - someone, somewhere has probably done this before - but I will say it is something I have never seen before! I would love to see your nails if you decide to try the tutorial, so don't be scared to send them to me. I don't bite. Promise!! :)

Right click and open in a new tab if you're having trouble reading the tutorial.

Patriotic Drips nail art Tutorial Spellbound Nails red white blue stripes glitter America Independence Day 4th of July

That's it for now. For those who don't follow me on Facebook but enjoy my polish I will be having a big restock, complete with a ton of NEW polishes and the return of those sold out polishes some of you may be waiting for! Head over to my Etsy shop tomorrow to see what I've come up with. Hope to see ya there. :)

Nudey drips

Oh what's that? More matte nails? Of course! I couldn't resist, I'm sorry, but I did originally do these shiny (technical terms) and didn't really like how the photos came out unfortunately, so I added matte and now they look awesome-r (duh). I love these cartoon drips, I see them everywhere so unfortunately I dont know who they originated from, if you know let me know and I'll give correct credit!


For the base I used OPI - Did you 'ear about Van Gogh, and then using a dotting tool I put on Barry M -Berry and China Glaze - For Audrey, later outlined and highlighted in acrylic paint.


Do you think I should have kept them shiny or is my neverending use of matte as awesome as I see it to be (hint hint)? Alice

Review: Born Pretty Store glow in the dark polish

Hi everyone! Today I have a review for you from Born Pretty Store on their glow in the dark polish number #06. I've also compared it to China Glaze's 'Ghoulish Glow', hope you like it! Each time I used 2 coats of either Ghoulish Glow or #06 and there's no top coat


So firstly we have a comparison of Ghoulish Glow and #06 in daylight. The yellow polish is #06 and the white is Ghoulish Glow. It's great that Ghoulish Glow doesn't leave a colour but it's not a big deal for #06 because it's what you expect from a glow in the dark polish. After all OPI's 'Zombody To Love' (which you can see here) is a very obvious green. More pictures after the jump!


Now here is them in the dark. I felt it necessary to show you the difference between the first and the second photo because although it's not that noticeable in the photos Ghoulish Glow lasted barely a minute with a strong enough glow to notice, whereas #06 is very clear and very bright in both pictures. I also love #06 glows blue, it's so bright!


This is #06 on its own and these kept their glow for a lot longer than I've ever seen Zombody To Love or Ghoulish Glow manage!

I decided to create some nail art with them too, because of course this is after all a nail art blog and I couldn't resist, so glow in the dark drips it was!

This is the only photo with top coat because I kept these on a bit longer.


I love the effect of these, even if I did put too many drips on them.

Overall, I was incredibly impressed with #06, it dried fast, as did Ghoulish Glow, and although it was yellow the incredible glow it produced made it worth it. I will definitely be buying more colours from this range, even if halloween is over!

#06 retails at $4.99 on bornprettystore.com and if you use my coupon of KHL91 you can get 10% off!

Hope you liked this review,
Alice

This product was provided for me to review by Born Pretty Store, my views and opinions are entirely my own and I was not influenced in any way for this post

Nail-Aween Bloody Nails

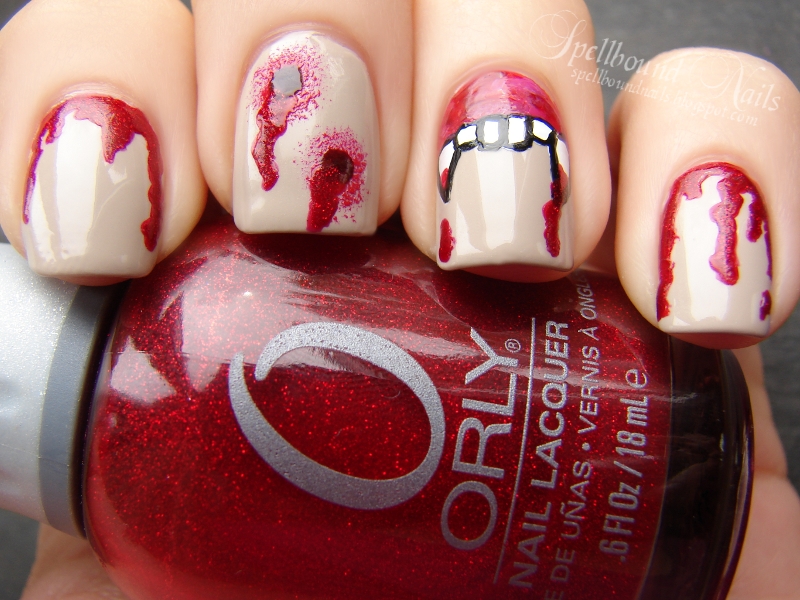
I've done a lot of bloody nails in my time as a nail artist. Splatters and drips and everything in between. I dislike redoing one of my nail art ideas unless I know I can make it better or unless I have a slightly different take on it. So when I saw that the next challenge in the Nail-Aween Nail Art Challenge was bloody nails I was a bit stumped ... until I came up with this.

nails nailart nail art mani manicure Spellbound Nail-Aween Halloween Challenge bloody blood drips shimmer glitter Orly vampire bite bites Just Bitten fangs

I call these Just Bitten. I used a three coat base color of Revlon's Bare Bones. I wanted a paler 'skin tone' like my nails had been drained of blood and were left slightly ashen. As for the rest, I followed the Kayla Shevonne Vampire Bites Tutorial again. I added some blood dripping vampire fangs to her original idea though. I think these are some of the best blood drips I've done yet since I tried to keep these drips very thin and realistic.

Out of the Halloween nails I've done so far, this is definitely my favorite. I didn't want to take these nails off!! What do you guys think?

C is for ...

Here is my mani for C in the ABC Challenge. I had so many ideas for C. The classic caged bird flying away design, cats, checkered, color blocking. However, I finally decided C is for ...

Chucky complete with blood drips. The Bride of Chucky movie is definitely one of my favorite 'horror' movies, right up there with Seed of Chucky. The only horror movies I like more are the Resident Evil movies.


nails nail art nailart polish mani manicure Spellbound character nails movie Chucky Child's Play Blood drips red white China Glaze Wet n' Wild Sally Hansen LA Colors shimmer ABC Challenge horror Halloween

I love the blood drips over white in this mani. These come from a tutorial over at Nails by Kayla Shevonne. I was left slightly disappointed at my Chucky. He came together so well but the overall effect just doesn't scream Chucky at me. I don't think I managed to capture that essential craziness he does so well.

However, this mani is chilling no matter if it looks completely like Chucky. So, if I must, C can also be for chilling.