Slenderman

Happy Halloween everyone! I'm so excited to show you my final Halloween design: Slenderman nails! I know all my other designs have been quite cute this year but I wanted to try something a little different. For those of you who don't know what Slenderman is, he's the character of the game Slender, which is basically just an incredibly creepy game. I'm too much of a wuss to have played it personally, having got scared enough just watching someone else play! If you want to read more about it, the wiki page for the game is here. Hopefully though, most of you know what the game is, and therefore can understand the meaning behind each of these nails.


On my thumb I have the Slender writing (albeit a bit thicker than the actual text), on my ring and pointer finger I have the trees and moon which represent the creepy setting of the game, on my middle finger I have slenderman himself, and then on my pinky I have one of the eight pages you have to find throughout the game. 

The base for these nails was Alessandro - Midnight Black, then I sponged on No. 7 Grey Skies, the white and black is all done with acrylic paint, I then used a coat of Seche Vite before finishing with a coat of Butter London Matte Finish 


What do you think? Let me know in the comments!
Alice

0 comments:

Zoya Carter


Zoya PixieDust Carter on aivan älyttömän kaunis ja kimaltava luonnossa, mutta valitettavasti yksi murheenkryyni kuvattaessa. :(  Carterissa on tummalla harmahtavan sinisellä pohjalla todella paljon pientä magentan pinkkiä glitterhilettä. Se kuivuu kauniiksi mattaiseksi kimaltavaksi tekstuuripinnaksi, jossa tuo pinkki glitteri on pääosassa. Näissä minun kuvissani kimallus ei välity oikein ja lakka näyttää liian siniseltä. Kynsillä lakkaa on muistaakseni kolme kerrosta. Yritin muokata kuvien sävyä oikeammiksi ja toivottavasti nämä vastaavat nyt vähän paremmin totuutta. Kuvissa Carter näyttää monien muiden tekstuurilakkojen tavoin myös röpelöisämmältä kuin livenä. Minun on pakko kyllä nyt todeta, että tämä kaunokainen teidän täytyy nähdä ihan kasvokkain! :)


Zoyan maahantuojana Suomessa toimii NailCity. Jälleenmyynjien listan löydät täältäLakkoja voi tilata myös suoraan NailCityltä sähköpostitse osoitteesta info@nailcity.fi hintaan 15,50€ / kpl,  jos omalla seudulla ei ole jälleenmyyjää. Kannattaa myös varmuuden vuoksi tiedustella etukäteen, onko lähin jälleenmyyjäsi ottanut uusimpia kausikokoelmia valikoimiinsa.

Niin tänäänhän se virallinen Halloween-päivä taitaa olla. Edellisessä postauksessa päivittelin sitä, että minulta ehti mennä Halloweenin juhliminen sivusuun, mutta ilmeni että käytännöt vaihtelevat sen verran paljon eri maissa ym. että olin panikoinut turhaan :D Olen ollut koko alkuviikon hirmuisen flunssan kourissa, enkä ole saanut oikein mitään aikaan. Ajattelin kuitenkin tässä kohta alkaa väsäämään jonkinnäköisiä Halloween-kynsiä. Toivottavasti ehtisin kuvata ja postata niistä teille huomenna, mutta viimeistään sitten viikonloppuna! :) Yves Rocherilla* on muuten aikas kiva Halloween-tarjous meneillään: su 3.11 saakka saa ensimmäisen ostoskoriin lisätyn tuotteen ilmaiseksi! Täytyy myöntää että itse äsken sorruin ja tilasin pari joululahjaa (itselle myös tietty :p). Happy Halloween! ♥


*Lakka saatu blogin kautta,
 Affiliate-linkki merkitty tähdellä.

0 comments:

Then and Now: Frankenvamp + Tutorial

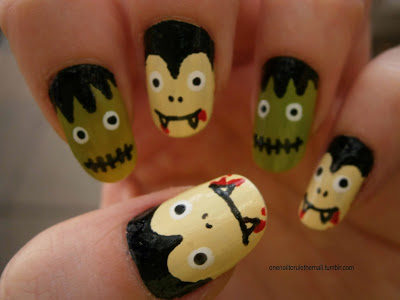
Hey everyone! I have the last of my 4 halloween tutorials for you today, don't forget to check out the tutorials tab at the top of my blog if you want to see the previous 3! This post is also another Then and Now post just like last week. I was so sad that I had to take these nails off for work, but at least with a blog I'm able to document my designs so I don't feel quite as bad when they have to go. Anyway, the tutorial and the 'now' nails will be after the jump!


The base for these nails was OPI - My Vampire is Buff (quite fitting), and Barry M - Key Lime, the black is acrylic paint, as is the white, and the red is Barry M - Bright Red, all topped off with a coat of Seche Vite


And these were what these looked like 2 years ago, I definitely prefer the Frankenstein nails now, the state of my cuticles, and my use of topcoat! Oh and also definitely my nail shape, what do you think?

Step 1: Paint your nails with your basecoat colours
Step 2: Using a thin brush and black nail polish or acrylic paint, paint on the hairline for both Frankenstein and Dracula, start at the tip of the hair and work your way up to the top to ensure neatness
Step 3: Using a thin brush paint lines for both monster’s mouths
Step 4: Then paint the teeth for Dracula and the lines for Frankenstein’s mouth using the same brush
Step 5: Using a dotting tool or cut down toothpick, paint on the eyes using white acrylic paint or nail varnish. You can also add a bit of blood using red around Dracula’s mouth at this stage
Step 6: Using either a dotting tool, brush or toothpick, paint on the centre of the eyes in black
Step 7: Draw on the noses of the monsters using your chosen tool
Step 8: Finish off with a topcoat to seal in your design and you’re done!

What do you think? Let me know in the comments!
Alice

0 comments:

Fashion & Nail Polish Haul

Yes I have a midweek post! I haven't done one in a while, mostly because I've been working a lot. But I have today off, so I thought, why not make a haul post! I love reading them, but I haven't made one myself in ages, So why not change that right now.
I didn't buy all the items in this haul at once, but I'm just going to group them together so this post won't be only one paragraph long.
I'm going to try to make more haul posts, especially now that I'm working and have more disposable income. But seeing that I'm not a bulk shopper - I buy bits and pieces at a time.- I will have to condense them together, so I think hauls will probably be a monthly feature.

Sidenote, if your not following me on Instagram - Link on the right.- than I have a big announcement at the end of this post! But first time to share my purchases:

Zoya Tomoko - $8 / Essie Matte About You - $10 / Hard Candy - $4 / O.P.I Alcatraz...Rocks - $8

First is a haul from my trip to Ulta, or as I call it, home. Ulta is on the expensive side, so I didn't buy as much as I would like to. But I still got some amazing polishes. I picked up Zoya Tomoko, which is from their Pixie Dust line. I found it on a bottom shelf, and the second I saw it I knew I was taking it home, I just love the champagne colored glitter. Then I picked up O.P.I Alcatraz... Rocks. A beautiful purple liquid sand polish with flecks of green, blue, pink, and gold, that I have been dying to try. And finally, if you've been reading my wishlist you know I have been hunting down a matte topcoat forever. Every time I would see one, it was either sold out, or my local drugstore didn't carry it. But my hunt is finally over! I bought Essie Matte About You matte finisher.
The Hard Candy polish is actually not from Ulta, but from the Super Walmart around the corner, where I was doing some grocery shopping. I love the light purple jelly like formula, and round glitters of pink and teal. I will be swatch & reviewing all these polishes in the near future, so keep an eye out if your interested!
Also, while I was at Ulta I saw my dream fragrance, Marc Jacobs Honey, which if you remember from my fragrance sample review (here.), I was obsessed with the fragrance, just not the $90 price tag. So I went a bit crazy with the tester they had on display :p. It just smells so good!

Scarves - $2 each. Clutch - $5.
I needed more winter clothes, as it is right around the corner. What I didn't need was scarves - I have quite the collection. -. But they were only $2 each! How could I pass them up... I bought them at Ocean State Job Lot. Which is a small discount store that sells just random crap. But if you really look you can find some cool things, like these scarves. The yellow one is my favorite, and is actually an infinity scarf. I bought a winter coat at the same store, which is black and white, so I wanted it to give the coat a pop of color. The blue one is just cute, and I wanted it... Don't judge me...
The cute lemon yellow clutch is from my work, and was on clearance! How could I not! Plus it matches my yellow scarf perfectly. It was fate... I hate how in the winter my wardrobe is always so dark and dreary, so I figured the clutch could add a pop of color when I'm wearing all my winter layers of black and grey neutrals.

Hounds tooth coat - $40.
This coat is also from ocean state, and I love it so much. I was shocked when I saw it, they usually only stock the most hideous coats. I love the pattern, the black and white keeps it neutral, but the hounds tooth pattern gives the coat some interest. Plus it has a very vintage shape, it's very 1950's. It makes me feel like Audrey Hepburn. And, you know, it's warm and stuff...

Black cardigan - $15? Leopard print cardigan - $5.
I discovered while going through my wardrobe, that I had like, three sweaters. Not good, especially since I walk to work mostly, and it's getting freezing out. So I have been stocking up. I bought the black cardigan at work, for I think around $15 dollars, maybe more. The leopard print cardigan is actually a surprising discovery at a second hand store for only five dollars. It fits really well, and I think the pattern is super cute. It's neutral, but not boring.

Bow earrings - $4.
I also bought these at my work. They were on clearance. My weakness. I normally don't buy stud earrings, my hair is cut into a bob, so I can't see them. But I thought these were just so cute and girly.

Pikachu - $25
Why yes, that is a Pikachu onesie. Why yes, I am a 24 year old woman... You can thank my love of Japan for this purchase! I saw it on a Vlog about Japan on Youtube, and then I saw a haul from a blogger in England who bought one from Amazon. So of course I had to go on Amazon and get one too... Basically, if I'm not working, I'm at home in my Pikachu, blogging or watching TV... I don't care, it's just so comfy!

Shoes - $19
These are also from work. I needed some new shoes for the trek to work - It usually takes 30-40 minutes.-, that wouldn't cause blisters or foot pain. I have a red pair of flat moccasins that I normally wear, but it's getting colder and they are open around my foot. Brrrr! These shoes are super comfortable, and feel like I'm wearing slippers. I also like the silver studs, they look a bit more dressed up for work, plus they look so cute with skinny jeans. Sorry about the dust and dirt on them, as you can see I've been wearing them frequently.

Sweater - $15? Hat - $7?
Sorry, I'm not very good at remembering prices after this length of time, but the cost of both items is around that. Both are from work. Yet another sweater. It's an open slouchy cardigan, and I just love how soft it is. I can just throw a blouse underneath and some skinny jeans, and feel put together, and most importantly, warm.
The hat is adorable! I needed something to wear for my walk to work, since I would leave the house with super cute smooth hair, and by the time I got to work, the wind would turn my hair into a rats nest. But now, my hair is protected, plus I look cute and cozy.

That's it! Now for my announcement! I adopted the cutest little thing yesterday!

His name is Charles Francis Xavier, but I just call him Xavier. Yes, he is named after Professor X, my favorite character from X-men besides Wolverine. He is a 5 month old ferret, who is slightly crazy, and loves to run around and play with his new lamb toy. He was waiting to be adopted for over a month, - Since he is a bit older, no one wanted him. Everyone wants babies. - but I am so glad, because now he is a new member of my furry family! If you follow me on Instagram I'm warning you now, my feed is going to be full of his cute furry face for a while.

Thanks for reading!
- Brittany

What have you bought lately? Are there any products that you are dying to try? Have a haul post you want me to check out? Let me know in the comments!

Follow on Bloglovin

0 comments:

Tutorial Tuesday: Models Own Velvet Spiderwebs

Hey everyone! I'm sorry it's been a few days since I last posted, I've been trying to get on top of the mountain of coursework that's due in very soon, and unfortunately that means my nails have fallen by the wayside. However, I still have 3 halloween posts for you (yep, I did an extra design) and I'm so excited for you to see the one I'll be posting on halloween itself. Today's post is a tutorial for these cute(ish) spider nails, which were done on a base of Models Own Obsidian*, from the Velvet Goth collection. The tutorial and swatches of Obsidian will be after the jump


These were quite rushed as I was doing them before I went for a train, but hopefully you'll still be able to gain something from the tutorial, in fact your version will probably be better than mine!


This was 2 coats of Models Own - Obsidian*. It's a little bit different to Absinthe from the same collection, which I showed you the other day, as the smaller glitter is more like bar glitter. Like Absinthe, this polish is completely enhanced with a topcoat, as you can see in the nail art picture above.


 And now for the tutorial! Enjoy:
Step 1: Paint your nails with your chosen base colour
Step 2: Paint an oval shape for the centre of your spider, and paint lines coming out from the corner of your nails, alternate between your nails for each design
Step 3: Using a thin brush paint ‘C’ shapes between the lines to create the spiderweb, and add the legs to the spider
Step 4: With a thin brush or dotting tool, paint on the eyes in black
Step 5: Paint white in the centre of the eyes (optional)
Step 6: Finish off with a topcoat to seal in your design, and you’re done!

What do you think? Let me know in the comments!
Alice

0 comments:

Paint & PrimeHER Review

Hello Everyone! 
I feel like I haven't written a review in a while so I'm super excited for today's post!

I was contacted by Paint & PrimeHER to try their products so here I am so share it with you all.

If you're not familiar with their products, I will acquaint you with the basics.


As you can see, the products are inspired by real paint, which makes sense because the creator is actually an interior designer.  


I'll just give you a rundown of the packaging (because I loved it!)


These were the instructions on the box, very straightforward and easy to follow. 


In my box I received Boss Lady, a gorgeous red polish with a tiny hint of shimmer. This was everything included in the set. 

One paint can with sponges inside for easy removal of polish
additional nail polish remover
one nail polish
one base coat/top coat (both the polish and top coat together are .5 oz)
nail clippers

Onto the swatches!


The formula on this polish was great! I am so impressed. It dried quick and this was just one coat! There is a hint of shimmer in this polish but it was impossible to photograph so you'll just have to take my word for it. 

I used the other polish included in the set (base and top coat) and was so impressed by that as well. I have to admit, I'm a top coat snob because I've never used another top coat and had it work as well as my Seche Vite. But I used the PPH top coat and it honestly worked just as well. It dried extremely quickly and actually hardened like a good top coat. It even lasted through the crafting of my Halloween costume. Bet you can't tell which nails I have the PPH top coat and which have the Seche Vite! 
 ( Index and ring have the PPH top coat and Middle and pinky have Seche Vite. )

Overall I have to admit that I was so impressed by this product. Both the polish and top coat worked wonderfully. I had minor problems with the brushes being a bit hard to work with but it's possible I could have gotten a bad bottle. The packaging is adorable and it's the perfect gift for anyone!

If you want to purchase a set, you can do so by their Etsy page here. (The website is www.paintandprimeher.com but it's not up and running just yet.) 

Use promo code TIASAYS for $5 off plus free shipping! 


Hope you loved this as much as I did!


Please note: PATENT PENDING

*This product was provided for review. All opinions expressed are my own and completely honest. 


0 comments:

Halloween Nail Art: Scarily Cute Faces

Ok, ok, I promise this is the LAST Halloween nail art I'll do! The possibilities for a Halloween mani are endless, and I didn't want to jam pack my blog with a million other posts (especially since I've already posted Sparkles & SpidersCrazy Pumpkins and Black Cat Silhouettes), but I was desperate to attempt a much more detailed design as my recent ones have been kind of basic. Anyway, to avoid an overwhelming amount of Halloween manicures, I decided to combine a few different concepts into one. Cue an unbelievable amount of nail polish, paint brushes, acetone and swearing (sorry Mum) in my creation of Scarily Cute Halloween Faces!

The equipment:

Sinful Colors 'Snow Me White'
e.l.f. Cosmetics 'Smokin Hot'
Barry M 'Papaya'
Fearne 'Burnt Out'
Sinful Colors 'Pistache'
No. 7 'Totally Teal'
Rimmel 'Grey Matter'
W7 'Purple'
Models Own black nail art pen
Models Own white nail art pen
So, as always, I started out with my bases. I alternated 'Snow Me White' with 'Smokin Hot', as I always enjoy a bit of variation. To achieve a good, opaque finish, all nails required three coats. Once dry, I added the block base colours. For my thumb's pumpkin head I used 'Papaya' and a medium sized nail art brush, and painted a slightly squashed circle with a few bumpy bits. For the skeleton on my index finger nail, I painted a circle with 'Grey Matter' and filled it in, then added a smaller circle protruding from the bottom. For Frankenstein's monster, I painted a rectangle with 'Pistache'. The vampire's face was a simple grey circle filled in, and the same for the cat but with black. 
Next, using a very finer nail art brush, I began to add the details. For every face I applied two large white eyes and mouths in black (apart from the cat). For the pumpkin, I used 'Burnt Out' to add a couple of lines for extra shape and colour. Then I painted a stalk with 'Pistache' and 'Totally Teal'. I added pupils and a glint with Models Own nail art pens, and then some pointy fans, which I sharpened up with my tiniest paint brush. Finally, I outlined the top sections of the eyes in black, and painted a tiny triangle for a nose. I decided my pumpkin looked a little bit strange just floating around in the middle of my nail, so I gave him some shoulders and a body. To tie in with the stalk, I painted stripes with 'Pistache' and 'Totally Teal'.
Next up, the skeleton! This face was one of the easiest, and I simply added little white dots for teeth and two small lines for a nose. I kept the eyes the same as the pumpkin's, and then added a couple of ribs for its body. There wasn't enough room on my nail to add too many details, which is a shame because skeletons always look so effective. Never mind!
For Frankenstein's monster I varied the eyes and added dark green eyelids. Then I gave him some black hair, and bolts through his neck in grey. His teeth also ended up spiky like the pumpkin's, which wasn't really intentional, it just kind of happened! For a bit of extra colour I gave him a purple jacket, which I think goes really well with his gorgeous green skin...
The vampire ended up being very detailed, and caused me quite a few problems. After adding fangs and some hair, I decided he needed a black cape and a red bow tie. This was extremely fiddly, even with a tiny paint brush, but I think it turned out alright!
Finally, the little black cat. I added a muzzle using grey, then added a nose and mouth. Obviously he needed some ears and a tail, so my Models Own nail art pen came in handy again. Once I was happy with every single Halloween face, I topped the manicure off with Essie 'Good To Go', which smoothed everything out, albeit highlighting a couple of errors that needed rectifying!

What do you think? This is definitely my favourite Halloween design so far, and I'm glad I managed to find a few hours to spend doing a detailed manicure. Who's your favourite? I have a very soft spot for Frankenstein's monster, but I think the pumpkin turned out best of all! That always seems to happen with thumb nails, I suppose it's because it offers a slightly bigger canvas... Make sure you check out the rest of the Polish Party girls' Halloween manicures, they're all fantastic!

0 comments:

Covergirl Glosstinis Swatch & Review

Today I have two polishes to swatch for you, from Covergirl's Glosstinis line of polishes. The collection I picked from were "limited edition" and were called Tropical Glosstinis. This line contains mini polishes in tropical cocktail inspired shades.
I don't know how "limited" this collection really is, I think "limited edition" is just a great tagline for selling polishes fast. I have seen them in many stores, and for a long period of time, so who knows... Maybe instead of having a stock of 5 million polishes, for this one they only have 4 million. :p
Obviously this is not a "seasonal" thing, because it is almost November, and I saw a whole stock of them at Ulta.

Anyway! Whatever the reason may be, they are limited edition, and they are cute! So I managed to walk out of my local drugstore with only two -How, I don't know.- to swatch & review for you today!

Covergirl Appletini - $4
They sell at my local drugstore for $4 each. While I do think that is steep for such a little thing,  I did have a coupon, so that made me feel a bit better about it.


As you can see, they are total baby polishes. Luckily, they have pretty good coverage, so I think they will last a bit in my collection. They are definitely not good for nail art, they would be gone in no time flat. But for simple plain mani's they will survive for a while. Also, since it is Fall currently, they won't get much use right now. I like to break out my darker, "Autumn" colors once the weather starts to turn frosty.

First up for review is Appletini. This is a creme formula, with a slightly matte shade of pea green. It reminds me of baby food, but I weirdly still like it... It's on the thin side, not as much as the second shade I bought, but still needed an extra coat. It has a hint of gloss, even more so once I applied my top coat.
I got nice coverage after three coats. Much better coverage than the second polish. I prefer this shade, it's my favorite out of the two, but I still enjoy both shades.

Close up of Appletini.
In sunlight.
Under lamp.

With flash.

For both polishes I applied a base of white polish, and finished them with a coat of my old top coat, Sally Hansen Double Duty base & top coat in one.

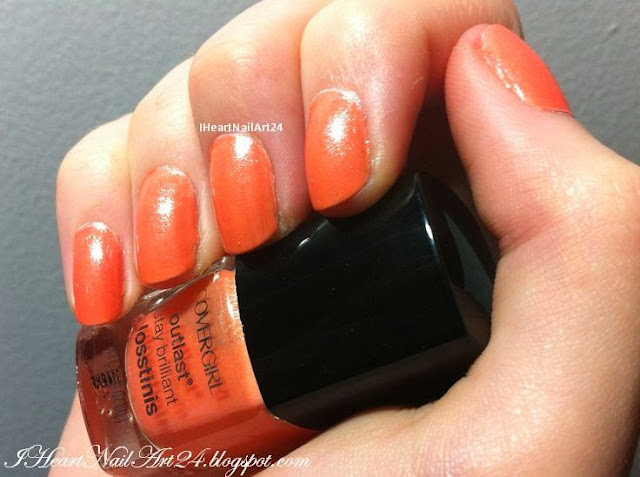
Next is Bahama Mama. Which I must say, has the best name ever. I just love saying it. Anyway, this shade has a creme formula, and is a peachy, soft shade of orange, with a silver shimmer. The shimmer is not too childish, it's more of a mature, subtle shimmer. In sunlight and shade, the small iridescent silver particles shine nicely. It's thin. Thinner than Appletini. But I was still able to get OK coverage with three coats. It does streak, and even after my three coats a hint of my free-edge still showed through. I wish it was thicker, so I wouldn't have to go so thick with the layers.
Drying time was a pain! To get the coverage I was able to required my coats to be a little thick. I could have applied the polish thinner, and just added more coats, but I was impatient.
Bahama Mama close up.
Under lamp.

In sunlight.
With flash.
I do like the peachy/orange shade of Bahama mama, I usually don't like orange nail polish, but this one is a baby step towards a brighter orange. I don't like the formula though. I hate when polish on the lighter side gets streaky.

I think covergirl's tropical collection is really cute, and great for testing out shades without having to buy a full sized bottle. I don't really think the shades are "special" enough to really be called limited edition, I feel I could find these shades in any polish line. But I still think they're cute, and I like the idea and look of the Glosstinis collection.

Thanks for reading! To check out my past Swatch & reviews click here.
Brittany

Have you tried Covergirl's Glosstinis? What were your thoughts? Let me know in the comments!

Sidenote: I realized I haven't done a haul post in forever! So be on the look out soon, I have a big haul coming with all the clothes and beauty products I've bought recently, including a trip to Ulta, where I picked up some pretty awesome nail polishes to review!


Follow on Bloglovin


0 comments: