Faceted

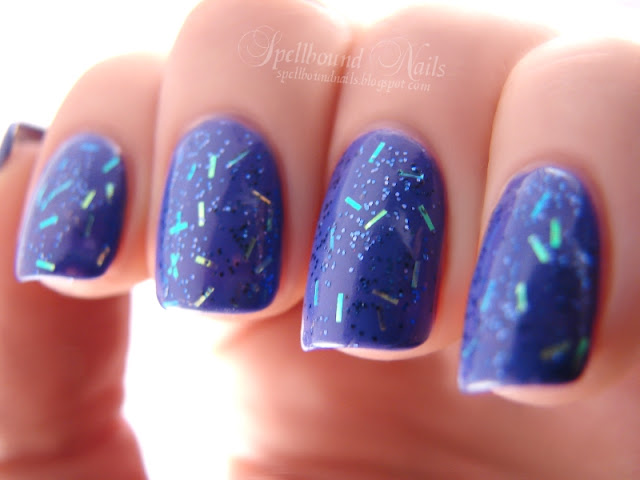
Today I have another glitter swatch. And I thought, why not start the holiday posts early? This is Faceted from the Sinful Colors Holiday Shimmers Collection.

nails nailart nail art polish mani manicure Spellbound Sinful Colors Color Swatch Faceted glitter bar shimmer Holiday Shimmers collection purple iridescent Wet n Wild On a Trip

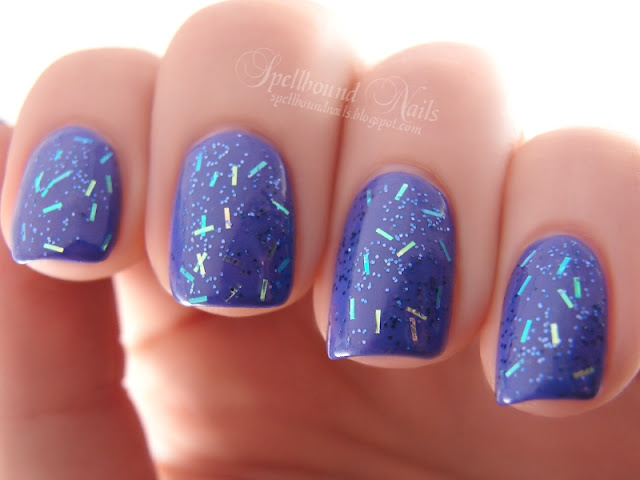
I used two very thin coats of Faceted over Wet n Wild On a Trip. I'm not usually a big fan of bar glitter but I love this. It's just the right amount of bar to shimmer.

nails nailart nail art polish mani manicure Spellbound Sinful Colors Color Swatch Faceted glitter bar shimmer Holiday Shimmers collection purple iridescent Wet n Wild On a Trip

Add some character to this mani by doing the first coat of glitter normally and the second with a few side to side swipes. This will turn the bar glitter so it's not all going in the same direction.

nails nailart nail art polish mani manicure Spellbound Sinful Colors Color Swatch Faceted glitter bar shimmer Holiday Shimmers collection purple iridescent Wet n Wild On a Trip bottle

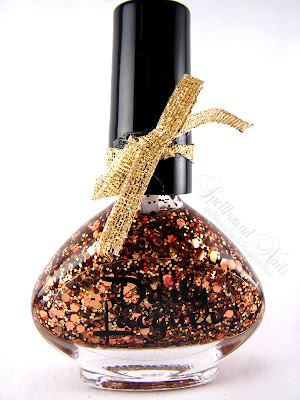
I didn't manage to get any really great pictures of this polish on my nails so here's a picture of the bottle. This glitter is definitely in my Top 5 ... maybe even in my Top 3.

0 comments:

Maple Syrup from the Daily Lacquer

I'm really sorry for such a late night post guys, but I am so behind on picture editing. Still, I just couldn't put this post off another day. I entered into a Facebook flash giveaway from the Daily Lacquer last week totally not expecting anything, but I won! As one of three winners, I got to choose one bottle of Daily Lacquer's nail polish. Beyond exciting!! I decided to take a chance and ask for Maple Syrup from what was the then upcoming Buddy the Elf Collection. This collection is now out and selling like wildfire along with her Sailor Moon inspired The Lovely Moon Collection and The Holo-Day Lovelies Collection. She totally deserves some major kudos!

nails nailart nail art polish mani manicure Spellbound Maple Syrup Buddy the Elf Collection Daily Lacquer Lacquerista brown bronze gold orange red glitter Indie black Sally Hansen China Glaze green flash giveaway winner Holy Day Holy-Day Chocolate Creme

I can't compete with the awesomeness of Daily Lacquer's bottle photos, but I gave it a shot. I love these bottles. They are just the perfect fit-in-your-hand bottles, and they look pretty too! Made even prettier by that cute glued on bow. What's better than such a personal touch to every bottle?? You just don't get that from big name brands.

nails nailart nail art polish mani manicure Spellbound Maple Syrup Buddy the Elf Collection Daily Lacquer Lacquerista brown bronze gold orange red glitter Indie black Sally Hansen China Glaze green flash giveaway winner Holy Day Holy-Day Chocolate Creme

My first use of this beautiful brown/bronze/gold glitter was over China Glaze Holly-Day. This combination is such a rustic Christmas combo.

nails nailart nail art polish mani manicure Spellbound Maple Syrup Buddy the Elf Collection Daily Lacquer Lacquerista brown bronze gold orange red glitter Indie black Sally Hansen China Glaze green flash giveaway winner Holy Day Holy-Day Chocolate Creme

My next choice was brown. I used Sally Hansen Chocolate Creme. It went on a lot darker with two coats than it looked in the bottle. In the bottle it was a gorgeous chocolatey brown. On my nail it turned black.

However, this color change was a good thing. It shows just what a chameleon Maple Syrup truly is, because it didn't get lost in such a dark color! It actually spiced it up. In my opinion, this glitter can go over anything and look amazing.

Did I mention this is my first Indie polish? I'm happy to say all the hype is well deserved. Maple Syrup went on smoothly. It wasn't thick or gooey and had no overpowering polish scent like a lot of big name brands. The glitter applied really easily. I didn't need to dig at all for the larger glitters. And using two coats of glue before my base coat made removing the glitter a snap ... or rather a peel. :)

0 comments:

Nail art "Metallic Strips"


Prodotti utilizzati:

base coat
smalto nero
top coat Essence matt
smalto azzurro metallizzato Essence n°75
smalto verde metallizzato Ice n°62
smalto rosa metallizzato Ice n°59
smalto viola metallizzato Ice n°43

Tutorial:

0 comments:

Nudey drips

Oh what's that? More matte nails? Of course! I couldn't resist, I'm sorry, but I did originally do these shiny (technical terms) and didn't really like how the photos came out unfortunately, so I added matte and now they look awesome-r (duh). I love these cartoon drips, I see them everywhere so unfortunately I dont know who they originated from, if you know let me know and I'll give correct credit!


For the base I used OPI - Did you 'ear about Van Gogh, and then using a dotting tool I put on Barry M -Berry and China Glaze - For Audrey, later outlined and highlighted in acrylic paint.


Do you think I should have kept them shiny or is my neverending use of matte as awesome as I see it to be (hint hint)? Alice

0 comments:

L is for ...

It's Wednesday again, and you know what that means—another ABC Challenge mani.

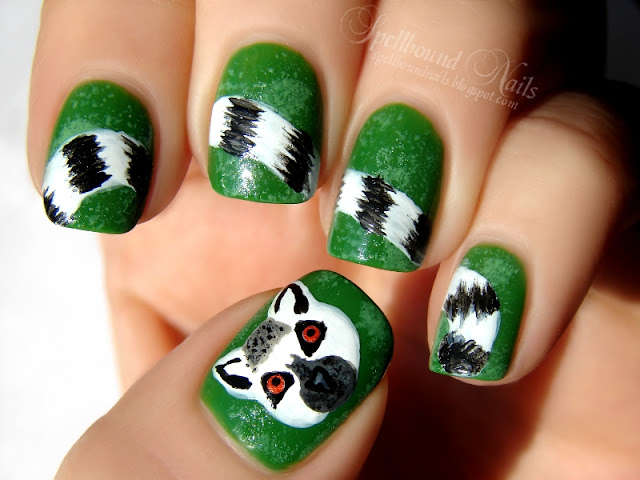
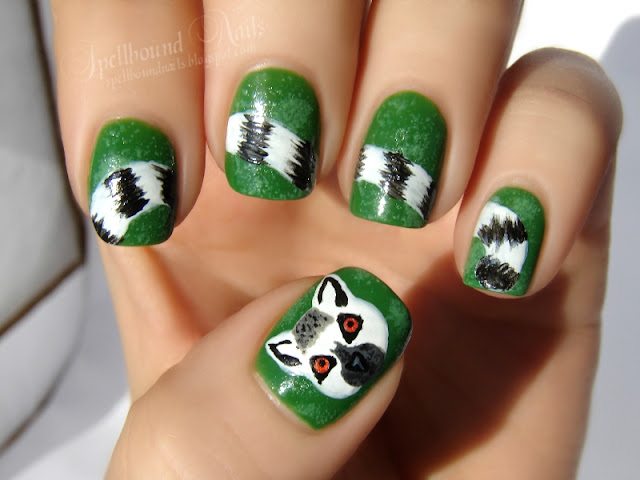
L is for ... Lemur Catta aka the Ring-Tailed Lemur!


nails nailart nail art polish mani manicure Spellbound ABC Challenge hand drawn painted L is for Lemur Catta Ring Tailed Ring-Tailed animals primate tail stripes black white green gold orange

I think lemurs are some of the most adorably weird creatures. I think of them as a combination of a koala, a cat, and a dog. Yes, that's silly of me. But they have the furry fluffy coloring of a koala, the slinky graceful body of a cat complete with long twitchy tail and there's something oddly reminiscent of a dog in their face. I think it's the long muzzle-like nose and the big expressive eyes. Look through some pics of ring-tailed lemurs and tell me I'm not right!


nails nailart nail art polish mani manicure Spellbound ABC Challenge hand drawn painted L is for Lemur Catta Ring Tailed Ring-Tailed animals primate tail stripes black white green gold orange

I decided on a green background for these nails. When a lemur isn't in the trees, they're usually bouncing around in the grass. Green seemed like a good idea. I used two coats of Sinful Colors Exotic Green then mixed it with a little white and used my eyeshadow applicator to dab on the lighter green. You know how I love my texturing. :) The rest, lemur face and tail, were all hand drawn.

0 comments:

Merellinen liukuvärjäys


Tässä lakkauksessa messuilta ostetut Zoyan flakie ja OPI lakat käytössä. En osannut päättää mitä näistä lumoavista vihreistä ja sinisistä käyttäisin ensin, joten tein liukuvärjäyksen, jossa käytin kaikkia :D Olenpas kyllä taas jäljessä näiden lakkauksien esittelyissä, kun kohta on jo joulukuu! Täytyykin yrittää kiristää postaustahtia, niin saan nuo jonossa olevat lakkaukset esiteltyä ennen joulua :D Viime vuonna tein muuten paritkin jouluteemaiset manit, mutta saa kyllä nähdä kuinka tänä vuonna innostun jouluaiheista. Tuosta linkistä voi siis käydä noita viime vuoden (ja aikaisemman) lakkauksia selailemassa ja hakemassa jouluinspistä.


Tämän lakkauksen pohjalla ihanan vaivaton kerros tummansinistä OPI Russian Navy Suede lakkaa, jonka levitin keskittyen kynsien tyviin ja pärjäsin yhdellä kerroksella. Sitten töpöttelin hiukan tumman vihreää China Glaze Jolly Hollya kynsien keskelle ja kynsien kärkiin sitten runsaammin nättiä vaaleanvihreää OPI Gargantuan Green Grape lakkaa (huh, mikä sanahirviö :D). Nämä OPI lakathan olisivat mattalakkoja ja todella nättejä mattana ovatkin, mutta näihin kynsiin tuli nyt sitten päälle vielä kerros turkoosia Zoya Maisie flakielakkaa ja pikakuivattavaa. Tarkoitus on kyllä ainakin tuota Russian Navya testata ihan mattanikin ja ehkäpä joidenkin kivojen leimauksien kanssa :p Maisien flakiet näkyivät näissä selkeimmin tummansinisen päällä ja näyttivät välillä vähän niin kuin katoavan kohdatessaan vihreän. Mutta mitäs näistä tykkäätte? Tämä värimaailma miellytti ainakin kovasti omaa silmää :) 

Zoya Maisie, OPI Russian Navy Suede,
OPI Gargantuan Green Grape -Matte ja China Glaze Jolly Holly

0 comments:

500 Follower Giveaway!!

Hey girlies!! My internet was down all yesterday or I would have had this posted much sooner. Check out my 500 follower giveaway. I don't have 500 followers yet ... but I hope to after this. :)

Please read the rules before entering.


Rules:

Giveaway is open to United States residents only.

Giveaway ends midnight, 12/03, and the prize will be shipped that weekend (as long as everything goes to plan). This will give me time to verify entries and choose a winner. A winner will be chosen at random and will have 48 hours to reply to winning email. If I get no reply, I will be forced to choose another winner.

All entries, except your email address (I'll need that to contact you), are optional. I would love to have you as a follower, but I will not require it for this giveaway. However, remember that each completed entry gives you another chance to win. :)


a Rafflecopter giveaway

The prize was purchased by me and this giveaway is in no way sponsored, endorsed, or administered by, or associated with Bath & Body Works.

0 comments:

Nail art "Pinguino"


Prodotti utilizzati:


Base coat
smalto blu Ice n°58
smalto Hologram Shaka n°06
colori acrilici Americana nero, bianco, rosa e arancione
Top coat


Video Tutorial:

0 comments:

Then and Now: Week 3

Hey everyone! So today I have week 3 of my Then and Now 'challenge' for you. I was quite excited for this design just because it was quite cute but I was disappointed by how amazingly simple it was to do, so I've decided that from now on I'm not just going to copy the design, unless I feel it's worth it, I'm instead going to adapt it to be a bit more complex. So for instance these could have ended up with bamboo or something, when I did these I didn't really have time to do much else otherwise I would have. In a way I kind of did change them slightly, as I gave them a nose and slightly better eyes, but I'd hardly call that a complex improvement haha. More after the jump!


I had to take these pictures in the dark because my camera screen wasnt working and I use a light box which relies entirely on flash, so that's why they're not very focused I'm afraid! Though to make you feel better about how focused they are look at this terrible old picture:


So again the first time I did these they were all completed using dotting tools. This time I used the brush from the white nail varnish (Barry M - Matt White) to create the white head, and then I used a dotting tool for the eyes and nose, and then a small brush for the ears, all using Barry M - Matt White and Black and the base colour is Barry M - Spring Green. Hope you like them!


What do you think? 
Alice

0 comments:

Nail Art "Floral Charm"


Prodotti utilizzati:

Base coat
Smalto viola Ice n°o9
Colori acrilici Americana giallo, azzurro e verde
Strass
Top coat

Tutorial:

0 comments:

Nail Whitening Tutorial

Lately I've been noticing my base coat just hasn't been doing its job as well as it used to. I'm sure it has something to do with all the swatching and daily nail art I've been doing, but that doesn't make the staining any less horrifying. It was definitely time to do another whitening treatment. I promised with my last whitening tutorial that I would try one of the other methods of whitening nails so I leave you with this to try over the weekend.

nails nailart nail art polish mani manicure Spellbound Whitening Tutorial denture cleaner cleanser crystals tablets

There really doesn't seem to be much difference in my before and after photos, but it is very noticeable in person. I admit, I'm a one hand painter. If I have no where to be, I only paint my left hand. So the staining was much worse on the hand you see in this tutorial. After ten minutes, my right hand was nearly stain free—after fifteen it really was stain free, so this method really does work and with much less effort on my part than the peroxide/baking powder method I tried last time.

So, while your out shopping this weekend pick up some denture cleaning tablets or crystals and give this tutorial a try. :)

0 comments:

Happy Turkey Day!!!

Surprise!!! I got my Thanksgiving nails done last night so I decided to schedule this to post while I'm not home. Right this second, I'm enjoying turkey and stuffing, mashed potatoes and gravy and many more yummy, yummy things. :) I hope you guys enjoy this mani and have a wonderful (and safe) Thanksgiving.


I did Pilgrims and Indians. The Indian nails were inspired by this absolutely gorgeous printed skirt I found browsing Google. If I could find this skirt for sale somewhere I would totally buy it ... and I don't wear skirts; I just love it that much!


And you can't forget about the turkey on my thumb. I'm sorry the picture is kind of fuzzy. I couldn't get my hand twisted just right to get anything better than this.

Enjoy and I'll see you tomorrow. :)

0 comments:

Tarjouksia - Deborah Lippmann ja Viva La Nails

Oletteko jo huomanneet, että Love It:lla ova Deborah Lippmann lakat -15% tarjouksessa niin kauan kuin tavaraa riittää? Itse pistin juuri kauan himoitsemani kultaglitterlakan, Boom Boom Pown tilaukseen :p Monet ihanuudet ovat jo loppuneet varastosta eli äkkiä tilamaan jos olette sitä suunnitelleet. Nythän Love It tarjoaa myös ilmaisen toimituksen, mikä ainakin minulla vaikutti myös ostopäätökseen. Myös MeMeMe tuotteita näyttää olevan Love It:lla tarjouksessa. 


Minulle oli myös tullut mainostus Viva La Nailsin Black Friday -25% tarjouksesta. Nimittäin koodilla BLACK saa 23.11-25.11 25% alennuksen kaikista sivuston tuotteista :) Ajattelitteko hyödyntää tarjouksen? Olen huomannut että monilla muillakin sivuilla on tarjouksia tänä viikonloppuna. Laittakaapa muuten ihmeessä linkki kommentteihin, jos tiedätte jonkun mielestänne hyvän käynnissä olevan tarjouksen :p Jospa löytyisi vaikkapa joululahjoihin vinkkejä :)


0 comments:

A bit of a jumble

Hey everyone! I will only be posting on Wednesday and Saturday until next week, and then hopefully things should become more regular again! You might also have noticed that I've changed the comments back to having a spam check, I'm sorry I've had to do that, I was getting around 8 spam comments a day and it was just getting a bit annoying, I hope you will still take the time to comment, I do love reading what you all have to say!

Now, onto the nails! I was feeling a bit uninspired, so I decided that I would just paint my nails a lovely colour (OPI - Thanks a Windmillion) and see where I went from there. Then when I had it on I thought of doing an accent glitter nail, and then the whole black and silver theme came to me and that was it, I just painted what I felt like. I used black acrylic paint and Barry M - Silver foil, alongside Barry M - Limited edition silver glitter. I particularly like the middle finger and will most likely be doing a whole hand of that, so I apologise that you'll be seeing such a similar design sooner or later. Anyway, I hope you like them!


Alice

0 comments:

K is for ...

Another day, another ABC Challenge post. With K words like ketchup and kazoo to choose from what was I going to do?? It actually took me a few days and much dictionary browsing to find something worthy of a mani. I bring you:

K is for ... Koi.


nails nailart nail art polish mani manicure Spellbound ABC Challenge K is for Koi fish saran wrap method face glitter shimmer Wet n Wild Club Havana orange Pure Ice Poker Face L.A. Colors White animal

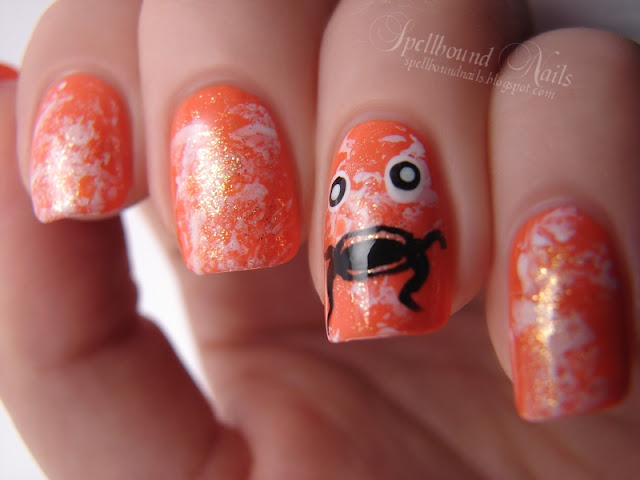
I confess that when I started these nails I still had no idea how I was going to accomplish them. I knew I wanted to do koi and use Wet n Wild Club Havana and white to make a splotchy pattern but that was about it. After using two coats of Club Havana I decided to use saran wrap to dab on the white. This gave the koi a very unique swirling watery pattern. I also used the saran wrap to dab on some Pure Ice Poker Face, a sheer shimmery golden orange polish, in an attempt to create the glittery metallic looking scales of a koi.


nails nailart nail art polish mani manicure Spellbound ABC Challenge K is for Koi fish saran wrap method face glitter shimmer Wet n Wild Club Havana orange Pure Ice Poker Face L.A. Colors White animal

I'm sure you know by now how much I love my accent nails. So, no matter how unique these nails looked alone, I just had to add an open-mouthed, barbel-whiskered koi like fish face.

I will not be posting tomorrow as I will be spending the day with family. To those who celebrate, Happy Thanksgiving. To those who don't, have a great day anyway. Spend time with family and be thankful for all you have. :)

0 comments:

Mint or Lime?


Sain jokin aika sitten Cesars Shopilta pari Ruby Wing UV-valossa väriä vaihtavaa lakkaa testiin. Tässä lakkauksessa pohjalakkana pirteä mintunvihreä/vaaleansininen creme, Ruby Wing Gypsy, joka muuttuu auringossa kirkkaan limenvihreäksi :) Kaksi kerrosta riitti peittävään tulokseen. Kärkiin lisäsin vähän glitteristä Ruby Wing Tide lakkaa, jonka pohja on sisällä läpikuultavaa ja hiukan vaaleanpunaista, mutta muuttuu peittäväksi tumman viininpunaiseksi auringossa. En tajunnutkaan että tuo muutos näkyisi niin paljon, enkä levittänyt glitteriä kovin tarkasti ja se kostautui sitten auringossa :p (vika kuva)


Leimasin kukkakuvioita valkoisella Konadin erikoislakalla  ja metallisella China Glaze Poetic lakalla Konad m84 kuvalaatasta (myös Cesarssilta). Harmi kun kuvissa nuo valkoisella leimatut kukat eivät oikein erotu. Luonnossa kuviot näkyivät minusta paljon selkeämmin. Mitäs pidätte lakkauksesta ja lakoista? Oletteko jo testanneet näitä väriä vaihtavia lakkoja? Tykkään varsinkin tuosta mintun-/ limenvihreästä Gypsystä ja tulen varmasti käyttämään sitä taas keväällä. Silloin messuilla lakkailin useammallekin asiakkaalle Ruby Wing lakoilla ja kaikki olivat yhtä innoissaan ja ihmeissään värin muuttumisesta UV-lampun alla :)


Parin auringossa olleen minuutin jälkeen lakat muuttivät väriä ja paljastui laiska glitterlakan levitys :D

0 comments:

Sleep Tight

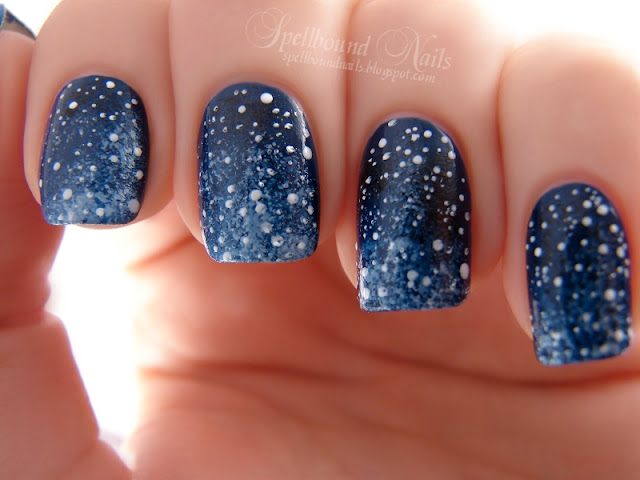
After the disaster of my last night sky nails I thought it was time to try again. What better time to post night sky nails than at night?

nails nailart nail art polish mani manicure Spellbound night sky sleep tight stars gradient China Glaze First Mate Secret Peri-Wink-Le Periwinkle blue white

I used China Glaze First Mate as my base color. I dabbed a very small amount of black around my nail near the cuticle to show some depth. The gradient was created by first mixing First Mate with some white and dabbing down my nail. China Glaze Secret Peri-Wink-Le was mixed with a very small amount of white and then a bit more to create the last two 'layers'. I used white polish and a sewing needle to dot the stars on, using more or less white to create larger or smaller stars. Be random. :)

0 comments:

Heels of Dazzle

So many nail polish brands are coming out with some really lovely holiday collections. It leaves me wanting to buy and swatch them all for you. Sadly, I don't have the money to buy them all ... but I did buy a few. Today's post is Heels of Dazzle, which is another from the Venique 2012 Holiday Collection.

nails nailart nail art polish mani manicure Spellbound Venique 2012 Holiday Collection Christmas Heels of Dazzle glitter sequin red fiery black L.A. Colors layered swatch color

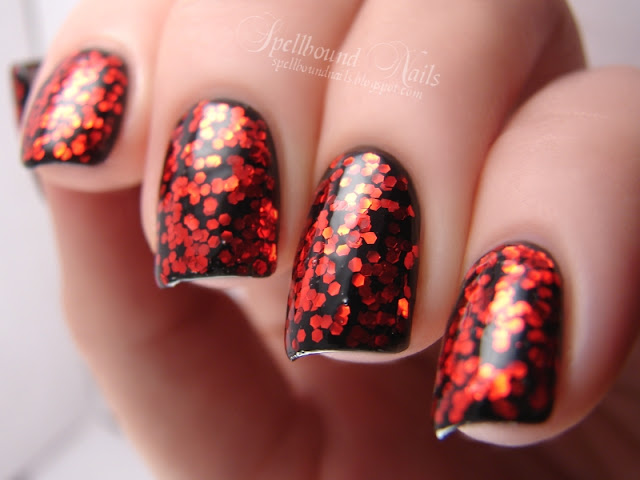
Heels of Dazzle is a shiny red sequin style hex glitter in a thick and clear base. I was drawn to this glitter because it is just so different from the other holiday glitters this year since a lot of brands went with ultra-fine glitters.

Shown above is one coat of Heels of Dazzle layered over L.A. Colors Black. At first, I was just using the black base to really pull attention to the red, but I came to really love this decision. As you can see, in some light the red really pops and in others it's a hidden mystery. It's like opening that one present on Christmas that you didn't manage to find hidden around the house (yes, I was one of those kid!) and being completely and totally surprised—but in a good way.

nails nailart nail art polish mani manicure Spellbound Venique 2012 Holiday Collection Christmas Heels of Dazzle glitter sequin red fiery black L.A. Colors layered swatch color

Adding a second layer of glitter gave me another surprise. Adding more glitter on top of the first coat caused it to begin reflecting the light off of each other. This caused fiery glints of color. The flares of fire really aren't this prevalent in all lights. It's more something you'll catch out of the corner of your eye or with a motion of your hand. It will capture your attention but will disappear when you look closer. I was really lucky to capture this with my lightbox and such direct lighting.

nails nailart nail art polish mani manicure Spellbound Venique 2012 Holiday Collection Christmas Heels of Dazzle glitter sequin red fiery black L.A. Colors layered swatch color

I added a top coat to seal the polish and give this mani a perfectly smooth finish. I was pretty darn impressed with how flat this glitter sat on my nail. There was only one problem piece and it was simply a defective bit of glitter that had gotten cut in half leaving it with a rough edge. It was easy to remove and the top coat filled in the gap.

A tip to distributing the glitter without large patches: give your brush a side to side swish as you drag it up your nail. It's not a perfect solution and you'll likely still end up digging for glitter to fill a spot or two but not as much. You can also try the dabbing method with your brush. A dab here and there can really distribute the glitter. :)

0 comments:

Nail art "red and gold"


 Prodotti utilizzati:

Base coat
smalto oro essence n°140
smalto rosso orly monroe's red
top coat

0 comments:

Portachiavi "Picture"


Portachiavi in gel uv
Realizzato a mano...
(Disponibile con qualsiasi foto!)

0 comments:

Portachiavi "One Cent"


Portachiavi in gel uv
Realizzato a mano...

0 comments: