Showing posts with label christmas. Show all posts

Christmas Haul: A Few Naily Treats!


Hi guys and gals :) I hope you all had a lovely Christmas, ate plenty, drank plenty, and got lots of presents of course! I've had a really busy few weeks what with Christmas, visiting friends and family and then organising our impending relocation for my new job, so I haven't had a minute to spare for nail art. I'm going to have to play catch-up this week; my nails are feeling extremely neglected and my polish collection is screaming to be used! Speaking of which, here are the additions I received for Christmas... I was well and truly spoilt this year, and along with the nail treats from my friends and family, I got a lovely Secret Santa gift from one of the nail girls on Twitter (I'm still trying to track her down - I really am a useless detective). This post is going to be pretty picture heavy, so prepare yourselves! 


My boyfriend treated me to the Fearne 'Perfectly Polished' collection. I really loved last year's collection so I was very excited to receive this instalment! The shades on the top row are 'Minty Maggie', 'Gold Lining' and 'Attention Seeker', and the bottom ones are 'Rudi Red', 'Vintage Cream' and 'Lola Lavender'. I really like the little box they come in, as I'm a sucker for pretty packaging! I haven't tried any of the polishes yet, but if they're anything like 2012's collection, I know I'll be impressed.


I had asked for Rimmel's 'Space Dust' polishes, but unfortunately every single Boots in Manchester had sold out. I still got 'Shooting Stars' though, which is a gorgeous silver polish jam-packed with glitz and glam. Along with that, I got 'Disco Ball' and 'Diamond Dust', which are both super duper sparkly!


I also received a set of Carolyn. K nail paints, which I've never tried before (I've not even heard of the brand?!), but they say they're 100% British which is always good, as well as being 'glossy, chip resistant, [and] quick dry', and infused with vitamins to make nails healthier. The colours have really strange names - 'Lilit', 'Huby' and 'Babette' - all of which totally confuse me. They're very rich, deep shades from looking at the bottles, so I'm hoping they're just as good on my nails!


My boyfriend then decided to be HILARIOUS and got me a Carolyn. K 'Polish Pod', since apparently I'm clumsy and spill nail polish all over the place... Me? Never! It's a spill-proof nail polish holder, and the bottle just sits comfortably inside, and can be rocked around to different positions without toppling over. I reckon this item was more of a present to my boyfriend and his coffee table than me, but it's still pretty snazzy!


I reckon my brother and sister paid all of Barry M's employees' wages this year, as they presented me with a rather large bag of polishes. It included 'Strawberry Ice-Cream','Chameleon Lilac', 'Passion Fruit' and 'Sour Apple', along with two glitters, 'Silver' and 'Rose Quartz', and a gold crackle polish. They also got me a dark blue magnetic polish, and a pink nail art pen. Well done siblings!


My Secret Santa spoiled me rotten with lots of lovely things, including some TarasTalons cuticle oil and hand mask, some 'Ginger Sparkle' hand cream, a wheel of different coloured and shaped gems, and some multi-coloured 'Sea Shell Nail Powder'. I also got Models Own 'Sardonyx' and Sally Hansen 'Kiwi Bikini', which are very festive colours :) Oooh and some chocolates, but they're long gone I'm afraid.


Finally, I got The Color Institute's 'Urban Nail Set', which includes lots of polishes and tools, along with some more hand and nail cream, a dotting set, and some nail scissors. Phewwww... I didn't realise I got all of this stuff! I think it's time to get some more nail storage...


Did you guys get any naily treats for Christmas? Let me know! You can tweet me @amykilv, drop by my Facebook page, or track me down on Instagram (@littletipoff), I'd love to hear from you!


Merry Christmas

Hello lovelies!! I'm a little late posting today, but right after finishing these this morning I had to immediately leave. How immediate? Immediate like I was terrified I was going to smudge them while getting dressed - thank goodness for my trusty Seche Vite top coat! The chance of smudging made me snap a few quick pics and then I was out the door. I just now settled down to watch some Christmas Doctor Who (goodbye, Doctor #11 ♥♥) and realized I never got around to taking the pics off my camera. So, here's my Christmas mani ... late but at least it's still Christmas. :)


I wanted a mani that I could wear after Christmas. Once Christmas is over I want Christmas over so I went simple - more winter than truly Christmas. I started with 3 coats of CQ Pearls and then topped it with 2 coats of Firefly from Hell.


If you'll remember Firefly from Hell was the glow-in-the-dark glitter topper from my Halloween collection. There are still a few of these glow polishes left if anyone wants one; you can get them on sale for $6 in my Storenvy shop. :) I adore how the stamped snowflakes still show up in the dark!!


I think I'm getting better at this whole stamping thing!! These snowflakes were done in mere moments (with China Glaze Blue Bells Ring) as I was in such a hurry and they're almost all there - only a few smudges and missing lines. And, as you can see, I also added a pearl to the center of the large snowflake on my ring fingernails. I think it added a slightly elegant, dressy touch.

So, how was your holiday? Do anything special? Wear anything special on your nails? How about gifts?? Did you get everything you asked Santa for? :)

Until next time,
-Ashley

Tutorial Tuesday: Christmas Eve Reindeer

Hey everyone! It's christmas eve! (now technically christmas day) I completely forgot to post this last christmas tutorial but I really want to go to sleep and wake up to christmas so it's only going to be a short post, and I haven't numbered the steps but hopefully you can work it out! Merry christmas everyone


The base for these nails is MASH - White, and I used Barry M - Red, Barry M - Red Glitter, Barry M -Mushroom and the black Barry M nail art pen.


Step 1: Paint your nails white 
Step 2: Using the brush from the bottle, paint a half circle in brown at the tip of your nails
Step 3: Paint a smaller half circle on top of the previous one using the same technique
Step 4: Using a dotting tool or brush (or a Barry M white nail art pen) draw the eyes and the base for the nose 
Step 5: Paint over the nose using red nail polish and red glitter over the top
Step 6: Paint black dots in the centre of the white for the eyes using a Barry M black nail art pen or dotting tool
Step 7: Using the nail art pen or dotting tool/brush paint on the antlers
Step 8: Finish off with a topcoat to seal in your design

Have a good christmas everyone!
Alice

P.S. If you haven't already I would super appreciate it if you could vote for my design in the China Glaze holiday competition here

Santa Came To Say - More Christmas Stamping

Yes, this is another attempt at Christmas stamping. I think I'm getting a little better. I'm still working on placement and which colors I can stamp over which polishes but not too horrible if I do say so myself.


This is Eight Tiny Reindeer with an accent nail of Holly Jolly. The main polishes used in this mani are from my Christmas collection and except for Holly Jolly, which was a freebie with select Christmas orders, you can now get them on sale here!!


I couldn't do a Christmas mani, especially one with a polish like Eight Tiny Reindeer and not use the reindeer stamp! And since this was inspired by Rudolph, this mani just wouldn't be complete without a bright red nose on at least one of the reindeer. :)


And since this didn't show up on the full mani shot I had to do a close-up of Holly Jolly. Just look at that sparkle! Holly Jolly is red, green, silver, and gold micro-glitter, and this is just two coats for full coverage! It also works wonderfully as a glitter topper - such a versatile little glitter.

Order 6 full-size Christmas sale polishes, and I will include a mini of Holly Jolly in your order completely free! :) This offer is only valid until the year's end, 12/31/13, so order quick!!

Until next time,
- Ashley

Happy Christmas To All

Hello lovelies! Welcome to another very simple mani idea for Christmas.

I've said it before but OPI The Spy Who Loved Me is perfect for Christmas manis. However, if you don't have this you can use a really any shimmery red or even just a plain creme red. I believe my go-to polish last year was Orly Star Spangled. It's a little bit of a darker red from what I remember, but is just as, if not more, shimmery!


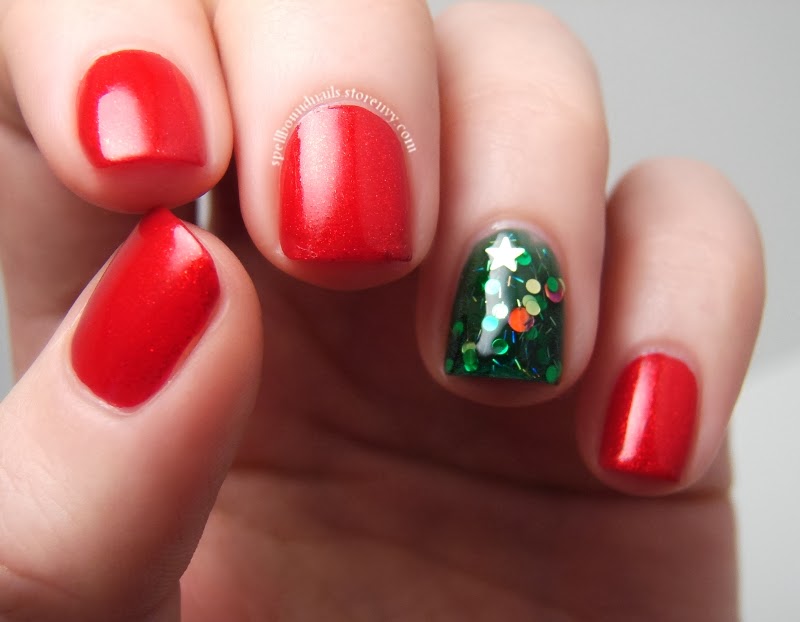
So, super simple! Two coats of OPI The Spy Who Loved Me and three coats of my own polish, Spellbound Nails Happy Christmas To All as an accent nail.


This mani looks so much better in person because you can really see the sparkle and shift of the glitter and this does seem to trick the eye into thinking Happy Christmas To All really does look like a Christmas tree especially with that star at the top of my nail. I admit I started this mani with a different design in mind; a bit of a tape mani to create a tree shape on the accent nail with a carefully placed star glitter, but once the star came out of the bottle (without my permissions lol) and refused to budge it all came together so much better in my opinion!

I plan to have at least another one or two designs before Christmas so keep an eye out for those.

Until next time,
- Ashley

China Glaze Happy Holiglaze Christmas Collection 2013 Swatches and Review - Part 2

Hey everyone! Today I'm back for the second part of my China Glaze Happy Holiglaze review, if you missed the first part you can see it here. I'm sorry it's been almost a week since I posted the first part of this review, but hopefully you've been enjoying all the christmassy nail art I've been posting this week! In this part of my review I'm going to be showing you the glitters from the collection, of which there are 3 fine glitter polishes and 3 glitter toppers. As most of us associate glitter and christmas this is definitely a very christmassy collection! Full review will be after the jump
First up is All Wrapped Up*, which is a purple-blue fine glitter. The pictures do make it look more blue than it actually is. This was 3 coats, and as it dries matte (as you can see below) I added one coat of Seche Vite.


Next up from the fine glitters is This Is Tree-Mendous* which is an awesome christmas tree green, hence the name. This again was 3 coats, and I added 1 coat of topcoat to bring out the shine.


The last of the three fine glitters is Put A Bow On It*, a gorgeous purple. This was 3 coats, although 2 coats might have been enough. I did think with the first coat that this was going to be a difficult polish but it evened out after the second. Again I used one coat of Seche Vite


Now we have the glitter toppers! The first of which is Your Present Required*, a multicoloured glitter. This is one coat over 2 coats of China Glaze - Kinetic Candy, and I did need some placement.


Then we have Be Merry Be Bright*, which is probably my favourite of the whole collection. I layered this over 2 coats of China Glaze - Something Sweet. This is one coat and some slight placement was needed, this is without topcoat


And finally we have Bells Will Be Blinging* which is a combination of gold and blue bar glitter and hex glitter. This was 1 coat over China Glaze - Electric Beat without topcoat and I had no trouble with application.


Overall, I'm really impressed with this whole collection, it's definitely well suited to christmas and I really love the glitters especially. What do you think? Let me know in the comments!
Alice

P.S. If you haven't already I'll love you forever if you vote for me in the China Glaze Holiday Competition here.

Tutorial Thursday: Candy Canes

Hey everyone! I have another christmas tutorial for you today, there's only one more left after today and then it's CHRISTMAS. I can't believe how quickly it's come around this year, I know I probably say that every year but December really has flown by. And I should definitely have got further with my essay, whoops! I really liked the idea behind this tutorial but you might notice that I made a bit of a mistake and finished the design on one finger, and my perfectionist nature really can't stand the images. Hopefully you can all still follow the tutorial without too much confusion!


The base for these nails was Barry M - Bright Red, and the white is MASH - White, all topped off with a coat of Seche Vite


Step 1: Paint your nails with both red and white polish
Step 2: Place striping tape or tape cut in to pieces diagonally on your nail, spread them out differently to create different width stripes
Step 3: Paint over the tape with red polish
Step 4: Remove the tape
Step 5: Using a small brush or Barry M White Nail Art Pen paint on the candy canes on the other nails
Step 6: Finish off with a topcoat to seal in your design

What do you think? Let me know in the comments!
Alice

Candy Canes and Holly Berries - Holiday Christmas Nail Art

Hello lovelies! Can you believe it's already less than a week until Christmas?? I feel like it was just last week that it was months and months from Christmas. Still, the Christmas spirit seems to have hit me hard ... well, hit me with nail art ideas because my house still isn't decorated and I have done less than no Christmas shopping.

And speaking of nail art ideas ... I think I'm a little obsessed with candy cane stripes. I seriously just want to keep these on until after Christmas; I love them so much!


These are actually really simple to do but there's a lot of waiting involved because the stripes are done with tape and the white polish has to be completely dry before you can start. If you don't wait for it to dry it will dent if you're lucky or ruin all your work at worst.


I think I'm also developing an obsession with OPI The Spy Who Loved Me. It is such a lovely shade of shimmery red and has such wonderful coverage. It also makes perfect candy cane stripes ... and holly berries!

Well, I think that's just about it. I hope you enjoyed yet another of my Christmas manis. :)

Until next time,
- Ashley

*A huge congratulations to Ariel of Lacquer: The Best Medicine for winning my Season of Giving Giveaway!! Her prize is already in the mail. :)

Looking for more holiday manis? Take a look at these!!

Tutorial Tuesday: Christmas Lights

Hey everyone! Just a quick tutorial tuesday today for these cute christmas light nails. I'm so excited that it's nearly christmas, and I've somehow managed to actually get all the presents I need to get. None of which I had got this time last year, so it's definitely an improvement! Tutorial steps will be after the jump

I used a base of MASH - White, then I used the Barry M - Black Nail Art Pen for the wire, then I used Barry M - Bright Red, OPI - The It Colour, and OPI - Green-wich Village for the lights, and white acrylic paint for the reflections. All topped off with a coat of Seche Vite


Step 1: Paint your nails with a base colour of white
Step 2: Using a Barry M - Black Nail Art Pen paint on lines for the wire
Step 3: Using a small brush and Barry M - Bright Red paint on the lights spaced out across the wire
Step 4: Do the same as above with green
Step 5: Do the same as above with yellow
Step 6: using white acrylic paint or nail polish and a small brush, paint on the reflections of the lights. Then finish off with a topcoat to seal in your design!

What do you think? Let me know in the comments!
Alice

P.S. If you haven't already, I'd be so grateful if you would vote for me in China Glaze's holiday nail art competition here

Christmas Birds

Hey everyone! First of all, congratulations to the winners of my giveaway, April and Samara, thankyou all so much for entering. Anyway, I finallllly got around to doing some detailed nail art, which feels like the first time in forever, and I'm so proud of how they turned out. I decided that I didn't really want to do a typical christmas design this year so I was searching around for a pattern and I came across this.  I know the design doesn't exactly match but I just adapted it to match my style more. 

I decided to enter these in to China Glaze's Holiday nail art competition and I'd be thrilled if you would vote for me, this is my voting link if you do. Thankyou in advance! 


I started off with a base colour of OPI - My Boyfriend Scales Walls, and then I used white acrylic paint to paint on snowflakes, which unfortunately don't show up very much in the photos. Then I used Barry M - Mushroom for the birds, and OPI - Green-Wich Village for the leaves. The pinks are a combination of polishes mixed together and the red is Barry M - Bright Red. All topped off with a coat of Seche Vite.


What do you think? Let me know in the comments!
Also, just because I feel like I should say this at the end as well, please don't forget to vote for these nails as my entry to the China Glaze Holiday nail art competition. You can find my entry here. Thankyou :D
Alice

Painting Other People's Nails

Hey everyone! It's almost a year since I did one of these posts and as I'm doing nails at Pastille nail bar in Leeds tomorrow (14th December) I thought it would be a good time to post all the nails I've been doing on other people. These are only over the past couple of months because I'm not very good at documenting it but hopefully you still get an idea! Don't forget you can come in tomorrow for walk-in appointments and I'll be there from 10-4 if you'd like any of my designs, or if you'd like christmas nails! I'll put the rest of the nails after the jump otherwise it'll be a bit long.

Above: Hebi's matte drip nails.
Below: Hebi's geometric nails


Above: Heidi's red and gold Christmas nails
Below: Lauren's christmas trees and christmas puddings


Above: Louise's glitter fade nails
Below: Natalie's dog nails (which you can see the tutorial for here)


Above: Nicole's floral heart nails
Below: Nicole's pink polka dot roses. (Can you guess what her favourite colour is?)


Below: Heidi's glitter triangle nails


What do you think? Which design of mine would you like me to do on you? Let me know in the comments!
Alice