Showing posts with label NYC. Show all posts

A Month in Mani's

A Look back at all my manicure looks for December 2013.


It's time for my last A Month in Mani's for 2013! I really like doing this recap -I hope you do too!- , so I think this is a series that I plan on keeping for 2014. Like always I will have links below each look, which will take you to it's corresponding post. I also will have manicures that I shared on Instagram. 
I actually did a lot more manicures than I thought in December! I was pleasantly surprised. Hopefully I can do even more this month.

Hard Candy Sweet Tooth
My first manicure for December was this review of Hard Candy Sweet Tooth. This was the first time I had ever tried Hard Candy polish. I was not too thrilled by the formula, but I was pleased with the final look. I just love the multicolored round glitters. I used four coats of Sweet Tooth over a coat of white polish, then finished the look with a coat of my Revlon Quick Dry top coat.

O.P.I I Theodora You
This soft, pale pink polish is from the O.P.I Oz the Great and Powerful Collection. It was very thin, so I used five thick coats over a coat of white polish. Then finished it off with my Revlon Quick Dry top coat. While I hated the formula, I really like the look of this shade.

O.P.I Don't Burst My Bubble.
This nude/taupe polish is also from the Oz the Great and Powerful Collection, and a total pain to apply. I applied five thick coats over a coat of white polish. Then one coat of my Revlon top coat. This shade was a thin, streaky mess, and very disappointing. Though the name is adorable...

I'd love to stay, but I really mustache...
My first design of December was this super cute mustache design using Milani A Rose My Lady as my base, NYC Black Lace Creme for most of my mustaches, and Zoya Tomoko for my ring finger's mustache. For the mustaches I used a stencil set by Revlon that I stumbled upon at a local store -And bought for $1!-.

O.P.I Glints of Glinda
This nude/light tan shade is the third polish in the Oz the Great and Powerful Collection. As with the other two polishes in this collection, it is very thin, so I used five thick coats over a base of white polish, then my Revlon top coat.

O.P.I What Wizardry is This?
This green, holo-glitter shade is the final polish from the Oz the Great and Powerful Collection, and my favorite. It had much better coverage than the other three shades, so I only had to use four coats over a base of white polish. And again, my Revlon top coat.

Let it snow...
My final design of 2013 was this wintery snowflake theme using Sally Hansen Grey by Grey as my base color. Sinful Colors Snow Me White, and Milani Art of Silver for the snowflakes, stripes, and dots. And Sally Hansen Triple Shine Sparks Fly for the glittery accent nails. I finished the design off with a coat of my Essie Matte About You top coat on the stripes and snowflakes, and my Revlon top coat on the glitter polish.

From Instagram
I made this manicure using four coats of Maybelline Clearly Spotted over NYC Black Lace Creme, then two coats of Essie Matte About You top coat.
From Instagram:
Instagram


From Instagram
I applied two coats of Wet n Wild I Won't Repel You and Drawn Together by Force, followed by my Revlon Quick Dry top coat.
From Instagram:
Instagram


Thanks for reading! To check out November's manicure round up click here
I think my favorite look from December is a toss up between my manicure using Clearly Spotted from Instagram, and my Mustache nail art. I can't decide!
-xo Brittany

Which one was your favorite? What was your favorite manicure that you did in 2013? Let me know in the comments!

Follow on Bloglovin


I Mustache You a Question...

Hello! Today I will be sharing my first nail design for December!
I've been doing a lot of Swatch & Reviews lately, which is fun, but I have missed doing designs. So when I had some free time last week I knew I had to do one. Especially because work is going to be crazy now that Christmas is right around the corner, and I don't know if I'll have time for designs in the coming weeks.

I mustache you a question... But I'm shaving it for later.
OK, no more mustache puns, I swear! But yes, while this isn't Movember, I couldn't resist creating some mustache nail art after I discovered these adorable stencils at a local store for only $1! I also bought some spider ones which I was going to use for Halloween, but didn't have time. I might create some nail art with them anyway, and just make it into something Gothic. I used to be goth during my awkward teen years, so maybe I could create some chic, spider, Gothic nail art... Maybe.

Anyway, for this mustache nail design, I decided to make facial hair a bit girly...HA! By using my dusty rose colored Milani A Rose My Lady as my base color. Then I used NYC Black Lace Creme for most of my mustaches. Of course I wanted a little sparkle, so I used my new obsession, Zoya Tomoko (Click here for swatches.) , to create a glitter 'stache on my ring fingers. I finished the design off with a coat of my Revlon Quick Dry top coat.
The awesome thing about the stencils is that they are self adhesive, so they won't slip on the nails, and they are also reusable! So I can have cute mustache nails anytime I want.


I really love this design, and actually got a few compliments on it.
It makes me think of my favorite fictional detective, Hercule Poirot. I just need a murder case, and some hot chocolate... Maybe just the hot chocolate will suffice.

Thanks for reading! I'd love to stay but I really Mustache...OK, now no more mustache puns...
To check out my previous nail designs click here.
- Happy Holidays, Brittany

Follow on Bloglovin

You're a Wizard, Harry

Yes, I was inspired by the holy grail for book nerds like me, Harry Potter!
I have wanted to do a Harry Potter themed design for quite some time, so I figured I would finally give it a go. I have been an avid fan since I started reading the novels when I was a preteen, and I have re-read them multiple times. I've also seen all the movies - Though, I prefer the books.- , and I own all the corresponding video games. Told you I was a fan!
I just love the story, and the characters. My favorite character would have to be either Sirius Black, or Remus Lupin. Though, my favorite animal character has to be Hedwig. I was so mad when Hedwig died! Spoiler! :p


For my design I went with a skittle manicure, which is a different corresponding design on each nail.
(Click here to see my last skittle manicure.)
I decided to theme my design after the four houses of Hogwarts; Slytherin, Ravenclaw, Gryffindor, and Hufflepuff. And yes, I know I have five fingers and only four designs. So I honored my favorite feathered character, Hedwig.

For the houses, I looked up the Hogwarts crest and based my patterns accordingly, and obviously I used each houses signature colors.

For all of my nails, I used a base of white polish to help coverage.
To represent Slytherin on my thumbs, I used four coats -It's very thin.- of Sinful Colors Out of This World, then I applied some striping tape down the middle of my nail, painted two coats of Revlon Spanish Moss, then quickly removed the tape.
For Ravenclaw, I applied two coats of NYC Sidewalkers on my index fingers. Then I applied striping tape to create the wide band. After I applied two coats of Pure Ice French Kiss, I quickly removed the tape.
For the popular Gryffindor house, I applied three coats of Sally Hansen Gilty Pleasure on my middle finger nails, then marked off a square at the top of my nail using striping tape. I used a detailing nail art brush and painted in the square using Sinful Colors Ruby Ruby, and, again, quickly removed the tape. For the bottom square, I used the same brush and free-handed it.
I created Hedwig using NYC Black Lace Creme, and NYC French White Tip. I learned to create the owl a few years back from an awesome tutorial by Cutepolish. I think the tutorial is still on Youtube if you want to check it out. I would recommend it, and all of her videos. She makes the most amazing, adorable, designs.
Hufflepuff was the most time consuming design. To create it I applied a base of Butter London Cheeky Chops - It's almost gone!-, then applied striping tape diagonally across my nail, applied two coats of NYC Black Lace Creme, then removed the tape.
To finish off all the designs, I applied a coat of Relvon Quick Dry top coat.


Close up of Hedwig.
Close up of Slytherin House colors. Sorry about my nail, it had a bad break. :(
This design was so fun to make, and reminded me just how much I love the Harry Potter story. It may be time to break out the novels again...

Thank you for reading! I hope you enjoyed this design as much as I did. To check out my previous designs click here.
- xo Brittany

Who is your favorite character? Which house would you want the sorting hat to pick for you? Let me know in the comments! While Gryffindor is an obvious choice, I think I would pick Ravenclaw.

Follow on Bloglovin

Rio Original Nail Art Pens Review

Hey everyone! How are you all? I'm so excited to have a week off uni! Although, I have 2 essays to write, so maybe it's not so much a week off, but at least I get to see my family and friends for a bit. Anyway, today I have a review of the Original Rio Professional Nail Art Kit. The kit includes 8 colours: white, red, yellow, blue, black, dark green, silver and a metallic pink. It also comes with a bag of rhinestones, a pot of gold glitter, a full bodied brush, an instruction book, and a step-by-step DVD. As you can see the box is full to the brim with stuff, so you're definitely getting a lot for your money. I decided to just review the pens, but perhaps one day I'll use the rest too! I decided it would be better to review each pen separately and then I'll give my overall views at the end.


Black pen: Good consistency, opaque and comes out easily
Yellow pen: Much better consistency than I was expecting, nearly as opaque as the black and not too blobby when coming out
White pen: Opaque but a bit too free-flowing, meaning it blobs a bit. Although, this may just be my bottle, and if not, putting it in the fridge often helps
Green pen: Opaque, great consistency, easy application (as in, it doesn't come out quickly) same as the black
Pink: Much too free-flowing and as a result it was difficult to control. Also, not very opaque as it's a shimmer polish, this was probably my least favourite of the bunch
Red: Opaque, although less creme that the others, but free flowing like the white
Silver: Not as opaque as I was hoping for, free-flowing but manageable
Blue pen: Exactly the same as the green and black

The base for these nails was 2 coats of the gorgeous NYC - Raindrop (which seems to now be called Blue Sky), and Nicole by OPI - Spring Break, with a coat of Barry M - Crystal Glaze topcoat on the latter. The design is all topped off with a coat of Seche Vite


What do you think? Let me know in the comments!
If you're interested in buying this set you can find it on their website here although the pink seems to have become purple. You can also find them on Facebook here 
Alice

The Wizard of Oz

I have another TV/Cinema inspired design today! I'm addicted now! I have even more planned, so I hope you like them.

For this design, I was inspired by the classic 1939 film The Wizard of Oz. I actually never liked the movie when I was a kid, and hated when my mother would try to get me to watch it. But now that I'm older, wiser, and not a bratty teen, I truly love this movie. I've watched it quite a few times, and still have not tired of it. My favorite character would have to be the cowardly lion, the costume is just too cute. And yes, being the nerd that I am, I also own the book The Wonderful Wizard of Oz by L. Frank Baum.
I think another reason why I love The Wizard of Oz now is the Syfy miniseries Tin Man with Zooey Dechanel - I think that's how you spell her name. -. I LOVED that series, and currently own it on DVD. Obviously, since it is based on the classic movie, it inspired me to watch the original again.
And, side note, can I just say, the clothes the evil sister wears in Tin Man were Amazing! I wanted to be an evil queen just to wear them! Just, you know, minus being possessed by an ugly, creepy, witch... Spoilers!


I decided to do a Skittle manicure, - A different design on each nail.- so I could showcase different memorable parts from the movie.
I picked the places and characters that really resonated with me, and what I pictured instantly when I thought of The Wizard of Oz.


For my thumb, I used two coats of Sinful Colors Out of This World over a base coat of white polish to represent Tin Man. 
To represent the iconic ruby slippers, I painted a coat of Milani Rapid Cherry as my base, then two coats of Milani Red sparkle.
For my favorite character, The Cowardly Lion, I used a base coat of Sally Hansen Lightening, then four coats of Sally Hansen Fuzzy Coat Peach Fuzz to get the full furry effect. Like the Lion's fluffy mane.
Of course, when I think of The Wizard of Oz, I think of the yellow brick road. So I applied three coats of Sally Hansen Lightening for full opacity, than I used a fine detail nail art brush and painted on a brick pattern using NYC Black Lace Creme. 
And finally, to represent the beautiful Emerald City, I applied a coat of Avon Sea Breeze as my base, then four coats of Wet n Wild Emerald the Crown Jewel for a bold, glittery look.
I finished the whole manicure with a coat of Revlon Quick Dry Top Coat.


In Sunlight.
This design was super fun to do. I am really starting to like skittle manicures! Especially inspired ones, so don't be surprised if I get stuck on them for a bit... Like in the next few weeks...
I wish I applied a base coat of white underneath all the polishes to make them more vibrant, and to also save me from all the countless coats I had to apply. But I was being lazy, and it backfired.

Thanks for reading! To check out all my past designs click here.
- Brittany

Do you love The Wizard of Oz? Who is your favorite character? Am I the only one who loved the series Tin Man? Let me know in the comments!

Follow on Bloglovin

Mint and Black & White Stripes

Yes, I finally have a new nail design up, and yes, I am still obsessed with my nail art striping tape. Though unlike my previous design using it (here), I wasn't up to the task of striping every nail.

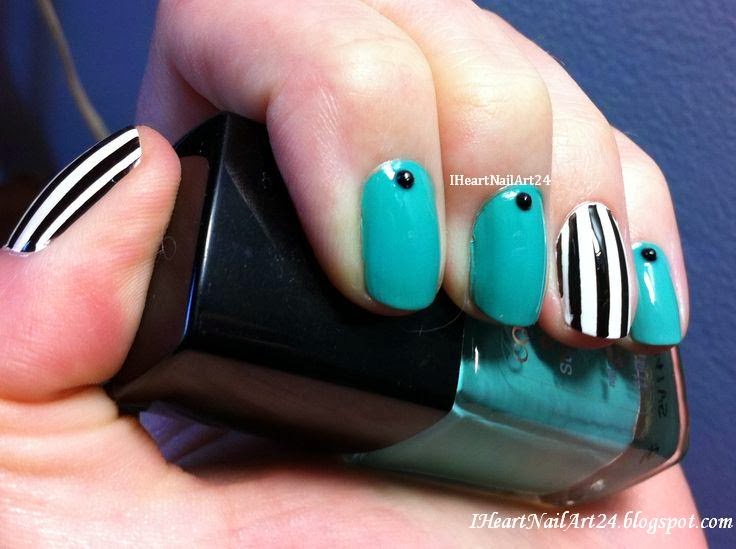
For this weeks design, I was, weirdly enough, inspired by a vintage table I saw - And wanted so badly!-. Inspiration comes in weird places I guess. Anyway, the table had mint legs, with a thick striped black and white table top. It was beautiful. So, since I couldn't have the actual table, I thought the next best thing was to make a design based on it!


For my design I used two coats of CoverGirl Mint Mojito as the base on most of my nails. Then I painted two coats of NYC French White Tip on my accent nails, a coat of my top coat, then let it dry completely. Afterwards, I used my striping tape and created the thicker stripes by placing two tape pieces side by side, painted two coats of NYC Black Lace Creme, then quickly removed the tape. For the look I was going for - And my sanity.-, I only placed stripes on my ring fingers and thumbs.

Maybe I read way too much Nailasaurus - I love her blog, I read it daily.-, but I still thought the design was missing something, and wasn't as cohesive as I wanted. So I dug out my nail gems, and applied black gems on the half moons of my mint nails -Nailasaurus style.- using tweezers and dipping the gems in clear nail polish beforehand. I think it really ties everything together.

After everything was finished drying, I applied a coat of Sally Hansen Double Duty base & top coat in one. Normally I won't apply a top coat on top of gems, since it can cause bubbles, but now that I'm working, I wanted to protect them from damage. Once the top coat was dry, I used acetone based polish remover, Q-tips, and an angled nail art brush to clean up my edges and cuticles.


Thanks for reading! To check out all of my nail art looks, click here.
Brittany

What do you think of this design? What surprising things have inspired your nail designs lately?
Let me know in the comments!

Follow on Bloglovin

Then and Now: Week 9

Hey everyone, today I have week 9 of my 'then and now' challenge. When I first set out to do this 'challenge' I randomly numbered the 22 posts I have so that I could do them in that order, but once I got to week 5 and didn't really like the design I started mixing things up a bit, so today's choice was because I felt I'd used too many reds and blues lately: bees! More after the jump


As you can see I completely changed the original design, only really keeping the concept of bees because I didn't really think the original design was that great. Originally everything would have been done with dotting tools and nail varnish but this time I used a brush and acrylic paint for the little bee and tape and black nail varnish for the stripes.

The base on all but my ring finger is NYC - Lexington Yellow, the black is Barry M- Black and the white base is Essie - Blanc (which I picked up in a set of 4 for £5!!)


What do you think? Was the original design any good and should I have stuck with it? Or do you like the cute little bee? Let me know in the comments!
Alice