Showing posts with label Glitter. Show all posts

Vintage Valentine Nail Art

Woohoo, more V-Day nail art! Today's mani is by far one of my all time favorites. I just love vintage-y nail art for Valentine's Day... anytime really. This mani is just so simple but still so elegant. :)


This mani was done with polishes from my Valentine's Day collection (Victorian Romance) and a little help from Born Pretty Store rose decals. I started with a base of My Own Sweet Valentine with an accent nail of Parchment & Lace. Once MOSV was dry I sponged on some Cheeks Tinted Red and a little more MOSV to really blend it together. The shimmer on this gradient was insane! I used top coat on Parchment and Lace and then used a Born Pretty Store water decal. (These decals are only $0.88 right now! Plus if you use the code BPS2014 you'll get 15% off sitewide! I say these are more than worth every penny!!!)


The decal was so easy to use. Just cut it out, dunk it into water (warm water if it's winter) for 10-15 seconds and the decal will slip right off the paper and be easy to position on your nail. I lightly wet the nail and placed the rose. I used a paper towel to blot the excess water and then gently used a finger to press the decal down, getting rid of wrinkles and bubbles until the decal dried completely. Then I topped it with more top coat and it was perfect!!


I couldn't resist trying the glitter of Love & Devotion over the gradient. It's nice, but I found I preferred the simplicity of the gradient alone.

What's your go-to nail art for Valentine's Day?

Tutorial Tuesday: Glitter Aztec Nail Art

Hey everyone! Today I have another tutorial tuesday that you'll have to head over to Divine Caroline for. After posting the nails I did at Pastille nail bar (which you can see here) I was a few times to do a tutorial for them, so here you go! Don't forget to check out the full tutorial here


What do you think? Let me know in the comments
Alice

Tutorial Tuesday: Tortoise Shell Nails by xameliax

Hey everyone! Today's tutorial tuesday is going to be slightly different because rather than a tutorial from me, I have an amazing guest post in the form of a video tutorial from my lovely friend Amelia, who runs xameliax. After mentioning to her that I was struggling due to exams she kindly said she would do a guest post for me, and the nails she has done are absolutely gorgeous! I can't wait to see your recreations. So without further ado I'll pass you on to Amelia...

Hi Everyone! I'm Amelia the beauty and lifestyle blogger behind xameliax.com and I, like Alice and probably most of you reading this have a little obsession with nail polish! So when Alice asked if I'd like to guest post for her while she was beavering away revising for her exams (go you super clever girl) I took it as the perfect opportunity to do one of my favourite nail looks - Tortoise Shell!


This effect is so easy to re-create as you can see in my Youtube Tutorial! They took me less than an hour to do and i think they look amazing. With just three polishes and some cling film you can create this beautiful tortoise shell effect and with a few studs ontop it comes together to make this simple but stunning manicure!

::Polishes Used::
Duri Rejuvacote (Base Coat)
Barry M - Countess (Pointed Finger)
Born Pretty Store Small Square Studs
Seche Vite (Top Coat)


Why not give them a go yourself! Tweet us a picture of your tortoise shell nails @xameliax @onenailtorule and we'll retweet some of the best ones!

Happy Painting!

xax

Sable Collar & Infinity


Hologlitterkärjet! Yksinkertainen peruslakkaus, mutta oikeilla yhdistelmillä niin toimiva. :D Tässä nopeasti toteutetussa lakkauksessa on siis pohjalla kaksi kerrosta shimmeristä tummaa luumunruskeaa essie sable collar -lakkaa, jonka päälle lakkasin vähän liukuvasti Viva la Divan Infinity glitterlakkaa. Sable collar levittyi nätisti kynsille eikä suurempia jälkipuhdistusoperaatioitakaan tarvittu, kahden nopeasti kuivuneen lakkakerroksen jälkeen. ♥ Lumoava Infinity taas on siis glittertopperi, joka sisältää hologrammisesti eli monivärisesti kimaltavia kultaisia ja vaaleanpunaisia kuusikulmioglittereitä ja samansävyisiä pienempiä hippusia. Kunnon party, party -lakka siis! :D

Mitäs tykkäätte? Onko tälläiset glitterit jo nähty vai iskeekö vielä? :p En lörpöttele tällä kertaa enempää, vaan jätän postauksen kuvapainotteiseksi. :) 


*Kynsilakat saatu blogin kautta.

Nails Inc. Polishes Review

Hey everyone! Apologies that it's been a few days since I've posted, I've been revising constantly, and yesterday (Friday) I passed my driving test (yay!) so I went out for a meal in the evening to celebrate and never got around to posting. I probably wouldn't have actually managed to get this up today if it hadn't been for my boyfriend, who very kindly edited all these pictures for me because I didn't have time. He's been offering to edit for a while now and I've struggled to let go of the reigns, but he didn't an awesome job so I think he's going to find himself bombarded with pictures now!

Exams aren't very far away now, so only one week and 2 days and my schedule should return to usual. I'm really sorry it's not been great for the past few weeks but hopefully you understand. I have a couple of posts in the 'vault' so to speak and I'll have a guest post from the lovely Amelia this week for you too which will be great I'm sure!

So today's post is a bit of a mix and match review with a few polishes from Nails inc. They're all from a variety of collections, but they work surprisingly well together. I love Nails inc. polishes and I'm really glad I got these to review because they're all amazing quality as usual, as you will see below! Full review will be after the jump


First up is St. Martins Lane*, which is a gorgeous burgundy colour. I absolutely love burgundy polishes and this certainly doesn't disappoint, this was 2 coats without topcoat.


Next is Hampstead Court* from the Fibre Optic collection. I'm not really a fan of bar glitter, but this is actually a really manageable polish and it looks really great. This was just one coat over St. Martins Lane*, without topcoat


Chiswick Park* is a lovely purple shade created for QVC for their 20th anniversary. It's part of a duo with Kensington Caviar Topcoat*, shown below. As you can see it dries with an almost matte texture, which (unsurprisingly considering my matte obsession) I love. This was 2 coats without topcoat, although I feel perhaps 3 might have been better to equal it out


This is Chiswick Park* with 1 coat of Kensington Caviar topcoat*. It dried relatively fast and is really shiny, quite a good topcoat in comparison to a lot on the market but I'm slightly off put by the orange colour of the topcoat. Something about coloured topcoats really dishearten me for some reason! 


Next is St. James* which is from the Gel Effect collection. This polish is amazing, this was just one coat without topcoat, and it's completely opaque, super shiny and dried really fast. I don't have a bad word to say about this polish. 


And last but certainly not least is Buckingham Court* from the Galaxy collection, this polish is so cool. It definitely reminds me of a galaxy, and it looks great. This was 1 coat over St. James*, but I needed a slight amount of placement, and no topcoat.


What do you think? Let me know in the comments!
Alice

Spellbound Nails does Valentine's Day with the Victorian Romance Collection (PIC HEAVY)

Hello lovelies! I bring you Valentine's Day polishes!! Being a polish maker means I have to be thinking much further into the future than I ever wanted to ... I sometimes forget what month it is lol.

But right now I know it's January but when speaking in terms of mixing and shipping polish, Valentine's Day is just around the corner. So take a moment and look at the pretties!!

This collection will be available for pre-sales 1/10 - 1/17. This means you'll be able to buy this collection in full and mini bottles (at pre-sale discount prices) starting tomorrow. The full release, meaning the ability to buy singular bottles, will start 1/22. As always, you can buy all Spellbound Nails polishes from my Etsy shop or my Storenvy shop.


I love having some kind of inspiration for my collections; not only do my polishes turn out better but I love being able to point to something and say "look, look, that right there - that inspired me so much that I had to make something awesome!"

Vintage Valentine © Victorian Traditions
This time, that inspiration came from the old timey Victorian Valentine's Day cards and postcards. You know those ones that are all yellowing parchment, lace, and soft and bright watercolors.


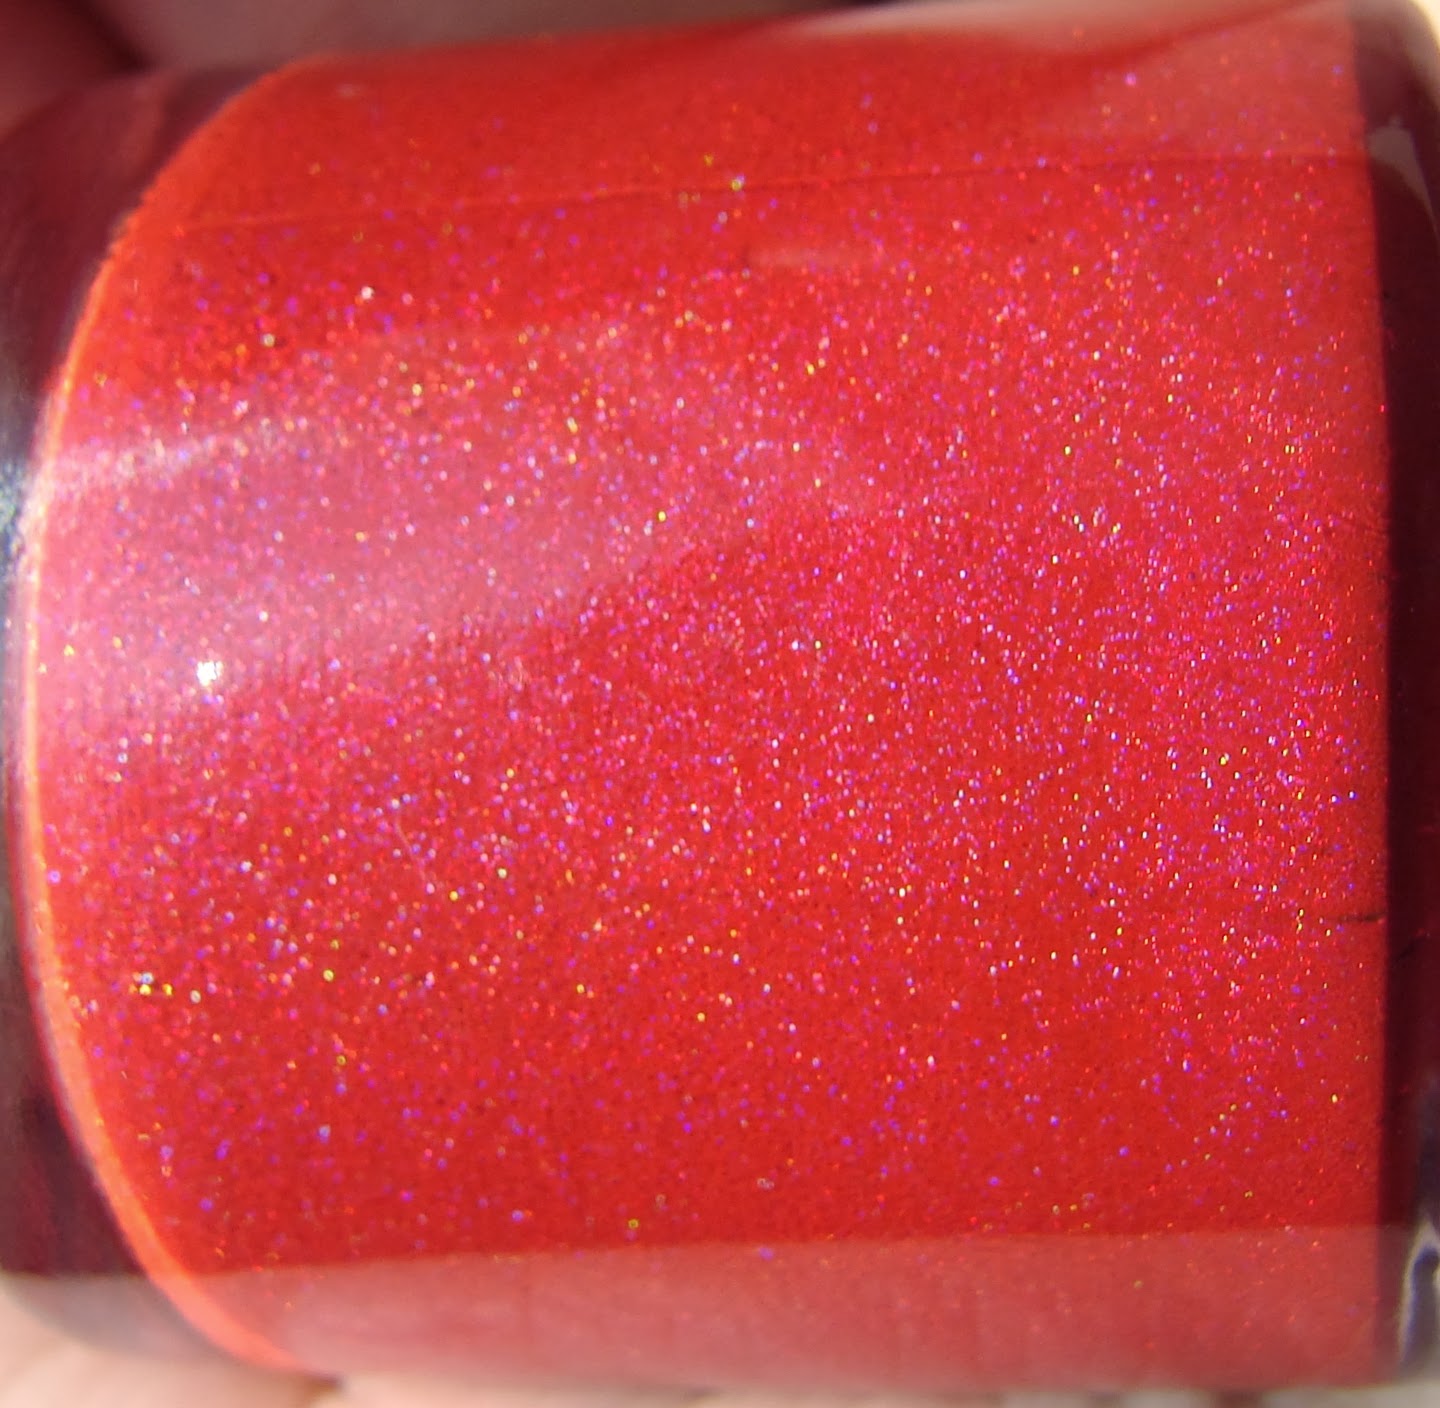
First up is Cheeks Tinted Red. This is a stunning bright red holographic.


 This polish has double the amount of holo that I put in my normal holos however I quickly found red eats holo. It adds a lot of depth and shimmer and has more of a lightly scattered holo effect.


And a close up of the bottle in the little amount of sunlight we're getting around here right now.

*There has been a slight increase in the pricing of my holographics. I have started buying a much better holographic pigment, however this does mean an increase in price for me which I sadly have to pass on to you. Holographic polishes using this new pigment will now sell for $9 in my shops. Prices will change on already released holos (only those using this new pigment) February 1st. This was a very hard decision for me since I pride myself on being affordable, and I believe I have managed to keep to my brand even with the price increase.


Next up is Parchment and Lace. This was the base of this collection - the very first polish mixed up and the one everything else was built around. I think the name of this one says it all. It's everything this collection was inspired by. Yellowing parchment, lace, and beautiful watercolors.

I've been told that this is a very flexible polish and would also work well for Easter and summer too.


This is the only glitter topper of the collection. Love & Devotion is a wonderfully romantic glitter in my opinion with it's white, pink and red glitter with lots of rainbow shimmer.


I'm All Aflutter is a gorgeous baby blue with purple and pastel pink glitter.


And last but not least is My Own Sweet Valentine. This is a girly, pearly pink with a delicate golden shimmer that acts almost duo-chrome-y in person.


Did I mention My Own Sweet Valentine also glows in the dark?? There are three different glow pigments hidden behind this girly pink - blue, green, and peach. Together they combine to glow an icy white with just a hint of blue and green. The blue and green show up a lot better in pictures. In person it really is an icy white with just a hint of blue and green. And with so much glow pigment the glow is pretty insane!


You can see a few hints and specks of the peach glow in this picture along with the blue and green. This is a picture of Love & Devotion over My Own Sweet Valentine.

I hope you enjoy these polishes as much as I do and remember pre-sales start tomorrow! :)

Until next time,
- Ashley

Tutorial Tuesday: Cosmo Swirls

Hey everyone! I've been super busy with revision and essays because I have a load of deadlines/exams coming up and I'm stressing a bit so apologies for not posting tonnes. I promise this isn't a sign of things to come in 2014, I just want to get my exams out of the way and then I'll be back to posting more regularly. I have a couple of nail art posts for you, a couple of reviews, and a couple of tutorials so I'll spread them out over the next 3 weeks until the end of exams just so you're not missing out! 

Anyway, today I have another tutorial tuesday for you. You might remember these nails from when I went to the Cosmo awards, and as they're clearly lucky because I won an award, I thought I'd do a tutorial for them. I actually created this tutorial for Nail It! so I wont be writing the steps down here because I think it's only fair that you head over there to see, (look HERE) but I will post the picture steps just so you have something to look at! 


As with my original post, the base for these nails was 2 coats of Alessandro - Midnight Black*, and 3 coats of Alessandro - Glitter Queen*. I then applied a layer of China Glaze - Fairy Dust to the black. Once that was dry I used a thin brush (this one) and white acrylic paint for the swirls, and finally I added the black studs (which I unfortunately cannot remember the origin of but they're most likely from Born Pretty Store). Finished off with a coat of Seche Vite

  
Don't forget to check out the steps HERE. 

I also wrote a post for Nail It! about photographing your nails with a few other bloggers which you can see here if you're interested.

What do you think? Let me know in the comments!
Alice

Vuoden 2013 suosikkilakkaukset

Vuosi 2014 on lähtenyt jo vauhdilla käyntiin ja arki rullaamaan. Töiden merkeissä on nämä ensimmäiset päivät täällä nimittäin vietetty. Palataan vielä hetkeksi kuitenkin viime vuoden kynsien äärelle. Ajattelin nimittäin nyt jatkaa tätä mahtavaa "vuosikatsaus perinnettäni" tällä postauksella.  :D Tälläiset samanmoiset postaukset olen siis rustannut jo aikaisempina vuosina 2012 ja 2011. Vanhoihin postaukseen pääset vuosilukujen linkeistä. Ideana näissä on minulla ollut kerätä yhteen postaukseen minua itseäni eniten miellyttäneet tekeleeni edelliseltä vuodelta (huh, onpas itsekeskeistä taas :D),  ei välttämättä joka kuukaudelta, mutta kuitenkin edes vähän jotain jokaiselta vuodenajalta. Jossain kuussa on sattunut olemaan enemmän aikaa, innostusta ja onnistumisia kuin toisessa, joten olen keskittynyt niihin kivoimpiin juttuihin. :)


Viime vuonna aloitin uudessa opiskelupaikassa ja opiskelurytmiin ja arkeen pääseminen oli aluksi haastavaa ja, no jos totta puhutaan, vieläkin vähän hakusessa. :D Tuntui että aikaa ei useinkaan ollut ylimääräisiin pikkupipertelyihin ym. ja turvauduinkin usein yksinkertaisiin ja vähillä tarvikkeilla toteuttaviin lakkauksiin tai sitten tuttuihin ja turvallisiin tekniikoihin. Tämä ei välttämättä ole kuitenkaan huono asia, sillä tykkäsin monesti suunnattomasti kuitenkin lopputuloksesta. Kesällä tekstuurilakat rantautuivat tähänkin kotiin Zoyan PixieDustien muodossa, jolloin innostuin myös kunnolla erilaisista teippailuista (eikä nuo innostukset ole kyllä vieläkään ihan laantuneet, köh). :) ...Ensimmäisessä kuvassa komeilee yksinkertainen liila ruffian-lakkaus.


Pääsiäisenä testailin lehdenpalasilla koristelua pirteän värisiin helmenpuolikkaisiin ja vaaleaan taustaan yhdistettynä.


Viime vuonna ei tullut paljon leimalua harrastettua (toivottavasti asia korjaantuisi tänä vuonna), mutta näistä ruusuista aksenttikynnessä pidin kovasti. Muihin kynsiin sipaisin turhamaisesti Deborah Lippmannin Boom Boom Pow kultaglitterlakkaa, joka sisältää aitoa kultapölyä. :p


Sitten alkoi hempeä kevätkausi ja maalasin kynnet täyteen pilviä inspiroituneena kaulakorusta. :)


Lämmön mukaan väriä vaihtavan lakan testailua pinkkihopeassa ruffian ja fishtail-manin yhdistelmässä.


Vappuna halusin testata mahdollisimman monta uuden essien kevätkokoelman lakoista yhdellä kertaa ja päädyin roiskimaan värejä kynsilleni abstraktisti inspiroituneena bloggajaakolleegoiden samantyylisistä lakkauksista. Näistä kynsistä innostuin tekemään myös kuvatutoriaalin. :) Tykkäsin hempeilysotkuista kyllä ihan älyttömästi (kuten varmaan huomaa profiilikuvastakin, heh)!


Opiskelupaikkani ainejärjestön vuosijuhlia varten lakkailin kynnet samansävyisiksi juhlapuvun kanssa. 


Kevät läheni jo loppuaan ja oli tyttöjen kanssa järkätyn kynsiblogimiitin aika! Miittiä varten turvauduin taas sinisen sävyihin, mutta panostin kaiken sählingin keskellä ja maalailin akryylimaleilla jotain lehtien/sulkien välimuotoja koristeiksi. :D


Sitten oli kesä ja PixieDustit. Tarviiko muuta näistä herkullisista sokerilakoista sanoa? :D


Kesällä innostuin myös yhdistelemään pirteitä värejä essien kesäkokoelman innoittamana. Tästä fishtail-manista tein myös kuvatuton.


Niittejä ja mustavalkoglittereitä sinisellä pohjalla. Nimesin kynnet niittitähtitaivaaksi ja kaduin sitä oikeastaan heti, sillä merenhän nämä minulle ensimmäisenä mieleen tuovat.


Teippailua, tekstuuria ja neonlakkaa. Aah, ihanan kesäinen yhdistelmä! Tuleepas tässä haikea olo ja halu päästä johonkin auringon alle. :(


Maalailin minä viime vuonna ensimmäiset one stroke -kukkasetkin! Vihdoinkin! :D Pohjalakkana toimi ihana A Englandin hololakka, Fated  Prince.


Zoyan syyskokoelmat eivät jättäneet tälläkään kertaan ketään kylmiksi (ainakaan minua!) ja teippausinnostukseni myötä yhdistin syksyiseen punaruskeaan pohjaan ihania Zoya Maria Luisa -lakan kultalastuja. Tästäkin lakkauksesta tein kuvatutoriaalin sitä kaipaileville. :)


Lisää teippailua, tekstuuria ja niittejä. :D TradeTrackerin gaalaa varten kynnet piti saada juhlakuntoon ja sopimaan asukokonaisuuteen. :)


Pikkujouluihin sopivasti jouluista tunnelmaa sai helposti punaisella Viva la Divan glitterlakalla rajattuna valkoisilla pyörylöillä. :) Neutraalina pohjana toimi, itseasiassa sama kamelinruskea Zoya Flynn, kuin edellisissä TT-gaalakynsissä.


Joulujoulukynnet eivät olleet tällä kertaa niin onnistunet, mutta näihin yksinkertaisiin sinisiin jäähilekynsiin olin erittäinkin tyytyväinen.


Viimeiseksi vielä nämä uudenvuoden juhlakynnet. Tässäkin käytin teippiä, mutta tällä kertaa teipit saavat jäädä koristamaan kynsiä pelkän rajausapuna käyttämisen sijasta. :p Näissä pidin erityisesti irtohologlitterillä koristellusta aksenttikynnestä ja no tietysti kauniista Sleeping Palace A Englandin hololakasta. :)

Mitkä kynnet olivat erityisesti teidän mieleenne ja löytyivätkö ne tästä listasta? :)
Kiitos kaikille lukijoille edellisestä vuodesta ja siitä että olette edelleen siellä ruudun toisella puolella. En olisi varmasti jatkanut tätä bloggaamista näinkin montaa vuotta ilman teitä!  ♥♥♥