Showing posts with label peach. Show all posts

Something a little different

Hey everyone! I know you're probably expecting the last of my 'Which is Best?' series today, which would have been about matte top coats. I shall be doing it next weekend instead due to some technical difficulties so keep an eye out for that. Today's post is a little different. As you will see, these are not my nails. I have a tonne of posts lined up for you, so don't panic that I'm not doing my nails or anything like that. My lovely friend Natalie wanted to make an appearance on my blog, and help me out with some of my product reviews. You may recognise her nails from my YouTube tutorials, as she is often my guinea pig. It's a bit like a guest post, except I actually did the nails!


To do this design I used Born Pretty Store's Sweet Color nail polish in Shade #105* on the alternate nails. This was 2 easy coats. Unlike the picture on their website shows, this is actually a very opaque creme polish, rather than a translucent one. 


  Once that was dry I applied some Fake Tattoos* (see picture above) to the nail. I've never used nail tattoos before and I'm surprised at how simple they are to apply. All you have to do is cut, peel and apply some wet kitchen roll to your nail to transfer the design and you're done! I used the hearts and the bows from the bottom middle set. 


I then applied Elegant Touch Patterned Colour Wash Wraps* (see picture above) to the remaining nails. This was my first experience using nail wraps and I was expecting to absolutely hate it. I've actually had this wraps for months because I was so wary of using them. Luckily I was proved completely and utterly wrong. These are super easy to apply, super easy to remove creases from, and they last well too. I would 100% recommend these for those of you who want nail art but don't have the time or confidence to do it yourself. You can get them here for just £5!


Finally, once I was done applying the nail wraps, I applied these gorgeous peach studs* (#5) from Born Pretty Store. They've recently just got in a tonne of new coloured studs and I ordered pretty much all of them. They're just so irresistible! And they definitely lived up to expectations. These are not only a brilliant size but also the colour doesn't come out when you apply topcoat as is often the case with coloured studs.  


What do you think? I hope you didn't mind seeing some different nails today!
If you fancy some of the Born Pretty Store products, don't forget to use my code KHL91 for 10% off
Alice

*Some of the products in this post were provided to me for review but the opinions provided are entirely my own and were not influenced in any way.

Butter LONDON Spring 2013 Collection Swatches

Hey everyone! I have some more fabulous Butter LONDON polishes to show you after yesterday's post, this time from the Spring 2013 collection. You probably all by now that I'm a sucker for pastels, so I absolutely love all 6 of these, especially Fiver. 


First up is Fruit Machine* which is a wonderful barbie pink. This was 2 easy coats with no top coat

Butter London - Fruit Machine

Next up is Jasper* which is a creamy lemon yellow. It seems that yellow is very much in this spring/summer because I've seen a lot of yellow polishes in recent collections, all of which have been great and this is no exception. This was 3 coats, but I could easily have got away with 2, I just messed up on the thumb and ring finger and wanted to do an extra coat. I never really used to like yellow polishes but I really really love this one

Butter LONDON - Jasper

Next is Kerfuffle* which is a lovely peach. I've actually not seen any peach colours in recent collections, but it's one of those colours that doesn't really need to be 'in', it just always looks great. I love this colour and I love this polish. This was 2 very easy coats with no top coat.

Butter LONDON - Kerfuffle

Next is Molly-Coddled*, a lovely lilac. This is very similar to Fruit Machine in the bottle and I was a bit skeptical about them including both in the collection, but on the nail they definitely look different. This was 2 coats, but I could actually have very easily got away with 1.

Butter LONDON - Molly Coddled

Next is Cuppa*, a creamy nude. This is not a very unique polish in terms of colour, but it certainly is in terms of quality. This was 2 coats, but I could have pretty easily got away with 1

Butter LONDON - Cuppa

Finally is Fiver* which is my absolutely favourite of the collection. I'm sure you all know my love of mints and light blues and this is no exception. I am totally and utterly in love with this polish. This was 2 coats with no topcoat. 

Butter LONDON - Fiver

Overall I'm in love with this collection, they all have an amazing formula and the colours are all perfect. I would definitely recommend getting at least a few of these if you havent already. You can get them on the Butter LONDON website for £13, and they're certainly worth the price.

What do you think? Do you own/do you want to own any of these polishes? 
Let me know in the comments!
Alice

*products in this post were provided to me for review but my opinions are entirely my own

7 Deadly Sins - Envy

Evening folks! So I've been noticing the 7 Deadly Sins challenge going around at the moment, and was kinda disappointed when I realised that the manicures it dictates aren't technically related to the sins (e.g. 'Greed' requires you to use your most expensive polish, rather than painting a greed-related image). Anyway, I admit that the challenge is a really good idea, however I've decided to start my OWN challenge which is much more specific. I'm going to attempt seven designs over the course of the next couple of weeks, focusing on Envy, Greed, Pride, Gluttony, Wrath, Lust and Sloth.

So obviously my first design is Envy! I decided to create a green-eyed monster to represent the sin, however I didn't really fancy having a monster on my nails so I made her into more of an Ariel/Jessica Rabbit type of girl. Obviously she has big green eyes, and I opted for flaming red hair as the colours complement one another (plus I'm repping the gingers!) I also used some gold sparkles to bling it up a bit... I just can't resist!
I'm gonna be a lazy bones and just say I used A LOT of equipment for this manicure. It would take ages to list everything, but throughout the tutorial I'll let you know of any colours that I think are important :) Since I'm missing out my usual 'The Equipment' list, here's my initial sketch for the design! As you can see, the original nail shapes I drew turned out to be too big, and I had to alter the shapes of the eyes a few times before I was happy. Planning is important for designs like this!
Once I was happy with my design, I painted on the bases. I don't have a good nude tone so I had to make do with pale beige topped with Essie 'Not Just A Pretty Face', and for the green I used Models Own 'Jade Stone' as a base and topped it with W7 'Neon Green' and Missguided 'Misslead'.
Once dry, I used a fine paint brush to paint on white almond shapes for the eyes, and Models Own 'Peach Fuzz' for the beginnings of hair. 
To outline the eyes I switched between my black Models Own nail art pen and a fine paint brush. The eyelashes were the trickiest bit as they're so tiny! I used the same green combination to create the iris, and a little black dot for the pupil. With the hair, I used red and a sparkly orange to add streaks.
This stage was the hardest... I struggle to get my own eye make up matching, imagine trying to paint even eyeliner flicks on 7mm eyes?! I also added eyebrows and some more hair. I really wanted the design to 'flow' through my nails and I think that painting 'wind swept' hair has helped with this.
And here's the final product! I evened up the eyes and added a bit more eyeliner, added some more streaks to the hair, and then thickened up the eyebrows to make her look as envious as possible! I also painted 'envy' onto my thumb nail, which was a lot easier than I thought, especially since I'd practised the font on my initial sketch. I finished off the manicure with a sprinkle of gold glitter, and it looks gorgeous against the lime green base.

What do you think of my green-eyed nails? Are you taking part in the 7 Deadly Sins challenge? 

Peach & Yellow Gradients With Butterflies

I'm feeling rather sorry for myself today as I have yet another ear infection. Most of my friends are out partying the night away, and since the wife is working nights at the moment I have to find some other way to entertain myself! So, as I always do, I scrubbed away the manicure I created earlier and started another design. I've entered these into a competition for Ombre nails, but to be honest I'm still pretty rubbish at the whole gradient thing. I avoided a step-by-step tutorial anyway, as I knew there'd be lots of mistakes, and there's plenty of brilliant gradient tutorials out there!

Anyway, after using my trusty kitchen sponge,  I added some little black butterflies and gems. They're very similar to my Pastel Butterfly Nails, but I actually think they look even better on a gradient background. Plus the colour scheme is nice and summery :) What do you think?

Avoir La Pêche!

Yesterday was one of the luckiest days I've ever had! Firstly, my lovely makeup and nail varnish packages both arrived (within one day of ordering!). Then when I checked my Euro Millions ticket, I found I'd matched two numbers and one star... Meaning I won €8! (Fair enough that's only 5.70 in GBP, but still...) In the afternoon, while scrolling through my Facebook feed, I noticed that e.l.f. cosmetics were holding a competition for Easter/Spring inspired makeup and nails. I submitted my Easter chick nails to their wall, thinking nothing of it until the evening, when I went back to check and realised I had won! The prize is an e.l.f. Easter bundle and I can't wait for it to arrive, fingers crossed for nail varnish :D

After all of this good luck, I decided to try out a really lovely, sparkly manicure to reflect my high spirits. I opted for my new favourite (I have far too many favourites...), Models Own 'Peach Sherbet'. It's such a pretty, creamy shade that even on its own it looks effective, however I always have to add something extra! Before beginning my manicure, I used my lovely new treats from Direct Cosmetics; I applied Sally Hansen cuticle gel and neatened up my edges, filed down with my cute Pinkee's emery board, and finally added a coat of Sally Hansen Dry & Brittle Nail Care.
This took about 2/3 coats. As always with Models Own, the consistency was quite thick and applied really smoothly. It seems quite inconsequential, but the actual shape and size of the brush also ensured neatness (there's nothing worse than uneven bristles that stick out in all directions), which is another reason why I love Models Own. 
Apologies for the colour change... The photos were taken at different times of the day! Once my peachy tips were dry (and I mean REALLY dry) I began to add the nail tape. I got this in a bundle from Amazon agessss ago, and colours include hot pink, cream, silver and royal blue. I chose the gold tape as it's really bright and sparkly, and I knew it would complement the peach base. I carefully added the tape in my chosen patterns - criss-cross for my thumb nail, diagonal lines for my index, horizontal lines for my middle, chevrons for my ring finger, and finally diagonal criss-cross for my little finger. If I ever do this manicure again I'm going to stick to chevrons for every nail, as this is the best pattern in my opinion (it's also the trickiest!)

When you apply the tape, don't worry about bits hanging over the edges. I always leave these until the last minute, even after applying a couple of clear top coats, and then go around with a pair of little nail clippers. The small, curved blades of nail clippers mean you can get really close to the edge of your nails, but a good sharp pair of nail scissors would work just as well.

I'm normally a little bit cynical about using equipment like this because I prefer everything to be hand painted, authentic and original. However when you find a colour that you really love, sometimes it's best to just stick to a simple pattern using nail tape, stamps or stickers. However, I'm currently cooking up a new idea that involves 'Peach Sherbet' and hand painting... Watch this space!

Collection 2000 Hot Looks: review and nail art

Hey everyone! I've still not taken the easy way out and gone home yet, battling through it (though I wish I didn't have to) so again I'm bringing you a post that I did before I came here. The lovely Hannah from Collection PR was so quick in sending me these and I intended to be quick in posting them. I swatched them straight away but the stress of moving got in the way and I've only just got around to editing them. I hope you enjoy my first official review even if it took longer than intended! All pictures were taken in natural inside light. I'll show you swatches first and then at the end I'll show you the nail art I created with these 4 polishes, but I'm warning you now of the extreme overload in pictures you're about to receive!


First up we have 'Shimmy Shake' which is a gold 'shimmery' glitter. When I saw this you can guess what my reaction was because of my impatience with removing glitter, but it was actually incredibly easy to remove and for that in particular I think I will be returning to this product. The picture above is 3 coats with no top coat. 

I decided about halfway through that this was definitely a polish to be used with layering, so I decided to put it over black. The ring finger has 2 coats and the rest all have 1 and I definitely prefer it like this:


Next up is 'Fruit Loop', a lovely peach colour. I own a lot of peach polishes and had expectations for this to be opaque within 2 coats but I found myself needing a third. That may just be the perfectionist in me or bad application on my part but the pictures below are 3 coats. It definitely does what it says on the bottle though, this polish dries incredibly fast! 


Next up is 'Angel Wings', I'm so glad Hannah sent me this colour because it's the kind of grey I've needed for so long and never had. It's a beautiful light grey and, like Fruit Loop, dries really fast. I used 2 coats in the pictures below:


Finally we have 'Button Moon' which is definitely my go-to blue now. I'm sure you all know of my obsession with blue polishes, especially baby blue so you can imagine my reaction when I saw this. Although, whilst it dries fast like Angel Wings and Fruit Loop, I had some slight issues with application on my pinky finger. I think I may have applied abnormally thin coats, which suggests that you may need slightly thicker coats for opaque application. Nonetheless the rest look great and I was definitely impressed with this product due to it's drying time and it's opacity compared to other baby blues I own.


In relation to application I would say all four are good in relation to drying time, although Shimmy Shake seemed to dry on average the same as most polishes, and opacity. Colours-wise there are also a great range of colours in their collection which I would definitely recommend, but out of these four Button Moon would of course have to be my favourite. 

Next up is some nail art using the 4 polishes above!


First of all is a gradient (still practising!) using Button Moon and Fruit Loop. I originally tried this the other way around but despite Button Moon's consistency in application it was way too thin to be used for gradients. Although I do like how they turned out this way!


Glitter alone will never be something I'm a fan of so of course I had to add something to them. I do wish I'd added black outlines to the hearts to make them 'pop' a bit more but for a quick design I quite like it. Button Moon and Fruit Loop were also both very opaque for nail art and dried very fast (perhaps too fast in Fruit Loop's case, I had to keep using new polish more often than usual)


And finally; the least obvious of the 3 designs, saran wrap nails using Fruit Loop and Angel Wings. Unfortunately I couldn't get a good picture of these but they were a lot more obvious in person I promise! This was my first time trying saran wrap nails and I was surprised at how easy is is. Both polishes were good with consistency and despite Fruit Loop's earlier issues it was very opaque atop of Angel Wings.

I hope you enjoyed my first review! I would definitely recommend Angel Wings and Button Moon, but that's just because of the colours I like, Fruit Loop and Shimmy Shake are both also impressive for the price range. 

Collection 2000 Hot Looks retail for around £1.99 in Boots and Superdrug

Alice

Ikat and beads

This post was just as a result of me messing around with yesterday's nails, I really debated whether to post these and I'm still not really sure about them. Mainly because I dont want you all to think I'm being lazy with posting because I posted twice about my feather nails as well. I tend to like seeing how designs can be transformed into something, be it with matte top coat or beads and I'm sorry if you were expecting something new today, I'll try not to do this too much! 


I hope you like them anyway :) Alice

Geometric Ikat

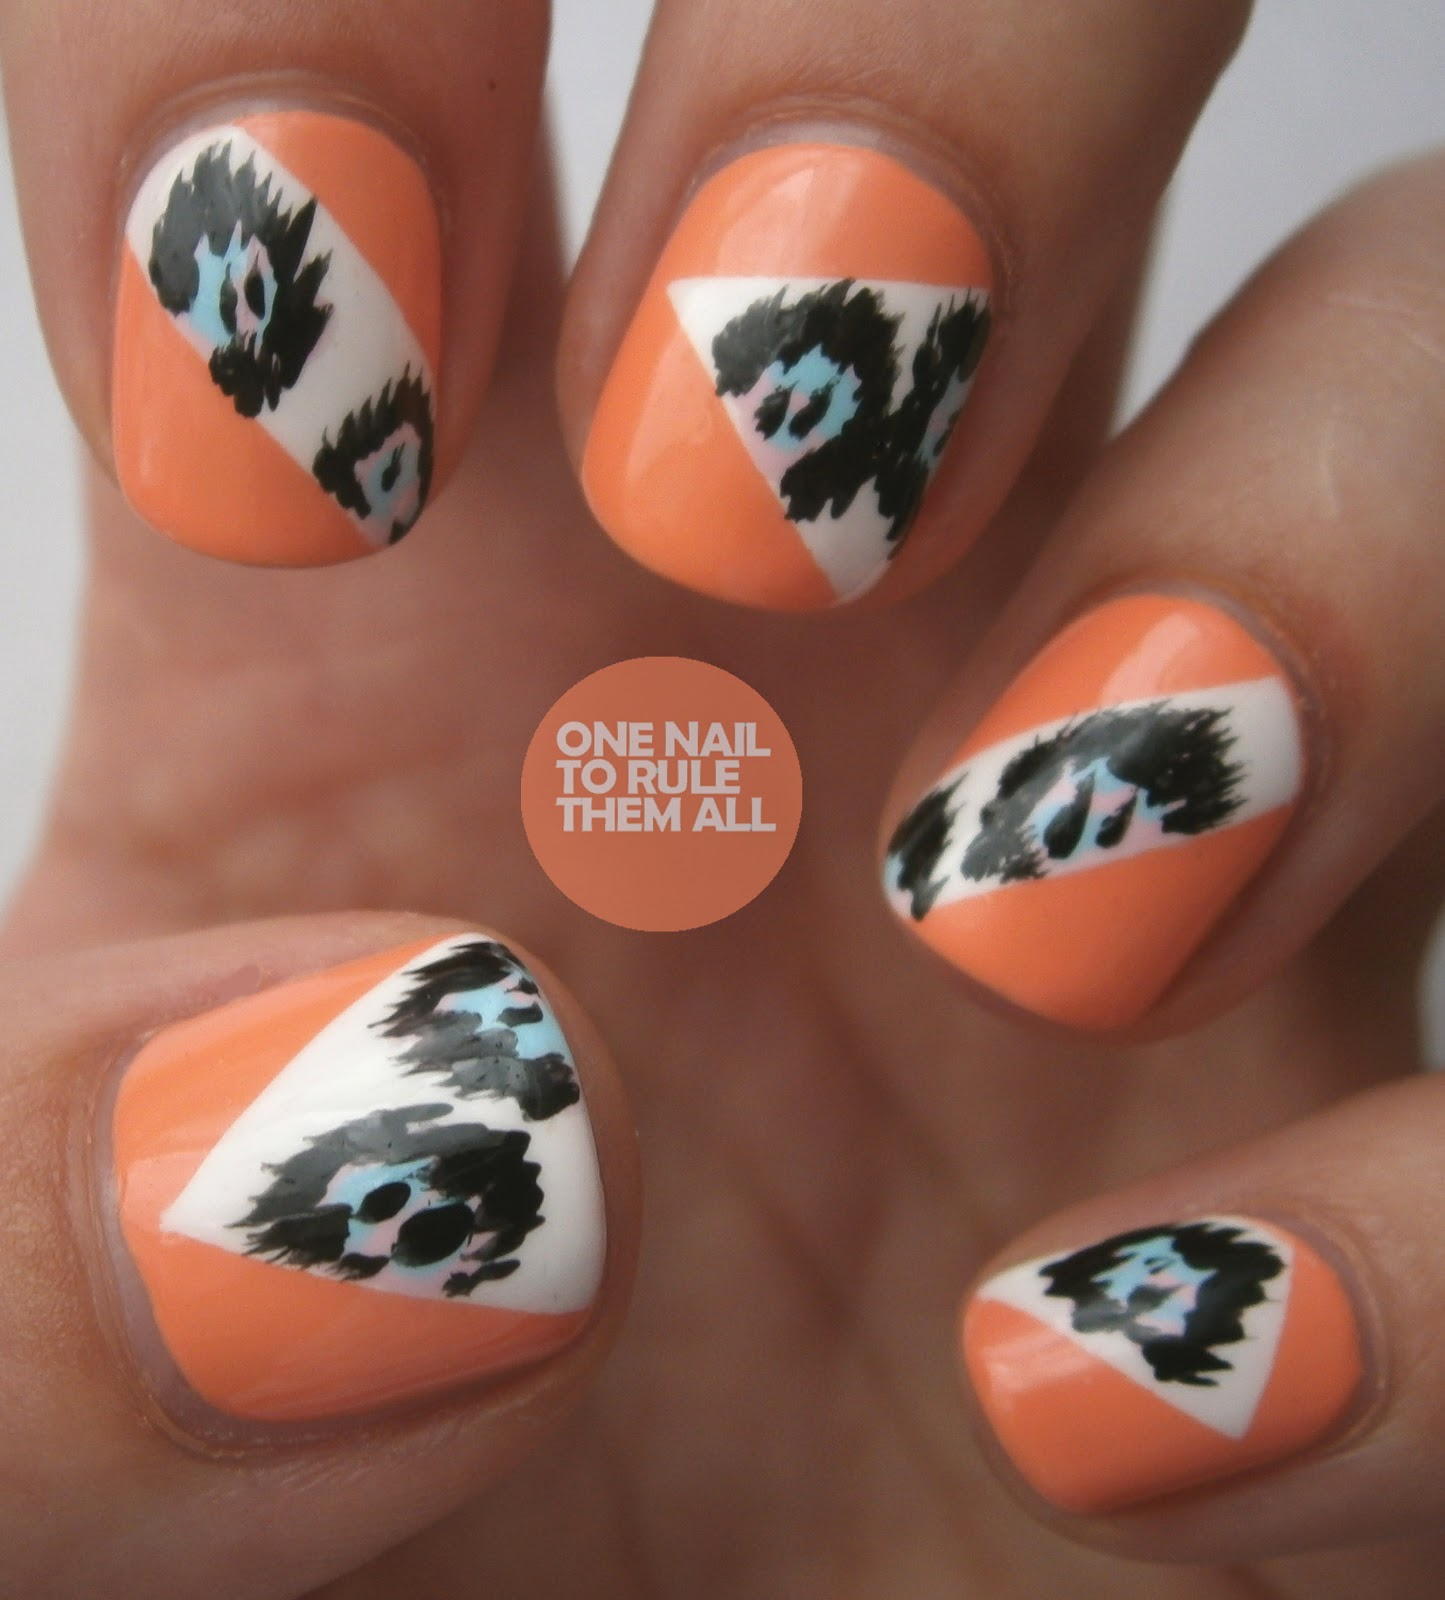
Hello everyone! So, I've been wanting to do ikat nails for a while but I never really intended to do it on these nails. I was just going to do shapes like these nails with peach and white, but they ended up looking really .. plain (see the first picture after the jump) but then I didn't know what to add to them until I remembered I'd been intending to try ikat nails, so here you go! 


(I told you they were boring :P)


I used:
  • China Glaze - Peachy Keen 
  • China Glaze - Something Sweet
  • Models Own - Blooboo
  • Art Deco Black Striper

Hope you like them!
Alice