Showing posts with label spots. Show all posts

Indian inspired?

Hey everyone! Today I have a design which came from nothing. My original idea for this design was to use my new striping tape* from Born Pretty Store to create a half and half design. I really like this striping tape as it's easy to use and doesn't tear like other tape I've used, you can get it here for $1.90 with free shipping, and if you use my code KHL91 you can get 10% off! I also wanted to use my Gold Nail Art Pen* from Models Own, which I knew would be great for an intricate design as it has a thin line and is opaque, so I decided to combine the two by adding a paisley design (albeit done badly) and a line design. When that was done I decided it needed a little extra so I added some white dots using acrylic paint and a small detailing brush. But looking at it now I feel it has kind of an indian feel about it, what do you think?


The base for this design was Viva La Nails, Lovely Colour in 'Tutti Frutti'*, which is a brilliantly opaque pink polish. I have a lot of pinks in my collection (waay too many) and this extra one is definitely a great addition! The other base colours were Essence 'That's What I Mint' and Essence 'L.O.L'


What do you think of this design? Let me know in the comments

Dont forget to use my code KHL91 for 10% off at Born Pretty Store

Alice

*some products in this post were sent to me for review. My views are never influenced by anything other than the truth

Then and Now: Week 16

Hey everyone! Recently there's been a new 'tag' on instagram called 'themanithatstarteditall' and I was 'tagged' to do it. So I decided to incorporate it into this week's Then and Now post. So today's design were the first nails I ever took a picture of, and I remember that I was super proud of them. I have created a tutorial for this design so please let me know if you want to see it! As always, the 'Then' post will be after the jump! 


As usual, there's a significant jump in quality. And also my ability to use top coat, but aside from that I think the original design wasn't too bad.

Another reason I chose to do these nails this week was because of the reemergence of nail art pens back into my life. This design was originally done with nail art pens, and I was apprehensive to recreate it with a brush, as I'm still not very confident with brushes. So the new Barry M nail art pens were the perfect opportunity for me to recreate these. 


For this design I used the same base colour as with the original design; Rimmel - Perfect Plum. I used the pink and white Barry M nail art pens for the flowers and filled in the blue with Essence - that's what I mint (can you tell I'm obsessed with this colour?) 

For the first time in a very long time I also decided to brave it and do my right hand, I normally just have a solid colour on there, and I was so pleased with how it came out that I decided to show you a picture. I've never shown you my right hand before, ever, so enjoy!


Let me know what you think in the comments! Alice


Barry M Nail Art Pens Review

Hey everyone! Today I have a post which I'm super excited to show you, using the 4 new Barry M nail art pens. They were released in Superdrug and online today (10th April) and will be released in Boots on the 17th April. As you will see, I highly recommend getting at least one of these pens because they're awesome and completely unlike any other nail art pens I've tried before. More after the jump!


First up is the White Nail Art Pen. The design I chose to do was inspired by this Nancy Mc design, which I've wanted to do for ages but haven't had the courage to do with a brush. I started with a base of OPI - Just a Little Rosti at This and then drew a line followed by two dots on either side for the bone, then I topped it all off with a coat of Seche Vite. 


I also did a matte version of these nails, because you know I can never resist, which do you prefer?


As you can see the nib is unlike most nail art pens. Rather than squeezing thick nail varnish through a tiny needle (which always gets blocked) you instead push the end of this down until the nail varnish flows through it. I'm not entirely sure if this is pure nail varnish, because although it's super opaque it's a lot runnier than usual, but it's definitely better than any other nail art pen I've tried. 


This Silver Nail Art Pen was probably my least favourite of the bunch. In person the silver looked completely opaque so if you're not a nail blogger like me it shouldn't matter, but the camera made these look quite translucent. I think I may have done something wrong and I shall be trying this again to make sure because the rest of the pens are great. My only issue with this is the opacity, and another layer over this would have solved that, so overall it's still a great pen. 

For this design I painted 2 layers of Barry M - Black, and then I painted a layer of Barry M - Aqua Green over the top for the duochrome effect. I painted on the baroque print using the silver nail art pen and topped it off with a layer of Seche Vite. 


I absolutely love this Pink Nail Art Pen, and I'm so glad they chose to include it as it gives a burst of colour to the collection. I really hope they bring out more shades because my experience of these so far has been nothing but positive! (Blue perhaps?) This pink is super opaque and dries really quickly. 

Anyway, for this design I started with a base of Essence - That's What I Mint and then I painted on the hearts in pink, then I outlined them with dots and added the lines using the White Nail Art Pen. Then I topped it off with a coat of Seche Vite. 


Last but not least is the Black Nail Art Pen, This and the white are my favourite of the pens, they're opaque and easy to use, as are all the pens, but I absolutely love creating nail art with black and white, so I'm sure you'll be seeing a lot more of these. 

For this design I started with a base colour of an unknown purple, and then added Sinful Colours - Frenzy over the top. To smooth it out I added a coat of Seche Vite before doing the rest of my design. I then drew the outline of the bow in Essence - That's What I Mint, using a MASH - medium length striper brush, and when that was dry I added the spots using the White Nail Art Pen, and then outlined it in the Black Nail Art Pen, topped off with another coat of Seche Vite.

These nails were inspired by this design by Lexi over at Finger Painted, but I'm afraid it's nowhere near as good!


Overall I'm super impressed with this collection. They're wonderfully opaque, except my slight issue with the silver, they dry fast and they're not thick at all so they wont smudge with a top coat if you apply it soon after. I really hope Barry M bring out more shades of these pens because I think they're brilliant and you'll definitely be seeing more designs using these on my blog over the next few months. 

What do you think? Will you be picking up any of these colours? And which is your favourite design I created with them? Let me know in the comments!
Alice

This product was sent to me for review but any opinions included are entirely my own and were not affected in any way.

Then and Now: Week 15

Hey everyone! It's been a while since my last 'Then and Now' post. I think until the end of may (when my exams finish) I probably wont be doing it every week, but I shall try my best! This week's post I wasn't actually going to do, because I really hated the original nails and I remember taking them off after about 10 minutes, but I decided it would be a good test of how far my skills have come if I could make the same design look good, and I think it worked because I really like how they came out, I think they ended up looking a lot like buttons actually. As always the 'then' post will be after the jump 


Look at that brilliant photography!

This time around I used Essence - Stuck On You as the base colour, and then I painted on large dots using a nail art brush in Essence - Free Hugs, That's What I Mint and Upper Green Side and then I used acrylic paint for the white

What do you think? Let me know in the comments!
Alice

Spotty bow 'rhinestones' review


Hey everyone, today I've got some really lovely bows to show you. I know I promised a really exciting post yesterday but I didn't have time to edit them so these shall have to do. I received these from KKcentreHK to review and I absolutely love them. However, I was really struggling to think of any ideas for what to do with them, even though I've wanted bows for ages, so I just decided to do a simple design with a dotting tool, but I actually really like how this turned out. I'm sure you'll be seeing plenty more designs with these bows as they're definitely reusable. 


There's not really much to say about these as they're pretty self explanatory. I started with a base of Collection 2000 - Angel Wings, and then used China Glaze - Liquid Leather for the black dots, which I did with a dotting tool. Then I put a coat of Seche Vite on, and then a coat of Essie - Matte about You. Then I used nail glue to add the bows.


You can get these bows here for $4, and you get 2 in a pack. At first I did think that was a little bit pricey, but considering the amount of times you will be able to reuse them I think it's definitely worth it. You can also use my code 'ONTRTA' for 10% off :)

What do you think? Let me know in the comments!
Alice

Then and Now: Week 12

Hey everyone, today's then and now post is a little different from previous posts as I actually have two examples of what these looked like 'then'. There's probably a years difference between all the posts so you can see how much I've improved each time (I also apparently was incapable of keeping my nails a similar length previously). As usual, the 'then' posts will be after the jump


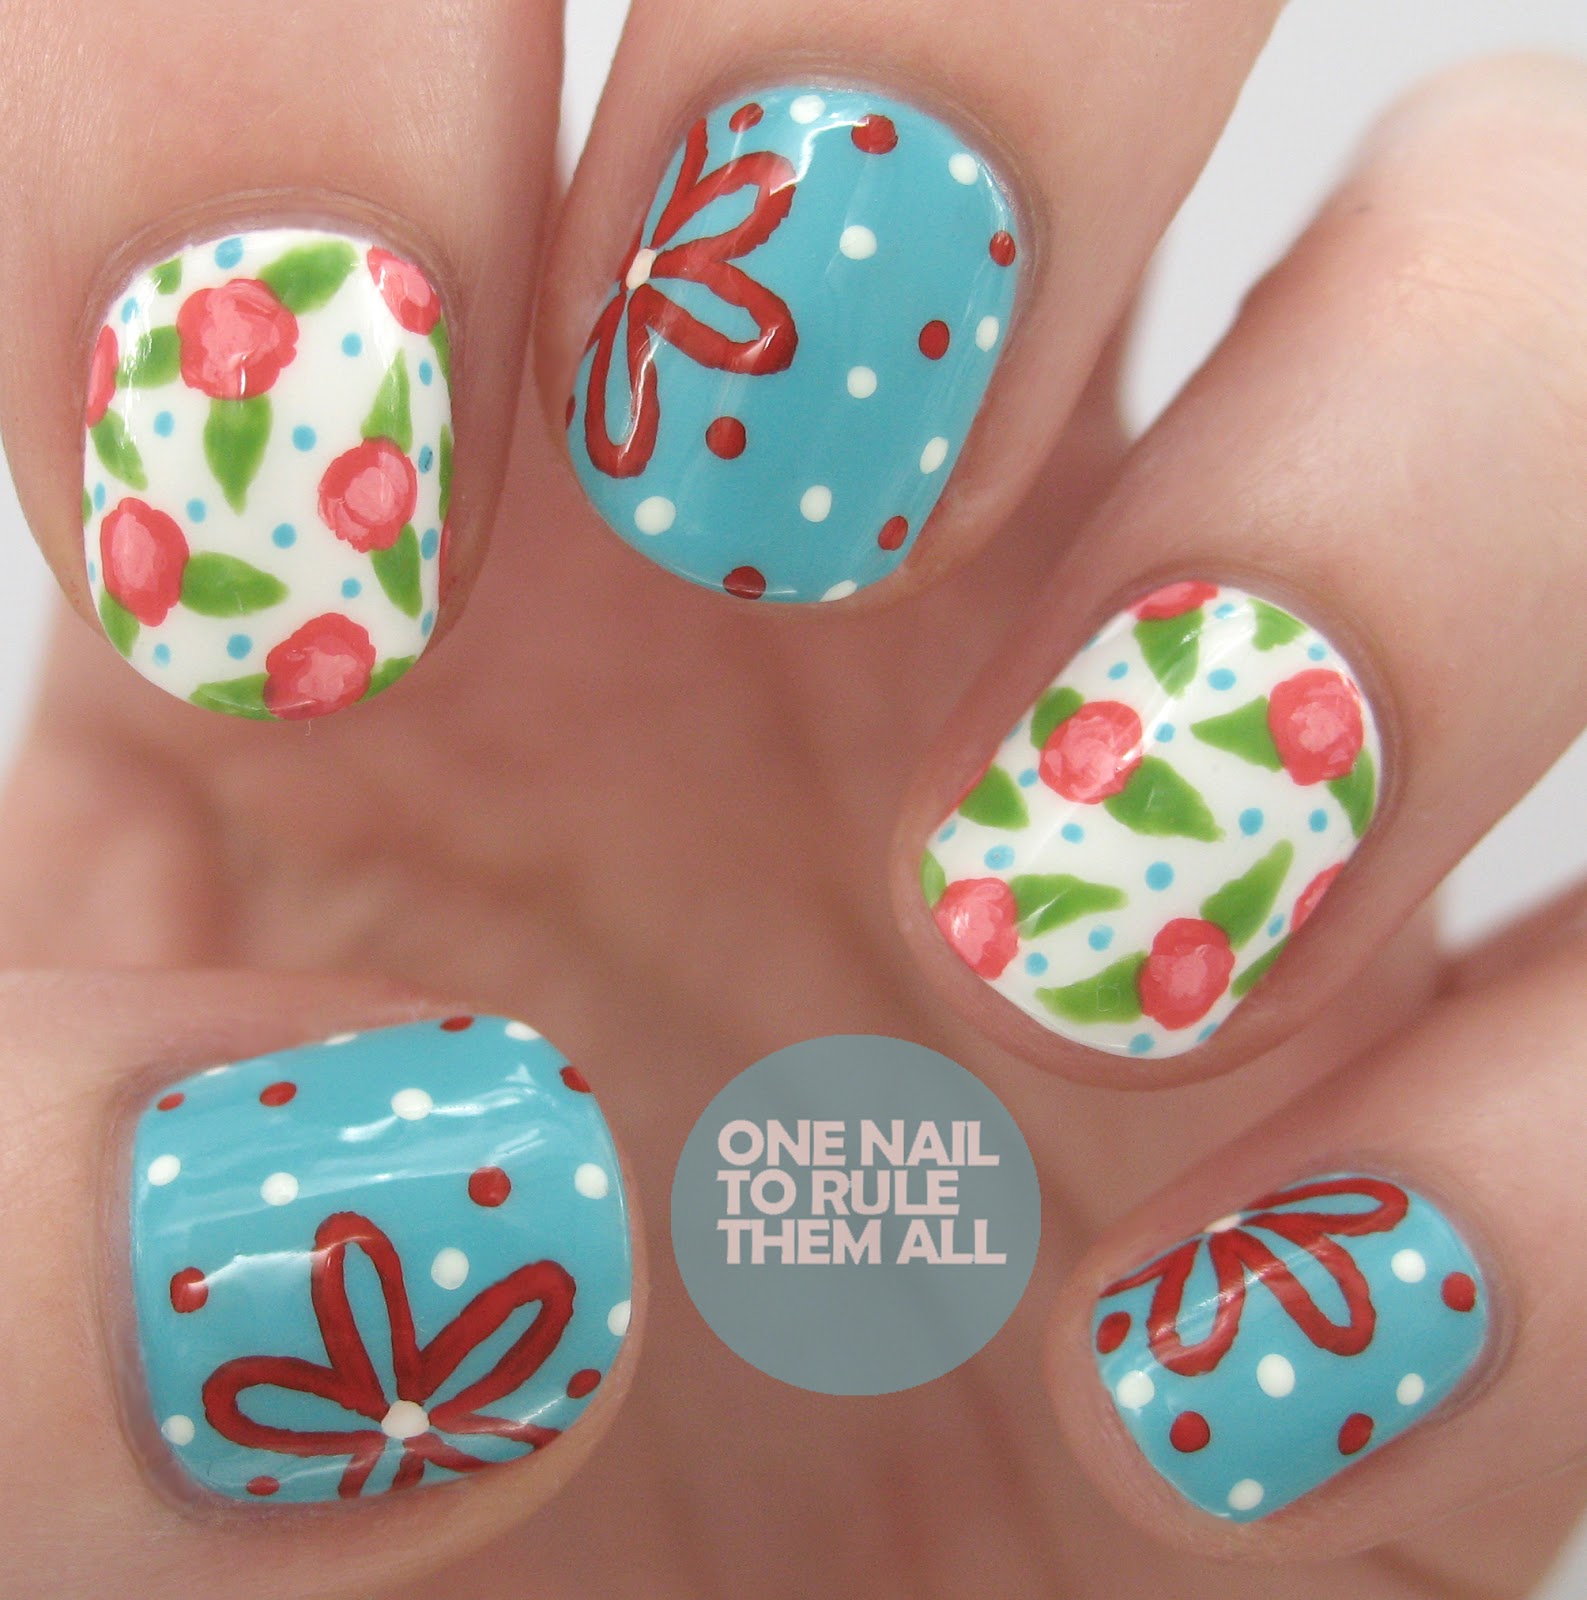
Both times previously the blue was Barry M - Blueberry but it's unfortunately still missing, so I had to use Barry M - Turquoise instead this time around. Originally everything would have been done with a dotting tool and nail varnish, but this time I mainly used acrylic paint except for the base colour and leaves, and a small brush.  The white base colour is Essie - Blanc, and previously would have been Barry M - Matt White


As you can see I actually mattified the second mani, but for once when I mattified these nails they didn't look good (I feel betrayed) so I had to stick to a shiny finish. I actually remember taking the above picture, because I did it in the centre of town and my friends were yelling at me to hurry up, but that was in the days before I had a lightbox and I knew the light was about to run out (blogger problems), this time I had no such issues. 


What do you think? I actually think I prefer the centre of the roses from the second time around, and I'd have rather done it in Barry M - Blueberry, but otherwise I'm pretty please with how these came out. Let me know your thoughts in the comments!

Alice

P.S. the giveaway winner was chosen on the 14th, but unfortunately did not reply in time, I'm now awaiting reply from the re-draw so please check your emails and spam to see if it's you!

Then and Now: Week 11

Hey everyone! Another 'Then and Now' post today. I dont know what I'm going to do when I run out of old designs because reading through the comments of the giveaway you all seem to love these posts, I was thinking about perhaps going through some old designs that I have on my Tumblr which I'm not really happy with or the photographing isn't great, is that something you would be interested in? I still have about 10 or 11 posts left before we get to that but I thought I'd ask you all.

Today's post makes a nice change from all the valentines posts I've been spamming you with (and there are a few more to come yet) as it's just dots. I quite like this idea and I've been meaning to redo it for a while, even before I started the Then and Now posts because as you'll see from the 'then' picture I didn't even manage to keep the whole hand complete. As always the 'then' post will be after the jump.


Originally everything was done with a dotting tool, and I tried to do that again here but miserably failed on the big dots so I instead chose to use a brush for the bigger dots and a dotting tool for the smaller dots on the red. The red is Essie - Snap Happy and the blue is Barry M - Turquoise. The white is Essie - Blanc, the pink is an unnamed pink from a boots set, and the purple is an unnamed no 7 (lost the label), all topped off with 2 coats of Seche Vite. The original blue was Barry M - Blueberry which I still have but couldn't seem to find.


What do you think? Let me know in the comments!
Alice

And dont forget to enter my GIVEAWAY

Then and Now: Week 2

Hey everyone! Today I have the second week of my Then and Now 'challenge' to show you. I wish I had left this one out to be honest, I don't know how I managed it before because it was incredibly difficult to put green over red and make it opaque, these nails were way way too thick and if it hadn't been for Seche Vite they'd have been off in seconds. Anyway, again this was done about a year or two ago, I can't be sure of exact dates but I really liked these when I did them first time around.

The first time I used all dotting tools but this time I used brushes and dotting rools, and I wish I'd stuck to my original method because it would have probably been a lot easier.

Take a look after the jump to see the original picture and polishes used!


For these I used an unnamed No 7 polish (really need to stop removing the stickers) for the grey, and the recent Glamour magazine's free red Nails Inc. For the white I used Barry M - Matt white, the green was Models Own - Lime Green, the Pink was an unnamed one from a set from boots, the yellow was a mixture of Barry M  yellow and white, and the Blue is Barry M - Blueberry and I think I used pretty much the same colours the first time around except the red was No 7 and the green was Rimmel.


Hope you like them! Let me know what you think.
Alice

Then And Now: Week 1

Hey everyone! Today I have the first installment of 'then and now'. I can't remember exactly when I did these nails but I'd say it was around 2 years ago, and I'm hoping my skills have improved in that time! If any of you have any old photos lying around and want to have a go at the 'challenge', please do :D

Apparently I also didn't know how to colour coordinate then either, because these flowers are crazy, but I enjoyed doing such a bright and colourful design. I find that I struggle for inspiration more than I did then, I didn't need much to give me a design and I wish I could still have that, even if the designs were a little mad! The original design was created doing a dotting tool, I only remember that because that's all I ever used then, a set of dotting tools was one of the first things I bought and I used nothing else until about 6 months ago when I decided to try using brushes in this post. As I've mentioned before, I'm still not very confident with brushes, so sometimes I will turn back to my trusty dotting tools, but not this time, I know now that it's a lot quicker to use the brush from the nail varnish to create big flowers like this, so that's what I did. I then used a dotting tool for the dots and specks within the flowers. Original picture after the jump!


For the base colours I used Nails Inc - 'grosvenor crescent' for the pink and Nail Inc - 'putney bridge' for the purple. Both went on in one coat which is awesome, and I'm definitely glad I spent £30 on a set of 10 (oops). 
Then I used Nails Inc - 'hyde park gate' for the green flowers, a mixture of Barry M - yellow and a tiny bit of Barry M - matt white for the yellow flowers, and China Glaze - refresh mint for the blue flowers.
For the white spots I used Barry M - matt white, and for the black specks I used acrylic paint

I told you the pictures were horrendous! 


I hope you liked my first 'Then and Now' post, the next installment shall be next Saturday!
Alice

Flowers and beads

Hey everyone, sorry (again) for the delay in posting, I do try to post every other day and at most every 3 days and that's really all it's been cos I've not been to sleep yet so in my head it is still Saturday and not 2am Sunday, though it's still Saturday in America so that's okay, haha.

Anyway, on to the nails! I was inspired to create these nails after seeing them (uncredited) on tumblr, but later found out that they were done by itsallnails, the original picture is at the bottom of the post :)


I used Models Own - Utopia, Barry M - Matte White, beads from Born Pretty Store (use my code KHL91 for 10% off!) and an unnamed Dark Blue by W7


Hope you like them!
Alice