Pääsiäislehtiä


Tämän vuoden pääsiäiskynnet :) Halusin käyttää näissä tässä postauksessa esiteltyjä Mimaxilta tilaamiani "metallisia helmenpuolikkaita", koska ne sopivat mielestäni hyvin pääsiäislakkaukseen ja lukijatkin olivat pyytäneet nähdä näitä käytössä. Muistin myös, varmaankin noin vuosi sitten, hankkimani keväisen vihreät lehdet (myöskin Mimaxilta) ja ajattelin vihdoinkin testata niitä :p


Tiesin että lehtien kiinityksen kanssa tulee varmaankin hankaluuksia, joten päätin aloittaa käyttämmään niitä vain nimettömissä. Lakkasin siis nimettömät vaaleankeltaisella Orly Lemonade -lakalla ja muut kynnet taas vaalealla vähän vaaleanpunaiseen/ -liilaan vivahtavalla Orly Decades of Dysfunction -lakalla. Molempia tarvitsi kaksi kerrosta. Laatuero näissä on kuitenkin valtava. Siinä missä Decades of Dysfunctionin koostumus lähentelee täydellisyyttä, niin vanhempi Lemonade on taas kaukana siitä :/ Lemonade on paksuhkoa ja sitä on vaikea levittää tasaisesti, kun taas DOD on juuri sopivan ohutta, mutta peittävää ja levittyy hyvin. ♥


Tämän jälkeen töpöttelin meikkisienellä Lemonadia kynsien kärkiin ja kiinnitin päällyslakalla pirteän vihreitä, keltaisia ja oransseja helmenpuolikkaita. Mielestäni nämä ovat kyllä enemmänkin nastoja kuin helmenpuolikkaita, koska ne ovat samanlaisia kuin aiemmin omistamani kultaiset koristenastat. Noh, kuitenkin ovat kyllä todella kivoja, mitä sitten ovatkaan :D ...Nimettömiä varten taas leikkasin kahdesta lehdestä kärjet ja yritin painella niitä kiinni kynsiin, joihin olin ensin laittanut kerrokset päällyslakkaa. Ensimmäisen lehdenpalan leikkasin liian isoksi ja se ei asettunut nätisti kynnelle vaan jäi vähän kupruille. Tämä lehti näkyy alla olevassa kuvassa. Toisen leikkasin sitten pienemmäksi ja sen kiinnittäminen onnistui paremmin. Lehtien päälle laitoin kaksi kerrosta Seche Viteä ja muiden kynsien päälle yhden. Lehdet vaikuttavat pysyvän ihan kivasti kynsissä ja voisi varmaan lisätä vielä yhden kerroksen pikakuivattavaa, niin saisi vielä tasaisemman pinnan.


Mitäs pidätte näistä kynsistä? Oletteko te käyttäneet tälläisiä lehtiä kynsien koristelussa? Millaisia kokemuksia? :) Miten teillä on lähtenyt pääsiäinen käyntiin? Kai olette syöneet paljon suklaamunia? :D

Orly Lemonade, Orly Decades of Dysfunction, helmenpuolikkaita
ja vihreitä lehtiä


Makoisaa pääsiäistä! ♥♥♥

0 comments:

Neon gradient + tribal nails (and an announcement!)

Happy Easter everyone! I'm going to hopefully be posting twice today because I'm going to quickly try and do a 'Then and Now' post for tonight because I didn't have time to do one last night. But I just wanted to show you these neon gradients I did, and then decided to add a tribal design to. I shall have a tutorial coming up for this soon if you're interested? These were meant to be my 'easter' nails for this year but I fancied something a little different to the usual pastel combinations.

I actually quite liked the design with just a neon gradient but as always I knew I wanted to add more to it, oops. The base for this design was MASH - White, which is meant to be for stamping but as it's so opaque it works great as a base too. The neon colours were Models Own - Toxic Apple, Orange Sorbet and Pink Sorbet, all of which as you can see are really bright and great neons, I would definitely recommend getting them if you haven't already got them. As neons tend to be quite translucent they're great for gradients. 


(The number 2 is there as it's part of the tutorial)


What do you think? Let me know in the comments!

Also, today is my blogiversary! This little blog is one year old today, I had started a Tumblr 8 months previously so it's not a year since the start of my 'nail art journey' but it is via blogger! I shall be having a little giveaway soon to celebrate so stay tuned! 

Alice

EDIT: the tutorial can be found here

0 comments:

Blogs to Love #8

Hello everyone. Sorry for the late post. I thought I had it to post automatically but I got back from girl's night out and found it was only saved as a draft. Better late than never? Anyway, get ready for a long post! Since I missed last week and since Easter is this weekend I thought I'd do a huge Easter link-up. :)

Blogs to Love Friday linkup
 

Since this post is so big I'm going to split the links into sections.

Nails
Hair
Makeup
Fashion
Food
Crafts
  • This one is part food, part craft. These Cute Printable Carrot Cones found on The Red Thread will make the perfect addition to any Easter basket and can be filled with candy or even healthy treats.
  • What a cute idea for the little ones and it takes very little effort from you! Sew your little ones or someone else's little ones a Sweet Bunny with this tutorial by Lifeologia.
  • Don't have a basket for Easter yet? Don't rush out to buy one this weekend — create your own with this Easter Bunny Basket Tutorial from Lizzie Florence!
Easter Eggs
  • My favorite part of Easter (besides making myself sick on candy) was always the Easter eggs! I never liked eating them; I just wanted to decorate them!! Sharpie Tie Dye Easter Eggs by Housing a Forest are something I wish I knew about as a kid. They are so fun!! They remind me of peeling paper mache.
  • If you want something a little more elegant to sit around you should try Golden Marbled Easter Eggs. It takes a bit of work but your friends and family are sure to ooh and ahh over them.
  • Neither of these your style? Here are 40 other Creative Ways to Decorate Easter Eggs compiled by Brit + Co. Seriously, the Message in an Egg is genius. It leaves me wishing I had a sweetie to give one to.
My Contributions to Easter

Easter Spellbound Nails nail polish nailart art fashion beauty shoes hair makeup outfit

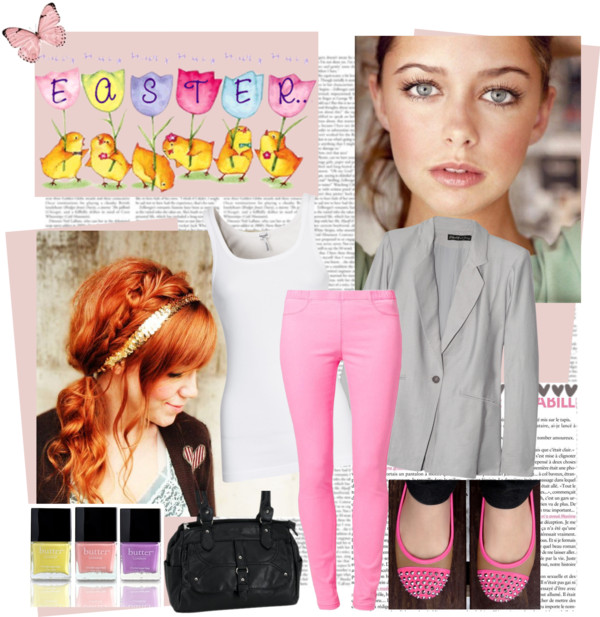
I have big plans for making this my Easter outfit. I have nearly everything needed to complete this outfit. Simple makeup, messy hair (in blonde instead of red), pastel polish for an Easter skittles mani, the purse, the shoes and a blazer nearly like this one. The key piece however is the pink pants and I don't have them. If I can't find a pair that fit in the color I want this weekend this whole outfit will fall to pieces. :( Keep your fingers crossed for me.

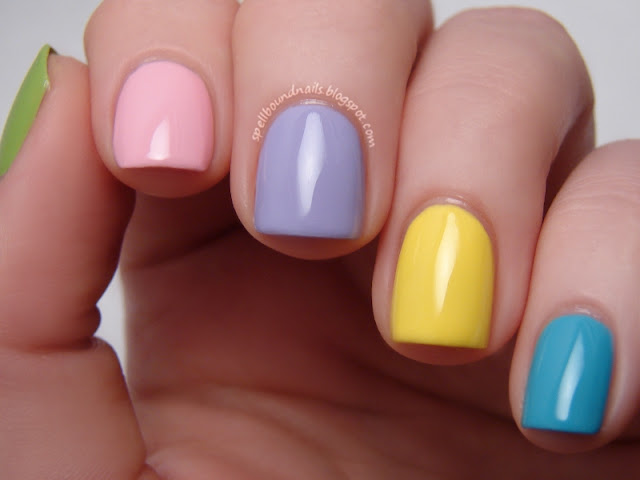
Skittles Spellbound Nails nailart art nail polish pink green purple yellow blue speckled Easter

My other contribution to this Easter post are my Easter nails! I plan to wear my nails like this Sunday instead of doing a fancy design. However, for this post I couldn't resist doing a little something extra.

Easter eggs polish nail nailart art polish Spellbound Nails speckled dyed pink purple yellow blue green

Speckled Easter eggs nails!! I used an old eyebrow brush that was fraying to dab on the base color mixed with some white and then I used some brown polish to create the speckled look. I adore how the blue nail looks here and the purple and green nails looked really awesome in person. Sadly, the pink and yellow nails were so light on their own that mixing the polish with white didn't really add any definition. Still, I think this looks really awesome overall.

And yes, that is a brown chicken egg I'm holding. It was the next best thing since I didn't have any speckled eggs ... or even any dyed Easter eggs. :(

Forgive me for any errors or typos. It's late, and not only am I so tired I can't see straight I have a headache to contend with so I didn't do my usual ten-thousand read throughs looking for errors.

0 comments:

Easter Nails (and the rest...)

Wow... The past few days have been incredibly busy. I've been backwards and forwards across the North of the country (I seem to spend my whole life on the M62), and so my nails have a been a little bit neglected. But I've finally managed to sit down and dedicate some time to creating Easter nails, which I've been mentally planning for a good few weeks!
I've seen so many Easter designs recently, from Easter eggs to Spring flowers to bunny rabbits. I always wanted to create a chick, as I knew it would look incredibly cute and would be pretty easy to paint. I took inspiration from a variety of Easter cards and gifts, and decided to keep it as simple as possible (because less is always more!)

The equipment:

Models Own 'Jade Stone'
Fearne 'Cotton Candy'
Models Own 'Feeling Blue'
Models Own 'Fuzzy Peach'
Fearne 'Lemon Drizzle'
Rimmel 'Rose Libertine'
NYC 'Pinstripe White'
Barry M 'Grey'
Models Own white nail art pen
Large dotting tool
Small dotting tool
A fine paintbrush
Clear top coat
As usual, I started off with clean, filed nails and applied 2 coats of each base colour. I stuck to a pastel palette, and opted for pale green, pale purple, sky blue, pink and lemon yellow. 
Once dry, I added the basic design to my thumb. This consisted of a large circle for the chick's head, a smaller oval for its body, and little leaf shaped wings. I used one of my brand new nail art paintbrushes, which I am in love with already!
It took about 3 coats to achieve a bright yellow colour over the top of the green, and once this was dry, I used my grey Barry M varnish to outline. I thought black would be too harsh against the pastel shades, and so grey was a good decision. I added legs, feet (claws?) and some spiky hair, and then used Models Own 'Fuzzy Peach' to add a tiny triangular beak. Once this was dry, I outlined in the grey as well, and add dots for eyes.

Once I was happy with my chick, I focused on my other fingers. I was contemplating designing complex Easter eggs, but eventually settled for simple polka dots and stripes. Using my dotting tools I added large and small dots to my index and ring finger, and then used the striping brush of my Models Own white nail art pen to draw vertical and horizontal stripes on my middle and little finger. As always, when all of my nails were completely dry, I added a top coat :)

So there we have my Easter nails! I'm so pleased with the final product, and I really hope they last over Easter weekend (I'm pretty certain they will, as Models Own nail varnishes are brilliant quality and never seem to chip or peel away!)

Ooooh, just before I go, I want to show you a couple of new purchases! They were waiting for me when I got home today...


I think the total cost of these was about £5, and that's including P&P. I cannot express how much I adore Amazon for their nail arty treats! The paint brushes are lovely - they're chubbier than normal brushes and so easier to grip, and the bristles are soft yet sturdy. I can't wait to use my new sequins and beads either, it'll be a nice change from gems which have always been my go-to for added sparkle!

Oh and one more thing... I feel slightly guilty for not dedicating a whole post to these nails, but they were done in a rush and therefore I don't have a tutorial. Plus, they're pretty basic in comparison to some of my other designs.

My brand new black and white midi-dress inspired these. I used W7 'Purple' as my main colour, and then for my accent nail I added an abstract pattern using my Models Own black nail art pen over NYC 'Pinstripe White'. These nails only lived for one night, but next time I wear my dress I will definitely do them again!

So I think I've finally covered everything. If I don't check in again over the weekend, Happy Easter! I cannot wait to feast on chocolate all Sunday long... This Lent has been a painful one!

0 comments:

Nail Polish on nails - what?

The last challenge of It's So Easy Nails contest was "Make Up Your Own Holiday"
What could be better than a holiday dedicated to nail polish?
N O T H I N G


Sorry for so many pictures. I couldn't pick one that was better than the rest. Anyone wanna guess what brands I painted? 

0 comments:

Over the top tribal print

Hey everyone! I've been traveling all day and I really just want to crawl into bed so this post wont be a long one I'm afraid. 

To do these nails I used these brushes from Born Pretty Store, I absolutely love this set, I'd say my favourite is definitely the smallest one. I'd definitely recommend getting them if you're just starting out with detailed nail art because they're great for variety. Don't forget to use my code KHL91 for 10% off!


These nails were definitely not planned out, I painted a base coat of Essence - I'm Bluetiful and decided to add some white acrylic paint detailing, but it looked a bit plain so I added red, yellow and blue acrylic paint, and Collection 2000 - Ninja to add some extra detail to the design. Personally, I feel like it ended up being a bit too much, but for some reason I still really like them. 


What do you think? Let me know in the comments!
Alice

0 comments:

Time Periods Challenge: Ancient Egypt

Hello everyone! You'll notice a bit of a difference in my nails with this post. Three of my nails broke last week. I filed them down pretty short and found out the hard way a few hours later that they weren't filed enough. One of them caught and broke again! My nails had to be filed shorter than I've had them in a good long while — so short that the tips of my fingers actually hurt where the extra length of my nails usually protected them.

But enough about that. Here is my post for the Time Periods Challenge. Today is Ancient Egypt. I've seen so many hieroglyph nails and the rarer death mask inspired nails that I wanted more than anything to do something different. Here's my attempt to think outside the box.


I'm not an expert, but I've always been slightly fascinated with Ancient Egypt. The pharaohs, the Gods, their way of life — it's all so interesting to me. Did you know cats were highly revered by the Ancient Egyptians? Some cats of royalty were dressed in gold jewelry and allowed eat from their owners' plates!

What better way of thinking outside the box than to do a cat nail for Ancient Egypt? I used a saran wrap base of Color Show Bold Gold and Funky Fingers Platinum Record. The cat is a representation of Bast/Bastet — most often shown as a black cat with gold jewelry or a woman with the head of a black cat.

I couldn't find my nail art brush so the cat was done with a combo of dotting tool and sewing needle (for the ears, tail, and collar).

0 comments:

Weekend Haul

*All products in this post were purchased by me.

Hello everyone! I picked up a few things this weekend at some really awesome prices so I thought I'd do a haul post. :)


First up: L.A. Colors neons. I adore these!! I stopped in at the local Dollar Store to pick up some rolls for Sunday dinner and couldn't resist taking a browse through the nail polish. I found Mint, Hottie, Pink Bubbles, In A Flash, and Tangerine. I was in a hurry or I would have dug out the neon purple I'm sure I saw at the bottom of the bin too. See Pink Bubbles on my toes in the picture collage below. Having a neon polish on my toes is a must for spring and summer!


Saturday, I picked up these pretties from the Rite Aid sale bin ... well, all but the NYC polish; it, and a few other products, were marked at 75% off!! The sale bin seems to be drying up sadly, but I hold out hope that more polishes will be moved there soon. From left to right: Battery Park Purple, Tahitian Green, Strength of Pink, Figi, and Corduroy.


Also on for 75% off was this gorgeous NYC Lip Plumper in Plum Tart. I got this for $0.99!!! I didn't get it for the plumper ... okay, I didn't get it only for the plumper. The color is just so pretty! It's actually much lighter in person. I think of a nude gloss with a drop of plum color mixed in to give your lips a very natural shimmery flush of color. I didn't notice any real plump to my lips but it did have a slightly minty scent and did cause some tingling to my lips. Almost like getting toothpaste on your lips while brushing your teeth; I found it causes nearly the same amount of tingling for me. I found it almost refreshing to be honest.


Also on Saturday I found some really awesome sale items in Boscov's. This white sweater was an amazing find. It is so very, very comfy and is light enough to last in my wardrobe through Spring. And was a steal at $5.99! I also picked up a lovely gray blazer (no pics yet). I love blazers!! They are an essential part of my wardrobe! To find one for $9.99 was brilliant, but to get up to the checkout and have the sale's women scan it up as $5.99 was stunningly brilliant!

The one thing I didn't get on sale was the shoes. I saw them two weeks ago and fell in love — which is odd because I can't stand flats. I've been told many times that I must have been born with my heels because the only time I'm without them is when I'm not wearing any shoes at all. When I saw them this weekend I couldn't let them go again. Especially after trying them on and seeing how comfortable they are. I honestly expected to try them on and have them fit like all the other flats. They would surely feel weird and hurt the backs of my feet, but these lovelies didn't hurt at all and they fit perfectly! They are so me. An oddly fitting combo of nude and neon color with an awesome spiked toe. They were about $17 — which is a steal in and of itself for a pair of shoes today!

And my new shoes match my new neon pink nail polish! I hate feet, abhor them really, but I wanted to show off my neon toes too much. I kept the picture small and hope it doesn't make anyone cringe too badly. And yes, that is snow between the gaps of my porch. Yes, yes I did stand outside in my bare feet to get this picture. Dedication to my blog at its best ... or worst?

*All products in this post were purchased by me.

0 comments:

Studs & Sparkles


I've been so busy for the past few days, I've hardly had time to think about my nails! I applied these on Saturday afternoon, and they have lasted until today with only minimal chipping. Even the gems are all still intact, which is impressive! I wore a pale pink jumper that night, which has gold and silver studs around the neckline, and so this nail design matched well.

The equipment:

W7 'Sheer Pink'
NYC Pinstripe White
Models Own black nail art pen
Pink and silver gems
Nails Inc. 'Bling It On' silver nail glitter
Clear top coat
Tweezers
A fine paintbrush

I applied around 3 coats of pink to my thumb, index finger and little finger, as I wanted a really bright, clean finish. For my middle finger I used a couple of coats of white, and once all were dry, I applied the first top coat. I knew I'd be adding extra details but wanted to seal in the base colours to try and avoid chips and peeling!

Once dry, I added the silver gems to my pink nails. I think placing them in the centre towards the base is a good position, but in either top corner would also look effective! Once I was happy with the positioning (I used tweezers, which help with precision!) I applied another top coat. On my middle finger I began adding the colour details, painting a pale pink chevron at the bottom, and then adding a smaller black triangle inside. I added black dots in a triangular shape using my nail art pen, and once dry, added four pink gems and one silver. Again, once everything was dry I added a top coat!

For my index finger I used one of my favourite products, Nails Inc. 'Bling It On'. I applied a base coat (any colour works), then rolled my finger nail in the glitter using the little tray that comes with the set. Glitter tends to get everywhere, and I always try and save as much as possible! Once I was happy with the coverage, I topped it off with a clear top coat.

Although these nails are quite simple in comparison to my other designs, they've stayed put really well and have received lots of compliments! I will definitely be using this again in the future, matching them to my outfits and switching up the positions and colours of my gems!


0 comments:

Garnier Fructis Hydra Recharge Review

*The products in this post were provided free for review purposes thanks to BzzAgent. All opinions are my own.


I signed up for BzzAgent last month and was so excited to be offered the chance at a BzzCampaign so quickly. They offered me the chance to try the Garnier Fructis Hydra Recharge system. This includes the shampoo and conditioner and the 1-Minute Moisture-Plenish, a deep 1-minute conditioning treatment. 

According to the BzzAgent campaign: Garnier Fructis Hydra Recharge is infused with superfruits for silky-soft-hydration. Hydra Recharge will recharge your thirsty locks and keep your hair super silky and surprisingly weightless for up to two whole days.
  • Works best on dry to normal hair
  • Keeps hair weightlessly silky for up to two days
  • Is available at grocery stores, drug stores, and mass retailers (I actually saw it at my local Dollar Store the other day)
  • Retails for suggested price of $3.99 to $6.99 each


The three bottles arrived in a plain box with adorable personalized BzzAgent bee logo tape. I opened the box still expecting to find deluxe samples or something, but they were all full-sized bottles!! They were also nicely bagged which I appreciated and which I'm sure the post office would have appreciated if there was a spill.


Just before getting invited to join this campaign I had a hairdresser tell me that my hair was very dry. Of course, I could tell by her tone that very dry was much worse than very. So, while skeptical of all the Hydra Recharge promises, I was really looking forward to this review.

The shampoo (as stated by the BzzAgent Campaign) is a hydration innovator, featuring for the first time thousands of beads that burst on impact.


I took a ton of pictures for this review so to conserve space (and lessen loading frustrations) I've hooked the relevant ones together. Click on them to see the full size image. You can see the texture of the shampoo here and also see the little blue beads. This shampoo has a really nice texture and creates suds very easily. I love this because our water is horribly hard and suds are really hard to come by.


This is me, washing my hair in the kitchen sink so I can get these pictures. I had so much fun with this review, and I wanted that to come across in my pictures. Here you can see the suds. Most of them have dissolved by this point, but even this amount is far more than I usually get with other shampoos.


Between the shampoo and conditioner, you use the 1-Minute Moisture-Plenish Treatment.

The 1-Minute Moisture-Plenish (as stated in the BzzCampaign) is a powerful deep treatment whose revolutionary lightweight creme-gel formula transforms dry hair with a surge of high-performance hydration in just one minute. For best results, use 2x a week.


This is almost like a lotion. It is thick and creamy and oh so smooth. I put on a dollop and massage it into my scalp and down the lengths of my hair paying special attention to the roots and tips. I continue to massage it in for the full minute. I can actually feel this working as my hair turns thick and voluminousness.


You can see here that the lotion-like texture thins down in the water but look closely at my hair. You can see how thick and silky it looks already.


Lastly you use the conditioner. You may be thinking - who has time for this?? But it really doesn't take all that much more time than your regular shampoo and conditioner, and the benefits far outweigh the extra two minutes of putting in and rinsing out of the Moisture-Plenish.

The conditioner (as stated in the BzzCampaign) contains superfruits of goji berry, passion fruit and kiwi to actively replenish without heaviness.

I wish more than anything that you could smell this whole system! Starting with the shampoo and ending with the conditioner the light and fruity scents just explode! I've actually been caught many times sniffing my own hair throughout the day because this wonderful scent lingers throughout the day and into the next as well! I love turning my head to talk to someone and getting a hint of this scent wafting around me. Seriously, stop into the shampoo aisle on your next shopping trip and take a sneak sniff of this!!


The conditioner is slightly thicker than the Moisture-Plenish. I was amazingly happy to see that both the Moisture-Plenish and the conditioner rinse out well and quickly. They leave none of the yucky residue of other brands.


Here you can see the conditioner in. It really isn't heavy at all! It feels light and silky smooth in my hair. And again, in this picture you can see just how soft my hair is looking.


This curtain of hair looks so soft and dreamy, right?? This is just after I washed the conditioner out.


I really couldn't be happier with this system, and would recommend it to all those who have dry hair or just want a bit more soft shininess in their life.

I also want to share that Garnier Fructis lives up to their promise of weightlessly silky hair for up to two days with this system! Thanks to natural genes and hard water, I have to wash my hair everyday or deal with flat, lifeless, and semi-greasy hair. After starting to use this system I noticed that my hair had much more volume the next day and nearly no grease! I can now leave it down if I want to, but I usually prefer to simply back comb it to give it a bit more volume and pull it up into a high pony. It's a classic look that I really couldn't enjoy before BzzAgent and Garnier Fructis.

Just an FYI: there is also a Hydra Recharge Moisture-Whip Leave-In Conditioner that you can purchase and add into this routine. I'm not a fan of leave-in conditioners given my hair's natural lean towards the greasy side, but given how much I love this system I may just give in and purchase it too.

*The products in this post were provided free for review purposes thanks to BzzAgent. All opinions are my own.

0 comments:

Summer Nails Pictorial

I really enjoy doing Pictorials because honestly I hate talking on camera, and this is an easy way to show people without having to awkwardly talk. So I made a pictorial on "Summer/Spring Break nails"
Here is a more detailed version than the one on Instagram.

First, I started by painting a white base color. This isn't necessary, but it helps make the colors brighter.
Next, I used a makeup sponge to sponge the red polish on. If you do not know how to execute the gradient sponge technique, there's tons of videos on Youtube showing how. Here's a really good one. And here's another. Hopefully that helps.
To do gradients, I usually cut the sponge and use a very small piece for each color. I use tweezers to hold the sponge and it works pretty well. Here's a picture to show you what I mean. 
Next, I sponged on the orange polish. 
After that, I used black polish and painted the tip of the nail. It doesn't need to be a perfect french tip or anything, the more imperfect it is, the better. 
Next, I painted a thin line for the trunk of the palm tree. It should be a bit thicker toward the bottom. 
After that, I painted five, thin lines coming from the trunk to make the bases of the leaves. Five is a good amount, any more than that will look too messy. 
Lastly, I painted short lines coming from the base of the leaves. Add a top coat, and you're done! 

Here's a simplified picture.

Thanks for reading! 
Celine

0 comments: