Tutorial Tuesday: Bows

Hey everyone! It's 1am here in the UK, and I just got in to bed and turned out the light, only to remember that I'd completely forgotten to do a tutorial tuesday! So the light is back on and I'm going to be super quick in writing this so I can go to sleep, second time around. This week's tutorial is for these glitter bow nails, which you might remember from here. This time I used a base of the gorgeous Shimmer Polish - Kim*, which you can see swatches of below. I'm going to include the rest of the post after the jump otherwise it might be too long!


Here I used 3 thin coats of Shimmer Polish - Kim, with 2 coats of Seche Vite topcoat.


And now for the tutorial:

Step 1: Paint your nails with a glitter base coat
Step 2: Using a brush, toothpick or dotting tool, paint the shape of a bow in a corresponding crème colour. (For instance, because the glitter is blue, the bow is blue too)
Step 3: Using a dotting tool, or a cut down toothpick, paint white dots on the bow shape
Step 4: Using a Black Barry M nail art pen, outline the bow shape. Start with the centre circle and then do the edges of the bow itself.
Step 5: Using the nail art pen again, draw the creases of the bow coming out from the centre
Step 6: Finish off with a topcoat to seal in your design and you’re done!

What do you think? Let me know in the comments!
Alice

My Nail Polish Storage Methods: Acrylic Racks, Vanity Cases & Fairy Lights!


Hi guys! For the past few months I've contemplated sharing a nail polish storage post, but have never quite plucked up the courage to snap away at (or tidy) my 'dressing room' (if you follow me on Instagram or Twitter, you've probably had a few sneak peeks at my lovely little space). Finally, the time has come! Recently, with my Master's degree finishing and my schedule opening up a considerable amount, I've had much more time to spend organising. Simultaneously, my polish collection has grown a lot, so I've had to enlist alternative storage methods. About a year ago, every single nail product I owned fit neatly into a cute little box. It then spread into a larger art box, and then overflowed into a plastic drawer unit. I soon realised that I needed to think outside the box (excuse the pun), and began my hunt for better storage. The requirements? It must be pretty, functional, space-saving, and most importantly, it had to showcase all my little bottles of loveliness!

I know that a lot of nail art bloggers turn to Ikea's Helmer unit to store their polishes. I think it's a good choice, as it's purse friendly and great for organisation. However, my nail polishes are all little show-offs, and would absolutely hate to be tucked away in drawers. I began researching alternative storage methods, and came across this acrylic display stand. I ordered two, both of which hold around 30 polishes each. I use these stands to store my W7, Jacava, Barry M, Fearne, Rimmel, Essie, L'Oreal, Models Own and Sinful Colors polishes. They both sit on my desk-cum-dressingtable, which I got from good old Ikea. It's kind of like this one, except without the storage part on top.


I was so pleased when the racks arrived, I decided to jump back onto Amazon and order another. This time, I ordered a five tier stand, meaning that I now had space to store around 100 polishes altogether. I use this rack to store a few 'odds and ends', along with my beloved OPI minis and nail art pens. It sits on top of this storage unit from Argos, which provides a good surface. I use the top drawer for all of my false nail sets and nail files (the rest of the unit is dedicated to other beauty products).


The majority of my tools and other equipment have their own section in my large pink vanity case. Since I received it as a gift, I can't provide the exact link, but it's very much like this large, lockable vanity case. The multiple sections mean I can keep everything organised, and my tiny bits-and-bobs like gems and glitter don't get lost amongst the larger items.


The most recent addition to my nail polish storage is a mirrored cabinet. My better half is a joiner and works on a lot of shop fits, so there's often a lot of furniture that would otherwise end up in the skip. He spotted this cabinet and knew it would be perfect for my dressing room, and so saved it from its dreadful fate! Again, I can't provide an accurate link for obvious reasons, but it's pretty similar to this mirrored cabinet from Ikea. We planned on finding some light fixings to hang over the top, but I decided I wanted it to be super girly, so grabbed these fairy lights from Wilko's instead. I store my e.l.f., No. 7 and a few random polishes on the glass shelves inside, along with my favourite brushes which sit inside a pretty little pot (it's supposed to be a candle holder, but it works perfectly for storing tiny paintbrushes!)


I got all of these items over the course of a few months, so although altogether it might seem expensive, the cost was very much spread, along with a couple of items being second-hand or gifts. In my opinion, when hunting for any kind of storage, whether it's for nail polish, makeup, jewellery or clothes, you really need to assess the sort of space you're working with. You also need to be well aware of your budget, and be willing to hunt! For some nail polish addicts, Ikea's Helmer is the perfect solution, but if you're anything like me, the best bet is to invest in some acrylic storage stands or a rack like this

How do you store your nail polish? Let me know, I'm exceedingly nosy!

Calling All Doctor Who Fans


Source: Fanpop
I warn you now - get ready for the fangirling! And images, lots of images. If you want to skip the images and go straight to the polish you can simply go to my shop and see the swatches ... but just know that you will be missing something awesome!! AWESOME, I SAY!!!

Source: Pinterest
Seriously, don't wander off! You might miss something important ... and awesome ... definitely awesome.

Photo Credit: Adrian Rogers, © BBC
Did you know that this weekend is the 50th anniversary episode of Doctor Who?? Did you really think a Whovian obsessed nut like me could let that day pass without releasing a special polish?

Surely you jest!


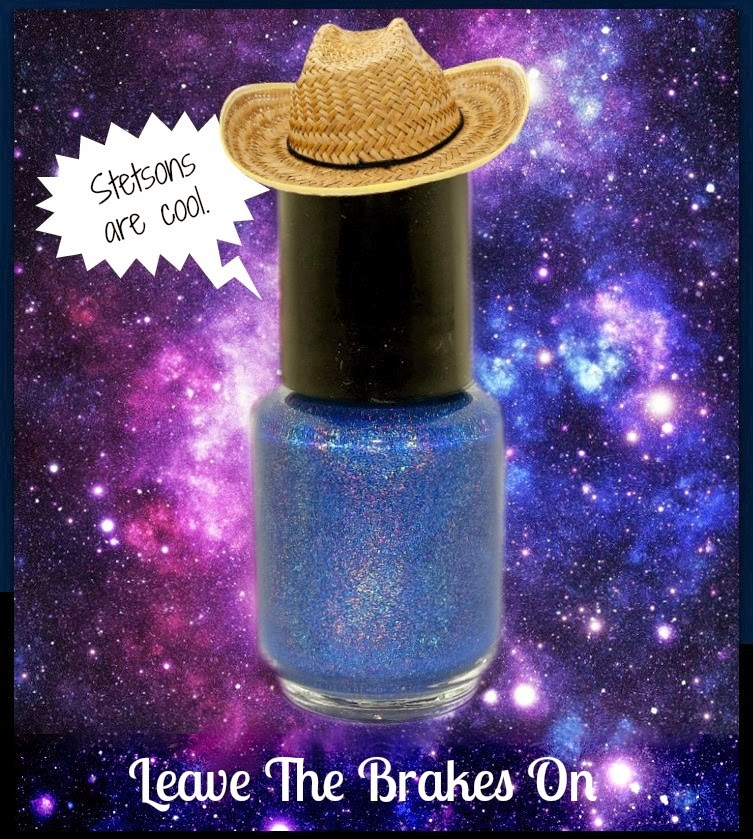
Leave The Brakes On is a Tardis blue holographic. Did anyone else really love that bit in Time of Angels where River tells the Doctor that the Tardis isn't supposed to make that noise ... he just leaves the brakes on! Maybe you didn't love that bit. Still wandering why would I take my inspiration from the Tardis?

Photo Credit: Adrian Rogers, © BBC
Well ... the Doctor is always changing. Just about the only constant of the show is the Tardis. The Tardis never changes ...

Source: Doctor Who Wiki
Except that time it was an organ ...

Source: Rebloggy
Or, ya know, that time it was a woman.

Photo taken in my lightbox
 But really, the Doctor would be nothing without the Tardis and it's ability to travel through time and space. He'd just be some odd alien bloke who works in a shop.

Source: Tumblr
Yes, yes, it's pretty in my lightbox, but check out the pictures taken with flash and in the sunlight!

Photo taken with flash.
Photo taken in sunlight
Source: Tumblr
Do you see it? Do you see the awesomeness of this polish?? I thought you might, so there is only one thing left to say ...

Source: Tumblr

WHY WHY MUST THERE ALWAYS BE A GOODBYE????

Born Pretty 3D Bow Review

Hello Everyone! Happy Monday! 
I know I haven't been posting much lately but I'm back with another Born Pretty review.
This time I tried these adorable 3D bow decals.


Starting off, they have four different sets. I chose set #1. 
It comes with 24 bows, or 12 pairs of bows of varying colors.
Onto what they looked like on my nails!


I've had to drastically cut down on my nail art this month so this was just a quick, simple design I did. I love the way the bow matches the polish. In real life it was just a tad lighter in color but still so gorgeous!


The blue polish is Sinful Colors Endless Blue and the glitter is China Glaze Glistening Snow.

The next design features the red bow in the set.


I love the way these turned out. The bow adds to the retro feel of the manicure. 


I've never used quite 3D decals so I wasn't sure how to go about applying these. I don't own nail glue so I just placed the bows on my wet polish. To be honest, they stayed pretty well. You just have to be careful with them. I am pretty confident they would stay much better with glue (Born Pretty actually sells nail glue here)

These are definitely one of my favorite decorations I've ever tried. They're so adorable! Not to mention the price is great, only $2.88 right now!

If you'd like to order, use my coupon code XKL91 for 10% off!


*This product was provided for review. All opinions are my own and are in no way influenced by anyone.

Kynsikirjan suunnittelu


Sain vihdoinkin tehtyä Ifolorille* kauan suunnitellun kynsikirjatilauksen!* :D Tilasin siis heidän kuvakirjavalikoimastaan* pehmeäkantisen A4-kokoisen Soft-kuvakirjan. Sivumääräksi otin tällä kertaa pienimmän vaihtoehdon, eli 26 sivua. Valittavana oli 26 sivun kirjasta aina 132 sivuiseen, mutta tässäkin oli jo sen verran suunnittelemista ja asettelua ym., joten ajattelin sivujen riittävän näin ensimmäiseksi kirjaksi. Ja kyllä, luultavasti teen vielä joskus uuden ja paksumman version, olettaen että olen tyytyväinen tähän, kun saan sen valmiina käsiini! ;) Ajattelin että tässä toimitusta odotellessa voisin vähän näyttää millainen tuo Ifolor Designer -ohjelma on, jolla siis kirjani kokosin. Kuvakirjan voi koota myös Ifolorin sivuilla valmiista pohjista, mutta tämä koneelle ladattava ohjelma on paljon monipuolisempi ja siinä voi välillä tallentaa kirjan ja jatkaa sen työstämistä myöhemmin (mikä oli minusta erittäin hyödyllistä). Sivumäärää voi myös tarvittaessa lisätä kirjaa työstäessä.


Ifolor Designer -ohjelman työskentelytila näyttää tältä. Vasemmasta sivupalkista löytyy kirjan ja kuvien työstämisvalikot ja oikeasta juoksevat kirjan sivut, josta näet millä aukeamalla olet. Sivujen järjestystä voi myös muuttaa sieltä raahaamalla valittu aukeama haluttuun kohtaan listaa. Yllä olevassa kuvassa minulla on vasemmalla kuvareunusten/rajausten valikko avoinna ja siinä näkyy pari itse muokkaamaani värikästä reunusta. Tämäkin mahdollisuus oli minusta kiva lisä tässä ohjelmassa, vaikka valmiitakin malleja oli useita.


Yllä olevassa kuvassa on työskentelypalkin eri valikoita valittuna. Ensimmäisenä varmaan kannattaa valita kirjalle kansi ja vaihtoehtoja on ihan paljon erilaisia, ihan kokonaan omista kuvista kootusta kansista, erilaisiin teemakansiin. Erilaisia sivumalleja on myös hyvin monenlaisia. Voit valita 1-8 kuvaa per sivu tai vaikka sivun jossa on pelkkää tekstiä. Tai voit vaikka valita jonkin kuvan jatkuvan koko aukeamman ylitse. Kaikkia näitä valmiita asetteluja voi muokata. Raahaat vain kuvat haluttuun paikkaan, muutat kokoa, kierrät haluttuun kulmaan ja vaihdat kuvien keskinäistä järjestystä (jos ne menevät osittain päällekkäin). Ohjelmalla saa kyllä järjestettyä kuvat juuri siihen järjestykseen ja asentoon kuin vain haluaa. Ainut ongelma mikä tästä saattaa seurata, on liiallinen suunnittelu ja yksityiskohtien hinkkaus. :D

Sitten on vielä ne kuvien reunukset, sivujen pohjat ja Clip Art -kuvat. Unohdin ottaa sivupohjista kuvakaappauksen, mutta niissäkin siis vaihtoehtoja riittää. Minä valitsin sivuiksi tuollaiset vaaleat pohjat, joissa on kulmissa kiekuroita. Käytin paria eriväristä pohjaa, eli kaikki sivut eivät suinkaan ole siis vaaleanvihreitä. Kuvien reunuksissa/rajauksissa on siis valinnanvaraa näyttävistä ja leveistä rajauksista, sydämen muotoisiin ja tavallisempiin ohuisiin reunuksiin. Ne valitaan jokaiselle kuvalle erikseen raahaamalla valittu reunus halutun kuvan päälle. Clip Art -valikosta löytyy joukko valmiita pikkukuvia, joilla voi täydentää ja piristää kirjan sivuja. :) Kuvat on jaoteltu teemoittain. Aiheita ovat mm. juhlat, joulu, Halloween, pääsiäinen, häät, vauva, matkustus, loma, musiikki ja urheilu. Nämäkin kuvat raahataan haluttuun paikkaan ja niitä voi kiertää ja niiden kokoa voi muuttaa.

Kuvan värikkään fishtail-lakkauksen tutoriaaliin » täältä «.
 
Kaksoisklikkaamalla kirjan kuvaa pääsee pieneen editointivalikkoon, josta minä käytin pelkästään tuota cutting vaihtoehtoa. Täytyy myöntää että oli kyllä aika kätevää, että kuvat pystyi croppaamaan itse tuolla ohjelmassa, eikä tarvinnut sitä varten muokata uutta kuvaa toisella ohjelmalla. Itse kuvathan lisäsin sivuihin pitämällä ohjelman vieressä auki kuvakansioitani ja raahamalla kuvan kansioista kuvalle varattuun paikkaan kirjassa. Tämän jälkeen yleensä aina muokkasin kuvan muotoa ja kokoa vetämällä kuvan reunasta ja joskus sitten vielä croppasin sopivammaksi. Niin ja tietysti asettelin kuvat paikoilleen.

En tiedä kuinka paljon saitte selvää tästä selkeästä selityksestäni, heh. Yhteenvetona sanoisin että kannattaa ladata tuo ohjelma koneelle ja tutkia rauhassa mitä kaikkea sillä voikaan tehdä, se on yllättävän monipuolinen! Sitten vain päästää luovuuden valloilleen ja kokoaa ihan niin omannäköisen kirjan kuin vain haluaa! :)  Ifolorolilla* on muuten tällä hetkellä kuvakirjat -20 % alennuksessa (19.11 asti), joten jos olet miettinyt oman kirjan kokoamista, niin nyt kannattaa tarttua tarjoukseen. Hihii, en malta odottaa omaani. Toivottavasti postimies tulisi pian paketin kanssa! ^_^


*Affiliate-linkit merkitty tähdellä, kirja tilattu lahjakortilla.

There's a Sale Going Down at Spellbound Nails!!

While adding a new review system to my Storenvy shop I decided to spruce up my layout a bit. In celebration I thought ... why not have a rare sale?? You can now take 10% off any order of $10 or more with the code NEWLAYOUT. This sale ends 10am EST November 18th. This code is only good in my Storenvy shop and will not work in my Etsy. And with that I say ENJOY!


Skin Art UK Nail Art Polishes Review

Hey everyone! I know it's been a few days, and I'm really sorry about that. Essay writing is driving me insane so I decided to take a bit of a break and write a blog post finally! So today I have a review of these gorgeous Skin Art Nail Art polishes (a bit of a mouthful). Skin Art create temporary tattoos, but they also create nail tattoos and a limited selection of nail polishes. Today I'll be showing you three of the polishes, all which can be found on their website here. The full review will be after the jump!


First up is Powder Puff Pink*, which is a perfect Barbie pink. This was 2 very easy coats without topcoat.


Then we have the gorgeous Out of the Blue*. This again was 2 very easy coats and no topcoat


Finally is Unicorns Are Real*, which I keep referring to as 'mermaids tears'. This is SUCH an amazing polish. Both pictures show 1 easy coat without topcoat, and as you can see below it transforms both the pink and the blue, and who knows what other colours! Definitely worth adding to your collection. 


Overall, I'm seriously impressed with the quality of these polishes. These retail for £3 and you would never believe they're so cheap! I think all 3 of these colours compliment each other perfectly, but I especially love Unicorns Are Real. 

What do you think? Let me know in the comments!
Alice