Hey everyone! Today I have a brand new tutorial tuesday for you, this time for some cute little glittery jellyfish. Don't forget to check out the tutorials tab at the top of my blog to see my previous tutorials! I've wanted to do jellyfish for ages, and I was really tempted to do them with needle dragging but I was in one of those 'it will probably fail so I wont even try' moods, and I'm quite glad because I like how these turned out. Perhaps I'll try needle dragging some time in the future instead. I'm starting to run out of ideas for tutorials, what would you'd like to see on future tuesdays? I only have a couple more tutorials left to post before I need to make some new ones, so any suggestions are welcome. Just don't ask for Christmas tutorials, I'm one of those spoil sports who doesn't even like the mention of Christmas before December begins. Anyway, the rest of the post will be after the jump! I've seen a few of you saying that you prefer it that way, as you can scroll through my blog much easier


The base for these nails was 2 coats of the gorgeous
Orly FX - AquaPixel*, from the Pixel FX collection. As you can see in the difference in the photos above and below, topcoat transforms this polish, but it is also as equally as beautiful on its own. This polish is vaguely textured, but not to an extent that it's irritating. I really love this polish, and I think it really suits the underwater look too.
And now for the tutorial...
Step 1: Paint your nails with your base colour, preferably blue.
Step 2: Paint semi-circles in white, this can be either acrylic paint or white nail varnish, and fill them in for the top of your jellyfish
Step 3: Using a thin brush, paint wiggly lines down from the semi-circle for the tentacles
Step 4: Paint on eyes using a thin brush or dotting tool, I used acrylic paint but you can also use polish if you'd prefer
Step 5: Finish off with a topcoat to seal in your design
What do you think? Let me know in the comments!
Alice
Hello! I have another
Born Pretty review for you guys today.
Let me start off by saying that I've never used water decals before so this was all new to me. I was pleasantly surprised by how easy it was though! Basically they are like tattoos for your nails.
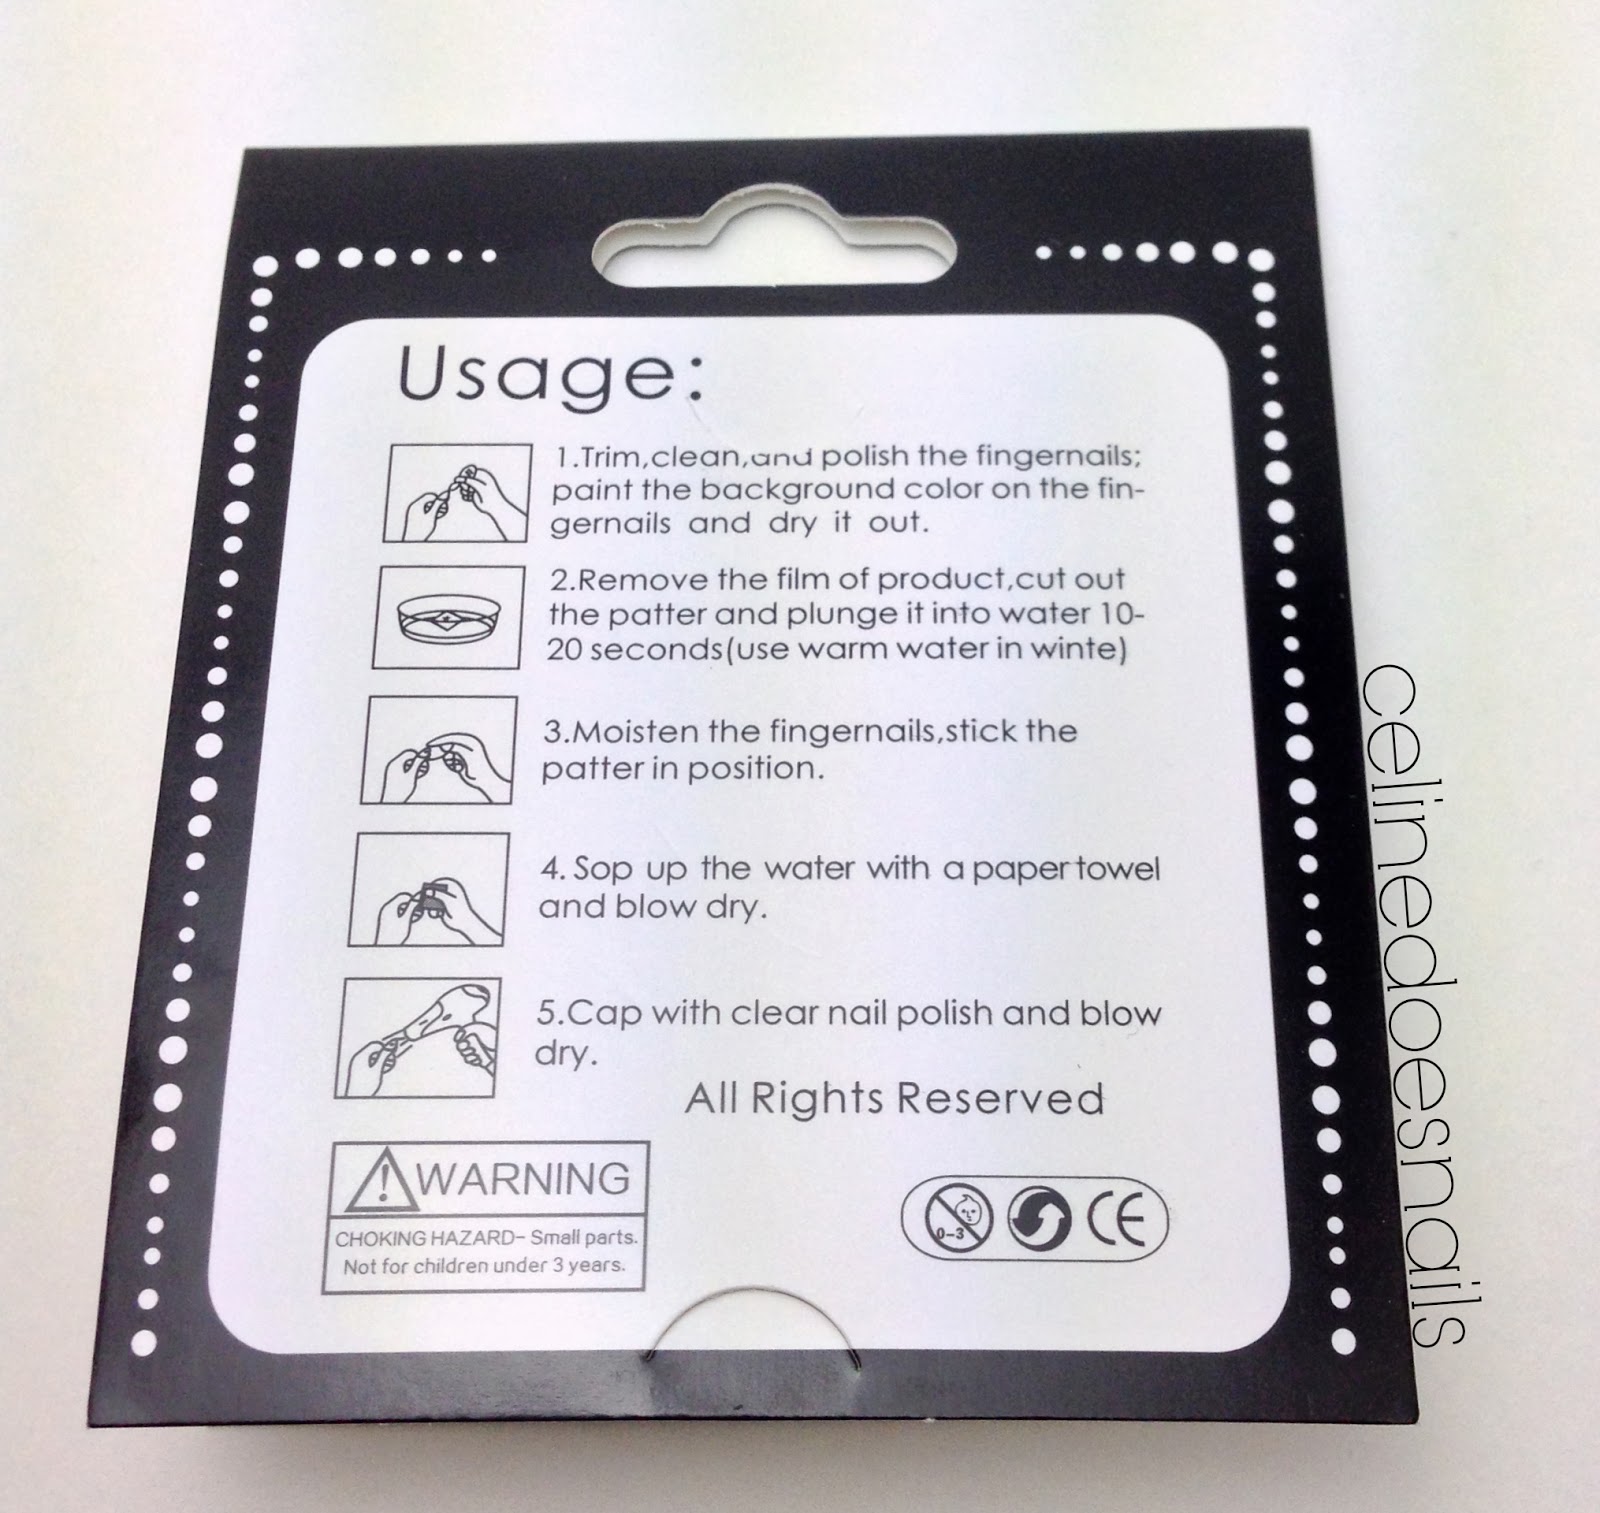
Here's the instructions on the back of the package.
Here's the simple version & what I did:
1) Cut out each decal you'd like to use
2) Peel off the plastic
3) Put the sticker into a small bowl of water
4) Wait 20(ish) seconds
5) Peel the sticker off and place on nails
6) Top coat!
It's so simple and virtually error proof. It took no time at all.
Now let's see how they looked on my nails!
In the past I've had trouble with stickers not laying flat but that was definitely not the case with these. They stuck nice and stayed put.
I especially love the skull on my index finger. It's great that the sheet comes with so many decals too! You can make many manicures with just that one set.
Right now the decals are $1.99. I personally think this is a great deal. This is perfect for when you don't have a lot of time but want something cute and detailed. They have so many other patterns too so if you're not much of a skull person look
here to see them all.
(side note: the polish is Sinful Colors "Envy" and it's absolutely gorgeous)
If you'd like to order these decals you can use my coupon code XKL91 for 10% off
and again they are found
here.
*This product was provided for review. All opinions are my own and are in no way influenced by anyone.
Isänpäivä (monesti äitienpäiväkin) tuntuu monesti tulevan jotenkin yllättäen nurkan takaa ja harvemmin ehdin ajan kanssa miettiä miten kiittää isää tänä vuonna. Tällä kertaa monet verkkokaupat ovat onneksi muistuttaneet minua tulevasta isänpäivästä, joka on siis ensi su 10.11. :D
The Body Shop* on alentanut mm. miesten
suihkugeelien hinnat 10 €:n (norm. 16.80 €).
He myös tarjoavat Shiny Nail Artin lukijoille -10 % alennuskoodin QQRU2ECU!!!
Koodi on voimassa
10.11 asti, mutta jos haluat varmistaa, että saat lahjan isälle ajoissa, täytyy tilaus tehdä viimeistään
ke 6.11 ennen klo 12.00.
The Body Shop:lla on tällä hetkellä lisäporkkanana tilauslahjana
käsidesi, jonka saa tilaukseen kaupan päälle 10.11 asti (ei ostorajaa!). Minulle ainakin aika ajankohtainen tuotelahja tämän flunssan kanssa, haha. :)
kuva : The Body Shop
...Tarjouksia on myös mm.
Hyvinvoinnin Tavaratalolla*, jossa on myös omalle sivulle koottuna isälle sopivia tuotteita ja alennuksia. Lakritsinen Born to Bio suihkugeeli vaikuttaa minusta erittäin jännältä ja hauskalta. :D
Sokoksella* muistetaan myös isää tarjouksilla. Sokokselta saa
-10 % alennusta normaalihintaisista miesten tuotteista koodilla
ISALLE! Koodi on voimassa enää vain huomiseen 5.11 asti. Sokos on koonnut erittäin runsaan valikoiman isälle sopiva tuotteita
saman sivun alle*.
Millä te ajattelitte muistaa isää ensi sunnuntaina? :)
*Affiliate-linkit merkitty tähdellä
Hello everyone!
Today's blog post is a bit delayed but better late than never right?
Here are my official go with my Halloween costume nails.
That's right! Pixar's UP.
This design is kind of recreation of a design I did about 8 months ago. (seen below)
I think I've definitely improved, especially with Russell.
Just a quick rundown of the colors - the background is a gradient of Wet N Wild Teal Slowly and See and Zoya Blu (one of my favorite polishes ever). Everything else (as always) was done with acrylic paint and topped with Seche Vite.
Onto the Halloween pictures! Whee I'm so excited!
Slight disclaimer: I'm not really one to post pictures of myself on my blog & such but I felt this was appropriate.
The photo above is of me and my boyfriend. In case it's not obvious, I am Russell and he is dressed as Mr. Fredricksen. I consider myself a decently crafty person and I put together both of our costumes myself. (lots of hot glue!)
I probably should have but I didn't really take any close up pictures of my costume. I made the sash out of brown fabric and foam and painted each badge with acrylic paint (hooray acrylic paint!) I actually painted my hat and flag (not too visible in the picture) with acrylic paint as well.
Oh and our Ellie badges! Which I did take a picture of.
Again, acrylic paint. I actually topped them with nail polish top coat (haha!) Not perfect but I don't think anyone was looking that closely.
We both carried around balloons all day at school. We got so many compliments, which I was honestly not expecting! It was a great feeling.
One last picture. Isn't he a cutie!? Oh & theres the little paper house I attached to the balloons.
I hope you guys enjoyed this. Sorry it kind of turned into a personal post.
Thanks for reading!
Huh, tämä flunssa alkaa vähitellen viemään loputkin voimani. Luulin että olin päässyt jo pahimman yli, mutta eilen oli taas kuumeilupäivä :'( Pidemmittä puheitta esittelen siis tämän vuoden
Halloween-lakkauksen.
Ei ollut kauheasti energiaa suunnitella mitään maata mullistavaa, joten onneksi olin tilannut
Adeninalta söpön Halloween-siirtokuvasetin*. Yhdistin siirtokuvat
Zoyan Cashmeres -kokoelman suklaanruskean
Louisen* ja pirteän oranssin
Color Club You Got Soul-arin kanssa. You Got Soul-ar toimi nimettömässä lakkauksen väripillkuna, kun taas muut kynnet saivat ylleen suklaisen sävytteen. Halusin vähän syvyyttä ruskeisiin ja kynsiin, joten töpöttelin niihin vähän kamelinruskeaa
Zoya Flynniä meikkisienellä. Pelkäsin myös että siirtokuvien mustat kuvioit eivät erottuisi tarpeeksi tummasta taustasta, ja Flynnillä sain vähän vaalennettua sitä. Louise oli käytettävyydeltään perus Zoya-laatua. Se levittyi helposti, peitti hyvin ja kuivui nopsaan (kynsillä kaksi kerrosta). Kimaltavaa You Got Soul-aria tarvitsi kolme kerrosta.
Pikkurillin kynteen kiinnitin siirtokuvan sijasta pyöreän
oranssin niitin (myös Adeninalta) ja mattasin sen
essie matte about you* mattapäällyslakalla. Lopuksi tein vielä tavallisella päällyslakka pieniä kiiltäviä "koukeroita" sen päälle :p Myös etusormeen tuli mattapäällyslakkaa. En osannut päättää mattaanko oranssin kissakynnen myös, joten kokeilin molempia versioita. :D Postauksen kahdessa ensimmäisessä kuvassa kynsi on kiiltävällä päällyslakalla ja kolmannessa taas mattana.
Mitäs pidätte? Nyt tämä painuu takaisin sängynpohjalle. No okei, menen oikeasti sohvalle kuuman teemukin kanssa katsomaan uutta lempi "flunssanpiristys sarjaani" eli
Parks and Recreationia :P
...Postauksen kirjoitusvirheet ja mahdollisen sekavuuden pistän flunssan piikkiin.
Essie matte about you, Zoya Louise, Zoya Flynn, Color Club You Got Soul-ar,
siirtokuvia/ water decaleita ja pyöreitä niittejä.
*Essie ja Zoya-lakat, siirtokuvat ja niitit saatu blogin kautta.




.jpeg)


