Minulle tuli viime viikolla joulu jo vähän ajoissa, kun postisetä toi yhden erityisen pehmustetun paketin :P Paketti nimittäin sisälsi koko
Zoya Ornate kokoelman! Himoitsemani talvikokoelma oli saapunut Suomeen ja Zoyan maahantuoja
NailCity oli lähettänyt sen minulle testiin (kyselin näiden perään jo kauneusmessuilla :P) Ornate lakat ovat kyllä juuri niin sopivia juhlakauden lakkoja kuin vaan voi olla! Ihanan kimaltavia ja todella kauniita mielestäni
♥ Yritin monta kertaa ottaa näistä kelvollisia pullokuvia, mutta hologrammilakat eivät vain kuvautuneet kunnolla :( Käykääpä myös kurkkaamassa Tyttö ilman helmikorvakorua -blogin Sonian postaus Ornate lakoista täällä. Siellä on lisää kuvia :)

Ylärivi: Zoya Storm (musta scatter holo!), Zoya Logan ja Zoya Blaze. Alarivi: Zoya Aurora, Zoya Ziv ja Zoya Electra. Hauskat nuo nimet mielestäni :D Varsinkin Storm ja Electra osuvat ihan nappiin. Musta Storm, punainen Blaze ja liila Aurora sisältävät siis holoshimmeriä. Eniten se näkyy Aurorassa, tosin ei näissä mun kuvissa valitettavasti :( Electra taas on näistä ainut glitter ja siinä on siis värittömällä pohjalla hologrammisesti kimaltavia hopeisia tikkuglittereitä.
Zoyan jälleenmyyjiä Suomessa voi bongailla NailCityn sivuilta täällä tai sitten kuluttaja-asiakkaat voivat myös lähettää sähköpostilla tilauksen osoitteeseen info@nailcity.fi. Lakat maksavat 15,50€ kpl, postikulujen hintaa en tiedä, mutta senhän voi siinä samassa mailissa sitten kysäistä :)
Sormeni syyhysivät heti paketin avattuani päästä kokeilemaan kaikkia, mutta varsinkin mustaa Stormia ja minusta erittäin kauniisti kimaltelevaa vihreää Logania. Meillä olikin sopivasti viime viikonloppuna työpaikan pikkujoulut ja valitsin asuksi kuvissa taustalla näkyvän vihreän mekon ja vyötärölle paksun mustan nahkavyön. Mekko toistuu näissä kuvissa vähän liian vaaleana ja on oikeasti lähempänä lakan väriä. Kaulassa minulla oli kuvissa näkyvät vihreät helmet.

Kynsissä on pohjalla yhdet kerrokset läpikuultavaa essie sugar daddyä, jonka jälkeen lakkasin ensin kaarevasti kynsien päihin mustalla Stormilla kerrokset ja sen päälle vihreällä Loganilla vähän ylemmäksi samanlaiset kaaret. Nämä Ornate lakat levittyvät tosi hyvin ja ovat peittäviä. Tälläinen koristelu sujui siis helposti, kun ei täytynyt kuin yhdet kerrokset kumpaakin laittaa :) Kun lakat olivat kuivuneet taiteilin kultaisella Moyra nail art lakalla lakkojen rajoille kuviot. Lopuksi lisäsin vielä kultaiset nastakoristeet, jotka kiinnitin kynsiin päällyslakalla. Kaiken päälle vielä paksut kerrokset Seche Viteä ja kynnet olivat valmiit juhliin :p Mitäs pidätte? :)

Tuo pukki on sellainen söpö pikku pyykkipoika, jonka baarimikko laittoi minun drinksuuni, kun kuuli, että olimme juhlimassa pikkujouluja ♥♥ Mun mielestä se oli niin suloinen, että oli pakko ottaa talteen! :p ...Hui, huomenna on jo aatto ja minä vasta täällä pakkailen ja joulukynnetkin on vielä tekemättä! :/ Toivottavasti ehtisin vielä huomenna ne postaamaan, mutta jos en ehdi niin toivotan jo nyt hyvää joulua kaikille! ^_^
Zoya Logan, essie sugar daddy, Zoya Storm ja kultainen Moyra nail art lakka
Hey everyone! I'm sorry for the delay in posting, I've had a pretty busy week because I got back from uni and I was seeing all my friends who I hadn't seen in a while, I hope you dont mind! So today I have week 7 of my then and now 'challenge' which, as promised, is christmas related. I was debating whether to include these at all because I actually did these
last year but I promised last week I would, and I also think it's a good way of seeing how I've improved throughout the past 2 years, and I guess these nails are becoming a bit of a tradition as well! More after the jump.
Oh look, bonus picture of my kitchen in focus! As you can tell I was reeeeally bad at taking good photos 2 years ago, I had improved more by last year but this years is definitely better.
I used Barry M - Matt white as the background and did both years previously too, this year I used OPI - Don't Mess With OPI for the holly leaves, Barry M - Red for the holly berries, Barry M - Silver glitter, and Sally Hansen - Just in lime for the inside of the leaves. This year all was done with a brush, last year all was done with a dotting tool, and the year previously all was done with a nail art pen (I guess my photography skills aren't the only thing that's changed)
 |
Last year's nails.
|

What do you think? Which year was best? Let me know in the comments!
Alice
Ulkona vallitsevaa säätä mukaillen, tässä nyt tämä edellisessä postauksessa vilahtanut kaunokainen
Sonnetarium Snowfall kynsillä,
Deborah Lippmannin tumman harmaan
Stormy Weather creme
-lakan päällä. Stormy Weather levittyi nätisti ja peittävästi, kuten tämän hintaluokan lakalta saattoi odottaakin. Parilla kerroksella sai parhaimman lopputuloksen. Snowfallia tässä on noin yksi kerros, saatoin nimittäin ottaa välillä lakkaa lisää siveltimeen ja vähän levitellä glittereitä paremmin ym, mutta tavallaan yhdellä levityksellä glitterkerros on kynsiin saatu. Nämä minun Sonnetariumithan ovat pieniä 9ml pulloja ja niiden siveltimetkin ovat siis pienempiä kuin "normaali" kokoisissa lakoissa, joten siveltimeen ei välttämättä saanut kerralla sopivaa määrää lakkaa.

Snowfall sisältää siis monen erikokoisia valkoisia kuusikulmaisia glittereitä, ihan pikkuruisista monen millin läpimittaisiin. Valkoisten glittereiden lisäksi se sisältää pieniä läpikuultavia glittereitä, jotka kiiltävät valon osuessa niihin erivärisinä riippuen alla olevasta lakasta. Aluksi luulin, että kaikki nämä kimaltelevat glitterit ovat samanlaisia, mutta niitä onkin vähän erivärisinä kiiltäviä, eikä väri johdu pelkästään aluslakasta. Moni ulottoinen lakka tämä Snowfall siis :) Lopuksi testasin vielä miltä tämä lakkaus näyttäisi matattuna ja lisäsin kynsiin kerrokset essien matte about you mattalakkaa. Mitä pidätte? :)
Sonnetarium Snowfall, Deborah Lippmann Stormy Weather
ja essie matte about you
Deborah Lippmann Stormy Weather saatu Love It:lta
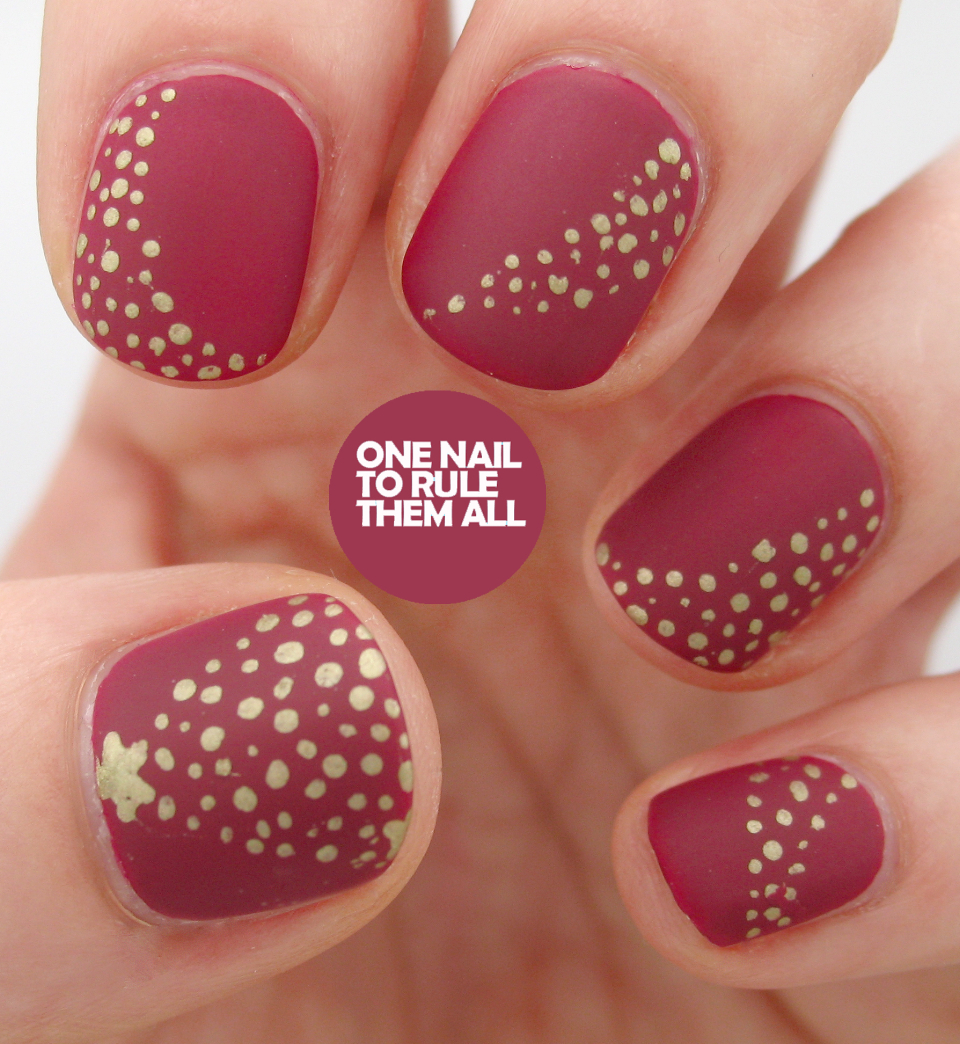
Hey everyone, I had the idea originally of doing these nails with studs, and then I thought perhaps studs and gold dots, and then once I'd just done the dots I quite liked them as they were, especially as they'd somehow developed to have a tree, so I added a (wonky) star on my thumb and topped with one coat of seche vite. Then I went to photograph them and no matter what I tried they looked AWFUL, the way the light was shining made them look streaky and awful so of course I decided to whack out the matte and make photographing 1000x easier (any excuse) and I actually do really like them like this, so I hope you do too!
I used a base of Nails Inc Hampstead Heath and Barry M gold foil to create the nail art and the matte top coat was one by Rimmel which doesn't have a specific name.
What do you think? Let me know in the comments!
Alice