Nail-Aween Frankenstein

I can't believe we are on Day 6 of the Nail-Aween Challenge already. With only 10 'days' in this challenge this means we are also coming closer and closer to the end. I plan to finish this challenge on Halloween.


nails nailart nail art polish mani manicure Spellbound Nail-Aween Halloween Challenge Frankenstein Bride of hair black white green stitched stitching stitch Sinful Colors Sally Hansen L.A. Colors

Today's challenge was Frankenstein nails. I decided to do the basic green, stitched Frankenstein nail and added a Bride of Frankenstein accent nail. These are very simple but simple can be good too, and I think these turned out pretty great.

I'm going to be so sad when this challenge is over. I've really come to like them and would love to be part of another. They do have to be flexible enough that I don't have to post daily though. If anyone knows of any upcoming challenges that will let me work on a flexible schedule let me know please.

Also, check out the other wonderful artists doing this challenge with me. They have come up with some really great nails!!


(List includes blogs and FB pages)

Arcadia's Witch's Brew

I wasn't sure what I was going to post today right up until I actually started typing. It's the reason for the late post. I haven't had much luck with my nails this weekend and even less luck in taking pictures. I finally picked up the supplies this weekend to make my light box, but what I haven't managed to find yet is the perfect setup for said light box or the correct setting on my camera. A lot of my pictures turn blurry and the others my camera does some automatic adjustment and turns the picture orange.

However, I do have one picture. It's not one I was planning on posting to the blog but it's all I have that isn't for the ABC Challenge or the Nail-Aween Challenge. So, here goes ...

nails nailart nail art polish mani manicure Spellbound Arcadia YouTube Halloween Witch Witch's Brew potion eye eyes eyeball glitter shimmer China Glaze Sally Hansen bloodshot

I knew the moment Arcadia posted the tutorial, Witch's Brew, to her YouTube channel that I had to do these nails. There were no ifs, ands, or buts about it — this design was totally meant to be on my nails! I was in a hurry so I left off the spiders. In place of the polishes shown in the video, I used Sally Hansen's Green With Envy and Wet n Wild's Party of Five Glitters. I did use China Glaze's Jungle Queen as my base. I love how Arcadia decided on this color because it is so different from the usual black base most use in Halloween nail art. Jungle Queen also adds a lovely shimmer that looks wonderful and unexpected in the sun. I had a woman stop me and positively gush over these nails so I tip my virtual hat to Arcadia and send all that gushing her way — along with my own gushing!

Seriously, if you haven't found her channel on your own ... go! Go now; you won't be disappointed.

Frankenstein-ish nails

Hi everyone! So today I have a quick mani I did to just try out an idea, I also wanted to experiment with lighting and stuff because my dad is building me a lightbox so that's why the pictures aren't very varied. These were meant to be based around frankenstein but my sister said they looked like barbed wire so I'll leave it up to you to decide! Hope you like them :)


I used China Glaze - Electric Pineapple as a base and used a small brush to paint the black acrylic paint, topped with a coat of Rimmel's Matte top coat I dont know why the pictures came out so green because they weren't so bright in reality!


Alice

Nail-Aween Ghosts

The next in the Nail-Aween Challenge was a choice between ghost or goblin. I chose to do ghost, but I wanted to do something a bit different than simple ghosts on my nails.

nails nailart nail art polish mani manicure Spellbound character Casper Ghosts Stinky Stretch Fatso friendly

With this in mind I did Casper and the Ghostly Trio: Stretch, Fatso and Stinky. What I couldn't manage to get in the picture is the glitter. I used a glow in the dark glitter on the Ghostly Trio, not for the glow, but for the slightly green tinge and the small bits of glitter to give them a ghostly sparkle. I used Sinful Colors Pearl Harbor for Casper.

The other Sinful Colors I used is Snow Me White. I just picked this up in my last shopping trip since my China Glaze White on White has run out. I never seem to be able to get to Sally Beauty to pick up more, so I had to settle. However, settling really isn't a bad thing. I like the texture of China Glaze better but Sinful Colors is a really awesome one coat white. I used two coats just to be extra sure it was perfect since I was just doing lines, but one coat would have worked perfectly. If you are looking for a one coat white, Snow Me White is definitely it.

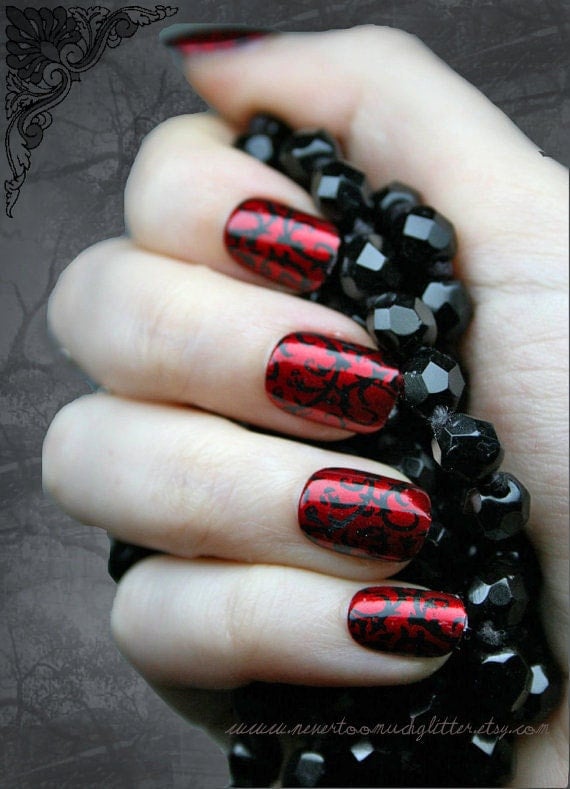
Nail art "Romantic goth"


Prodotti utilizzati:

base coat
smalto rosso magnetic pupa n°28
colore acrilico nero
top coat

Inspired by: http://img1.etsystatic.com/000/0/5531644/il_570xN.342498969.jpg

Collection 2000 'Twilight' review and nail art

Hey everyone! So unless you didn't get my hint the other day and you didn't see my tumblr post yesterday then you should know that today I'm reviewing Collection 2000's Hot Looks "Twilight" collection. All pictures are taken in natural light. Hope you like it, pictures after the jump! 


First up we have 'Shadow' which is a reddish/brownish/blackish colour (can you tell I dont know how to describe it?) Though I would say that in person you could quite easily pass it off as black. I've been wearing it on my nails all week and you just can't tell the difference. So if you're running low on black and you want a good alternative then this is the polish for you! This was two coats with no top coat


Next is 'Dusk' a lovely teal. One bonus to this polish was definitely that it didn't stain like most teals. This was two coats with no top coat


'Hidden' is definitely my favourite polish of the whole collection. I already have some awesome nail art planned with it that I unfortunately didn't have enough time to do this weekend but this polish is perfect for it. This was two coats with no top coat


'Twilight' is a lovely dark purple. It was very opaque and I may have got away with just one coat but I used two just in case. This is also without top coat


Lastly is 'Midnight' which is a dark blue. Unfortunately, this is my least favourite polish of the bunch, which it had the promise to be opaque in two coats it spread unevenly upon drying. I kept with two coats for consistency but it could have done with a third, in which case it would have probably been a lovely navy blue. This is also without top coat


Overall, the polishes are consistent and the only one that I had any vague problems with was 'Midnight'. They also all dried incredibly fast, just like the bottle says. Of course though, I couldn't review nail varnish without seeing how it works for nail art!


Firstly I used 'Shadow' as a base colour to these nails to show that it really does pass off as black. These are inspired by acid wash nails but I actually just took it off by dabbing with my finger over one coat of white.


Just a quick flower post with 'Hidden' because I didn't want to hide the colour too much! For this I used 'Dusk' for the flowers which I painted on using a small paintbrush


I also used 'Twilight' to create halloween look quickly, the black is a generic striper and the grey is Collection 2000's Angel Wings


Finally, the nails you saw the other day, spun sugar nails! There are plenty of tutorials out there for this, Tis Ems has a good one and that's the one I used. This was created using 'Midnight' and 'Hidden'


All of these polishes are available in Boots and Superdrug for around £1.99
Let me know in the comments what do you think about this collection, will you be buying it? 

Alice

These products were provided to me by Collection PR for an honest and truthful review, my opinions were in no way influenced. 

Halloween Glitter and Glue

Today is supposed to be the next in the Nail-Aween Challenge, I know! But I'm a day behind after being sick this week. I'll be able to catch up this weekend but until then I've swapped today and tomorrow's posts. Tomorrow will definitely be the Nail-Aween nails.


Today's post is another of the unnamed/unbranded polishes in the cute pumpkin bottles. This polish is from the same company who made the awesome pumpkin bottled pink glow-in-the-dark polish I posted to welcome October. After seeing a few of these polishes in action, I think I'm just going to start buying these whenever I see them. They are all so great and cheap too!


Since this is such a glitter-packed polish I decided to try a glue base coat. My polish addicted sister-in-law recommended I check out Pretty Purple Polish's post on glue base coats, and I thought it was an awesome idea. If it could make removing glitter easier I would worship the creator of this idea!! I cleaned out an old polish bottle and filled it with Elmer's glue. If you're going to use an old bottle like I did make sure you clean the bottle thoroughly! I used a lot of nail polish remover and water and more than a few Q-tips before I felt it was clean enough. Wet glue and wet polish are like oil and water! This is one thick coat of glue on my nails with my usual base coat under the glue.


The glue will dry clear and matte on your nails. This is a great picture showing how the glue dries. I'd recommend a second coat of glue, as this will make removing the glitter much easier.


I used three coats of the pumpkin polish. It's black base is packed full of large and small orange hex glitters that look amazing in the sun. They actually look great anywhere but they really grab attention in the sun. This is such a perfect polish for Halloween!


Then came the moment of truth — the removal. Would the glue base coat work for me like it worked for others? Yes, it really did work!! Since I didn't have an orange stick and I didn't want to risk damaging my nails, I soaked my fingers under some hot water to loosen the glue before I began peeling. As you can see, I started at one corner of my nail near the cuticle. It felt really weird to peel my nail polish off, not painful but there was definitely some pulling that could be felt. Some of the polish came off in chunks, I'm guessing where I didn't use enough glue, but most came off in one big, nail shaped piece. I worried that there might be some damage to my nails after all the horror stories of what can happen if you pick at your nail polish, but there was no damage to be seen after clean-up.

Don't be worried about peeling happening while showering, doing dishes, or washing your hands either. Even after soaking my nails, I still had to work to get the polish to peel.