Keltaisia kaaria

Tässä yksi julkaisematta jäänyt lakkaus kesältä. Käytin näissä samaa "kaarityyliä", jota aikaisemmin kokeilin tässä, paljon katseluita keränneessä, Helmirusetteja -postauksessa. Tällä kertaa vain tein sen kerroksittain kahdella värillä ilman muita koristeluja :) Tietääkö joku onko tälle lakkaustyypille olemassa joku oma käytetty nimitys blogimaailmassa? Siis tälläiselle, että tehdään tavallaan ranskis kahdella sisäänpäin kaartuvalla kaarella, jotka yhdistyvät kynnen keskiosassa. Musta tuntuu että on, mutta en nyt millään saa mieleeni mikä.


Pohjalla siis läpikuultava essie sugar daddy*, jonka jälkeen tartuin ihanan peittävään ja erittäin kesäisen keltaiseen Nabi Funky Yellow neonlakkaan, jolla muotoilin ensimmäiset kaaret. Olen saanut tämän Nabi lakan Ihanat kynnet.fi verkkokaupalta, jossa näitä myydään 5.50€ hintaan. En ainakaan tiedä mitään  muuta paikkaa missä tätä merkkiä myytäisiin. Tykkään tämän lakan laadusta paljon. Yleensä neon lakat ovat niin lapikuultavia, että niiden alle täytyy ensin laittaa valkoisella lakalla kerros ja näin niiden "neonisuus" myös pääsee oikeuksiinsa, mutta tämän kanssa tarvitsi vain kaksi normaalia kerrosta lakkaa ja voila! No onhan tuon koostumus vähän normaalia vetisempää, mutta ei se ainakaan tälläisessä lakkauksessa sen kummemmin haitannut.


Seuravaksi lakkasin siis samanlaiset kaaret pastellisella likaisenliilalla  essie bangle janglella. Harmittaa kyllä kovasti, kun sen väri toistuu näissä kuvissa lähinnä harmaana, koska olin niin innoissani tästä väriyhdistelmästä. Se on siis luonnossa paljon violetimpi. Todella nätin sävyinen. Temptalia esittelee koko essie coctail bling kokoelman tässä postauksessa, jossa mielestäni viimeinen kuva bangle janglesta on todenmukaisin. ...Niin ja lakkaukseen palatakseni, lopuksi tietysti kaikkien kerrosten päälle paksu kerros pikakuivattajaa tasoittaamaan :)

Essie sugar daddy, Nabi Funky Yellow ja essie bangle jangle

Wuhuu, bloggerin kautta lukijoiden raja on jo pamauttanut 700 yli!!! Aivan mahtavaa, kiitos! Tervetuloa kaikki uudet lukijat ja toivottavasti viihdytte :) Kai olette jo huomanneet osallistua Mini MIYO arvontaan?  Hauskaa viikonloppua < 3

*Essie lakat saatu L'oréalilta

0 comments:

Orecchini Floreali


Orecchini in gel UV interamente fatti e dipinti a mano da me...

0 comments:

Sephora Giveaway Reminder


This is a reminder that The Great Sephora Giveaway is ending Saturday. Really, it ends midnight the 31st but midnight makes it September 1st, right? Either way, this is just a reminder to get your entries in before it ends.

I also want to thank all those who have already entered. Over 2500 entries? Nearly 300 GFC followers, 225 on Tumblr, and 29 Hellocotton as I'm typing this?? Plus all those who follow invisibly? You all have made this an amazing giveaway, and I couldn't possibly love you more!! ♥ I hope you all find something about my blog that will keep you following me. :)

0 comments:

Mini MIYO arvonta!

* Arvonta on päättynyt *

Heips! Palasin juuri parin viikon matkalta takaisin Suomen kamaralle ja nyt on taas juttua jonoksi asti. En oikein ehtinyt nettiin matkalla, jos ihmettelitte kommentteihin hidasta vastaamista, ja sain vain yhden postauksen sinä aikana julkaistua. Mutta nyt minulla onkin vähän normaalia kivempi postaus teille tänään! :) Muistatteko kun jokin aika sitten esittelin Face Helsingiltä testaukseen saamiani lakkoja? Noh, arvatkaa mitä? Nyt teillä on mahdollisuus voittaa kolme niistä itsellenne! :) Sain näitä siis Face Helsingiltä kaksin kappalein, joten teille lukijoille lahjoitetaan toiset :)

Arvottavana siis kimalteleva turkoosinsininen MIYO  Jupiter, kultainen glitter MIYO Glitzy Gold ja tuoksuva vihreä MIYO Mini Drops Papaya/Mango. Näistä lakoista kahta käytinkin jo tuossa edellisen postauksen liukuvärjäyksessä :)


Arvonnan säännöt:
  • Osallistuakseen täytyy seurata Shiny Nail Art blogia jotakin kautta: joko bloggerin kautta (sivupalkissa-->), tykätä Facebookissa, seurata Blogilistalla tai Bloglovinissa. Bloggerin kautta lukijoiden tulee antaa nimimerkki ja Facebook tykkääjien fb-nimi. Bloglovinin ja Blogilistan kautta seuraavien odotan todistavan jotenkin seuraavansa blogia esim. kuvankaappauksella, jos voitto osuu kohdalle...
  • Osallistujan tulee täyttää lomakkeseen toimiva sähköpostiosoite, jolla otan yhteyttä voittajaan. Voittajalla on kaksi päivää aikaa vastata ja lähettää yhteystietonsa minulle, jonka jälkeen arvon uuden voittajan.
  • Pakkaan lakat mahdollisimman hyvin (niinkuin aina), mutta en ole vastuusta postin kämmäyksistä.
  • Voin postittaa lakat myös ulkomaille, jos siitä aiheutuvat postikulut pysyvät alle 15 eurossa. Tietääkseni kirjeen postitus ulkomaille pitäisi onnistua alle tuon määrän, mutta en ole varma onko  postilla joitain erilaisia hintoja eri maihin, joten varmuuden vuoksi laitan tuon rajan. En ole vastuussa toimitusmaan tulleista tai muista kuluista/ kielloista joita kyseisessä maassa saattaa olla.
  • Arvontaa saa mainostaa blogissa ja sosiaalisissa medioissa lisäarpojen kartuttamiseksi. Tällöin lomakkeeseen tulee täyttää toimiva linkki mainostukseen.
  • Täytä lomake vain yhden kerran! Useamman osallistumisen lähettäminen tulkitaan vilpin yritykseksi. Jos et ole varma oletko jo osallistunut, niin laita mieluumin kommentti tai sähköpostia...
  • Aikaa arvontaan osallistumiseen on sunnuntaihin 9.9 klo 15.00 asti!


0 comments:

Ugly Doll Nails Tutorial

A while ago on Tumblr I posted these nails before I started this blog and recently someone asked me to do a tutorial for them. I'm afraid it's only a picture tutorial but I hope you like it :) tutorial is after the jump!


First of all paint your nails black, I used Barry M - Black for this design


Next, using the brush in the nail varnish, paint a squoval shape on the corner of your nail, it's best to use an opaque colour for this if you're using a black background, I used Barry M - Blueberry


Next, using a small dotting tool make the ears and arms (Don't worry about it being completely even as the top coat will even it out later)


Once all the blue is dry, take a large dotting tool to create the eyes using white nail varnish (I used Rimmel). Then using the thinnest dotting tool you have, create the nose using red nail varnish (I used Barry M) and using the same dotting tool create the pupils of the eyes using black. 
Then, using a thin paintbrush, or (if you wish) the dotting tool again, paint a thin black line for the mouth and add small white dots for the teeth using the same brush/tool.


Then finish off with a topcoat and you're done, you can also do this with other colours and body shapes as in the first picture using a similar technique. 


I'm sorry it's a bit rushed towards the end, I didn't have much time, but I hope this was helpful!
Alice

0 comments:

Watermelon Nails

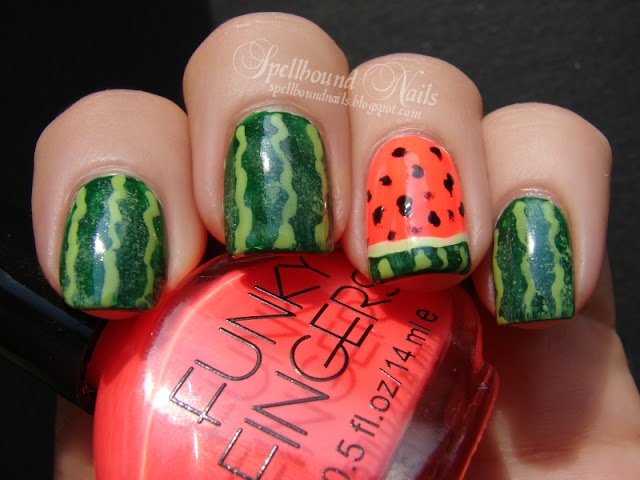
Wow, is it time for another post already? I was going to use yesterday to get my pictures all nicely resized and watermarked and, if I had some extra time, get a few posts typed up for auto-posting ... yeah, that didn't happen. Lol! I spent the past two days doing extreme cleaning. I don't know about you but cleaning makes me hungry and there's nothing better than a nice refreshing watermelon!


nails nailart nail art Spellbound mani manicure watermelon fruit green China Glaze Holly-Day Sally Hansen Green with Envy Funky Fingers Kingston realistic

This design was originally done by The Polish Well. I fell in complete and total love with this idea after seeing her nails posted on Beautylish. I debated doing them on my own nails since she had already done such an amazing job on them ... but you should know by now that I have no impulse control. I couldn't resist.


nails nailart nail art Spellbound mani manicure watermelon fruit green China Glaze Holly-Day Sally Hansen Green with Envy Funky Fingers Kingston realistic

I knew immediately that I wanted to use Funky Fingers' neon Kingston for the flesh of the watermelon. For the skin, I decided to go slightly more realistic by using China Glaze Holly-Day as a base and dabbing on a light speckling of Sally Hansen Green with Envy. I also used this color to draw the squiggles onto the watermelon.

I wish I had had a watermelon on hand (no pun intended) so I could have pictures of this mani next to a real watermelon. My family were amazed at how real they looked when we went shopping while I was wearing this mani.

0 comments:

Scrabble love nail set

So a while ago on tumblr I posted these nails and they became my most popular post ever. I don't really know why because I almost didn't even upload them because the background to the picture annoyed me. Anyway, I decided to redeem that picture by doing them in the form of a new set that's now available on my Etsy.


Alice

0 comments:

Neon Sunbeams

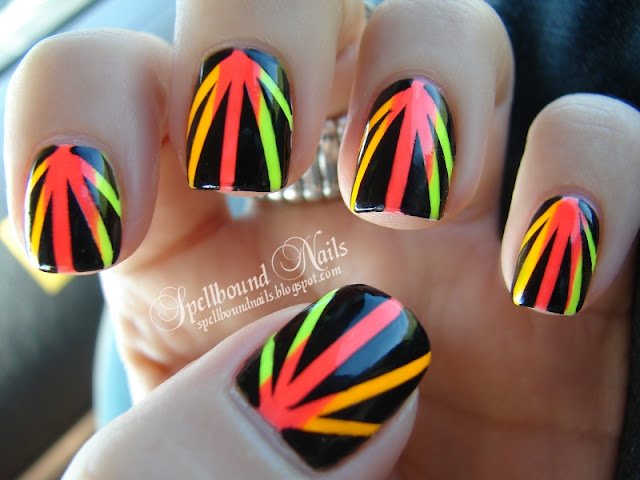
I'M BAAACK!!! Well, I've been back for a week but I needed time to mourn the loss of the beach. I missed it horribly this week. Gasp, I didn't even want to do my nails this week! However, that's over with, and I'm ready to get back into my usual posting schedule. I have a few nail designs saved up for you but I want to share my beach nails in this post. The design for this post was inspired by Neon Rays by Chloe's Nails. I thought they were the perfect nails to arrive at the beach with. And these nails are amazingly easy to do. The hardest part was actually cutting the tape since I don't own any striping tape.

nailart nail art nails mani manicure Spellbound Neon Sunbeams Rays Sunrays China Glaze Funky Fingers Color Club Taped Taping Tape orange green yellow pink hot black white Sun Worshiper Kingston Yell-Oh!

I'm not sure where the idea came from, I remember reading it on a blog somewhere, but the easiest way to cut the tape is to take a strip of the tape and place it on a sheet of wax paper. That way the tape doesn't stick to your scissors and you can get nearly perfect 'beams' every time. Simply peel them off once your base polishes are dry and create the beam pattern. I used the fairly standard beam pattern but you could turn the beams around, do different beam patterns on different nails or even do something else like zigzags.

nailart nail art nails mani manicure Spellbound Neon Sunbeams Rays Sunrays China Glaze Funky Fingers Color Club Taped Taping Tape orange green yellow pink hot black white Sun Worshiper Kingston Yell-Oh!

Speaking of the base polishes, you gals should know by now that I always use two (or more) coats of white to make the neons pop. This time I used two coats of China Glaze White on White. The neon polishes are China Glaze Sun Worshiper, Color Club Yell-Oh! (which looks slightly green to me and these pictures agree), and Funky Fingers Kingston. I didn't do or use anything special to get the polishes lined up on my nails. I tried using a nail art brush but they were simply too small to work with so I used the polish brush and carefully painted stripes on either side of my nail and finished with a stripe down the middle. These colors took two coats and I was extra careful with the final coat to touch up any mistakes I made with the first. It may sound daunting and there is a moment of panic before you begin (how could such a large brush make three lines without overlapping horribly?) but it's really not once you start! Trust me! You will want to be careful with the wider brushes such as some of the Sally Hansen brushes and the Wet n Wild Pro brushes. If you just have to use one of these brushes try tipping the brush in it's side. That will give you a slimmer brush to work with.

nailart nail art nails mani manicure Spellbound Neon Sunbeams Rays Sunrays China Glaze Funky Fingers Color Club Taped Taping Tape orange green yellow pink hot black white Sun Worshiper Kingston Yell-Oh!

Let your base polishes dry. You can add a top coat before taping for extra protection against chips and bleed through and also to give a smoother finish if you like. After your polishes are dry simply tape your pattern. Make sure the tape lays flat and remember to fold the ends of the tape over your nail tips and work it into the creases of your fingers. Coat your nail (and the tips of your nail between the tape) in your top polish. I chose black but again it doesn't have to be black. Once you have your top polish on immediately remove your tape. I use a pair of tweezers to grasp the tape (less messy and a smaller chance of smudging already completed nails) and get best results when I pull the tape slowly and smoothly back over my nail from the tip ... much like waxing in slow motion. :)

0 comments:

Nail Art "Holobutterfly"


Prodotti utilizzati:

base trasparente
smalto azzurro hologram shaka n°04
smalto argento hologram shaka n°06
colore acrilico nero
top coat

0 comments:

Nail Art "Purple Hearts"


Prodotti utilizzati:

base trasparente
smalto viola pupa n°401
smalto viola Hologram shaka n°03
top coat

0 comments:

Something that was meant to look better than it did

So in my head today's nails looked a lot better than they did in reality, I just dont think the colours really match and it looks a bit strange. I like these simple flowers and I've done them before and will probably do them again, so one mistake doesn't mean the end of the world. Nonetheless, I needed posts for whilst I'm away so this is what you're getting haha. 

I used China Glaze - Gaga for Green, Rimmel's white tip nail varnish, Barry M - Blueberry and an unnamed dark pink. Hope you like them!


Alice

0 comments:

Pink Mix 'n' Match

So today I decided to combine some of my favourite nail artist's ideas into one manicure. I chose pink because it was first to hand but I may try this with other colours in the future because I really enjoyed doing them. 

Thumb - based on tutorials by The Nailasaurus
Forefinger - based on a more complex design by Dressed Up Nails
Middle finger - MrCandiipants' lovely little flowers
Ring finger - just fancied some studs and I've seen a few people do these
Little finger - Mr Candiipants' again with her zig zags.


Alice

0 comments:

Glitzy Papaya


No niin tässä nyt tämän  edellisessä postauksessa vilahtaneen lakkauksen "virallinen postaus" :p Lisäsin siis liukuvärjäykseen vielä käsinmaalatun kukat nimettömiin. Pohjalakkana tässä taas essie sugar daddy*, jonka päälle aloin kärjistä lähtien tuputtelemaan meikkisienellä vihreää MIYO Mini Drops Papaya/Mango tuoksulakkaa. Vihreän päälle levitin kultaista MIYO Glitzy Gold  glitterlakkaa, sen omalla siveltimellä lähtien oikeastaan kynsienkeskeltä niin, että liu-utin sitä liukuvärjäyksen rajalta molempiin suuntiin. Tällä tavalla sain vihreän lakan näkymään eniten ihan kynsien kärjissä ja liukuva efekti voimistui. Tähän väliin kaikkiin kynsiin tuli pikakuivattavaa pari kerrosta, joka myös tasoitti glitterin epätasaiseksi jättämät kynsien pinnat.


Lopuksi maalasin nail art lakoilla nimettömiin kukkaset. Aluksi muotoilin terälehdet kultaisella nail art lakalla ja sen päälle tein ohuet vedot vihreällä ja vähän pastellista pinkkiäkin laitoin terälehtin keskelle. Se ei kyllä näy kovin paljoa :D Vihreä lakka näyttää kuvissa turkoosimmalta kuin luonnossa..Viimeisenä pistelin punaisella lakalla pisteitä kukan mediksi. Mitäs mieltä olette? Miten te yleensä teette liukuvärjäyksen? Olen lukenut/ katsonut monia erilaisia ohjeita. Joissakin laitetaan meikkisieneen valmiiksi raidat kaikkia kynteen tulevia värejä ja sitten töpötetään ne samaan aikaan kynnelle. En itse ole koskaan tehnyt niin, vaan aina väri kerrallaan. Pitää varmaan joskus koittaa tuotakin tekniikkaa :)

Orly Instant Artist Pink Pastel, Color Madrid Teal Charge, MIYO Mini Drops Papaya/ Mango, MIYO Glitzy Gold, essie sugar daddy, Flexbrush Red ja Art Club You're Golden


*Essie sugar daddy saatu L'Oréalilta
  MIYO lakat saatu Face Helsingiltä 

0 comments:

Back to normality!

So now the challenge is over we can return to normality, although having written all these posts in advance for my 2 week holiday I wouldn't exact call it normal. I'm not one of those bloggers who has a large selection of things still to post, I do my nails and I post them, simple. So it's been pretty stressful to try and get some extra posts sorted for whilst I'm away, but I hope you'll enjoy them.

Today's post came to me accidentally, I was just messing around and this is what I came up with. I actually really like it though I think it would have been even better outlined in black, maybe I'll try it again when I get back from my holiday. 

I used Barry M - Blueberry and Matt White + acrylic paints, using a dotting tool for the hearts and a small thin paintbrush for the details. Hope you like them!


Alice

0 comments:

Day 31: Recreate your favourite challenge.

So that's it, the challenge is over! I've really enjoyed doing it but whilst the inspiration was good it was stressful to manage everything alongside getting a post up everyday. Today I decided to do gradients again, they're super easy and I think I need to improve on them a lot because mine are never very smooth, the sponge effect is always very obvious. I also felt that my original post's colours weren't obvious enough so I changed them around a bit (and I made it into a 3 colour gradient instead)

I used China Glaze - Something Sweet and an unnamed light pink and an unnamed darker pink. Hope you like them!


Alice

0 comments:

Day 30: Inspired by a tutorial

The second I saw what today's post was I knew what I wanted to do. I did this design before way back when I never took pictures of my work (idiot) and it probably wasn't very good anyway but it's such an awesome design that I wanted to do it again. I chose this tutorial by the Daily Nail, the blog that started me on the path to nail art, and let's face it she is awesome at nail art!

I love these nails because they really stand out and I'll be re-doing them for my holiday on Saturday (don't worry I have lots of posts lined up) because I can't take any nail varnish with me (BOO)

Hope you like them! I had to mattify them because I've run out of Seche Vite and whilst I have other top coats they are AWFUL and I didn't want to ruin these nails with them + matte is awesome.


Alice

0 comments:

Day 29: Inspired by the supernatural

I had no idea what to do today so I just turned it into "inspired by halloween" and did a halloween themed post with a haunted house, bats and ghosts.

The background is Barry M - Black and then I use white acrylic paint for the outlines.


Alice

0 comments:

Motel Rocks

Hi everyone! A break from the challenge today to bring you a tutorial for some nails I did for a website called Motel Rocks, it's a clothes website and they have some really lovely stuff. You can check out my post on their blog here and check out their website here.

Alice

0 comments:

Day 28: Inspired by a flag

I must say that the olympics have made me very proud to be British and I was definitely supporting Team GB the whole time, so when we placed 3rd in the medal table (which, when you think about how small we are, is quite a feat) I knew I wanted to do flag nails related to the olympics.

Our flag takes pride of place on my middle finger (don't look too much into that) and in order of the top 5 from thumb to middle finger is the American flag, the Chinese flag, our flag, Russia's flag and the Republic of Korea's flag.

The base to all nails was Barry M - Matt White and I also used Barry M for the red and blue and acrylic paint for the yellow and black.  All details were done with a small brush. Hope you like them! There's only one picture today because it seemed a bit silly (and offensive) to cut off the American flag on my thumb as I usually do.


Alice

0 comments:

Day 27: Inspired by artwork

These nails might seem rather lazy but I had barely any time to do this design in and I couldn't think of anything inspired by artwork that wouldn't take a billion hours to do.

I have done this design before, before I had this blog and before I could actually take pictures of my work that were in focus. I have a few designs on my computer that are all out of focus and I've been intending to redo them all for a while, mainly so that I have good pictures of them but also to see how I've improved in the last year or so. So consider this the first installment, perhaps I should post before and after photos? What do you think?

For this design I used Barry M for the red, yellow and blue, and unnamed pink from a set I got ages ago and China Glaze - Gaga For Green. Then I did the details in acrylic paint and Barry M - Matt White. Hope you like them!


Alice

0 comments:

Day 26: Inspired by a pattern

I had a billion ideas for this but I chose this one because it was different to my usual style, hope you like it!

All done with dotting tools of different sizes on a background of China Glaze - Refresh Mint


Alice

0 comments:

Day 25: Inspired by fashion

Hello everyone, I'm afraid I'm not a massive follower of fashion, in fact most of the 'fashionable' pieces of clothing in my wardrobe are those that I barely ever wear, so for this challenge I turned to trust Google images and put in 'fashion' and then chose the first thing that caught my eye.


I used Orly - Glowstick and Barry M - Matt White and Black with tape to create these nails, hope you like them!


Of course as is always the case with neons it was difficult for the camera to pick up, but I promise you it was incredibly bright, and you'll just have to take my word for it ;)

Alice

0 comments: