Showing posts with label Milani. Show all posts

Teal Glitter Gradient

Hello again! Today I have a design using two Milani polishes I picked up at my local drugstore for half off the regular price! I mean, how was I supposed to walk away from that deal!
I didn't plan to use them together, but once I brought both polishes home I was inspired to try to do my first ever glitter gradient!


For this look I used two coats of Milani Quick Teal as my base, then I applied a drop of Milani Pink Flare by my cuticles, cleaned the brush off, then pulled the polish down the length of my nail. I added a bit more of Pink Flare to my cuticles afterwards to touch up the glitter, and make it a little bolder. For my first ever glitter gradient, I think it came out pretty well. It took a couple tries to get the right amount of polish, but I think Pink Flare had the perfect density for it.
I finished the gradient off with a coat of my new Essie Super Duper Top Coat.
I don't remember where I learned how to do a glitter gradient. I think it was from the amazing blog Chalkboard Nails, but I'm not sure. I have a terrible memory!

Glitter gradient under lamp.


Glitter gradient in natural light.
Glitter gradient close up.
I know I went a bit picture happy, but I had a hard time getting the pink in the glitter polish to register in the pictures! It looks silver, but I swear, Milani Pink Flare is a dusty pink base with dense, fine, pink micro glitter, and round holo-glitter in just a rainbow of colors. You can see the true color in the bottle in the pictures, but on the nail, not so much. In person though, it looks fantastic and bright pink.

I plan on doing more glitter gradients in the future, including free-edge gradients. They are just so pretty and interesting to look at. I may have to give color gradients a go as well, though I think that is going to take some practice...

Thanks for reading! To check out previous designs I've done click here.
- xo Brittany


Follow on Bloglovin

A Month in Mani's

A Look back at all my manicure looks for December 2013.


It's time for my last A Month in Mani's for 2013! I really like doing this recap -I hope you do too!- , so I think this is a series that I plan on keeping for 2014. Like always I will have links below each look, which will take you to it's corresponding post. I also will have manicures that I shared on Instagram. 
I actually did a lot more manicures than I thought in December! I was pleasantly surprised. Hopefully I can do even more this month.

Hard Candy Sweet Tooth
My first manicure for December was this review of Hard Candy Sweet Tooth. This was the first time I had ever tried Hard Candy polish. I was not too thrilled by the formula, but I was pleased with the final look. I just love the multicolored round glitters. I used four coats of Sweet Tooth over a coat of white polish, then finished the look with a coat of my Revlon Quick Dry top coat.

O.P.I I Theodora You
This soft, pale pink polish is from the O.P.I Oz the Great and Powerful Collection. It was very thin, so I used five thick coats over a coat of white polish. Then finished it off with my Revlon Quick Dry top coat. While I hated the formula, I really like the look of this shade.

O.P.I Don't Burst My Bubble.
This nude/taupe polish is also from the Oz the Great and Powerful Collection, and a total pain to apply. I applied five thick coats over a coat of white polish. Then one coat of my Revlon top coat. This shade was a thin, streaky mess, and very disappointing. Though the name is adorable...

I'd love to stay, but I really mustache...
My first design of December was this super cute mustache design using Milani A Rose My Lady as my base, NYC Black Lace Creme for most of my mustaches, and Zoya Tomoko for my ring finger's mustache. For the mustaches I used a stencil set by Revlon that I stumbled upon at a local store -And bought for $1!-.

O.P.I Glints of Glinda
This nude/light tan shade is the third polish in the Oz the Great and Powerful Collection. As with the other two polishes in this collection, it is very thin, so I used five thick coats over a base of white polish, then my Revlon top coat.

O.P.I What Wizardry is This?
This green, holo-glitter shade is the final polish from the Oz the Great and Powerful Collection, and my favorite. It had much better coverage than the other three shades, so I only had to use four coats over a base of white polish. And again, my Revlon top coat.

Let it snow...
My final design of 2013 was this wintery snowflake theme using Sally Hansen Grey by Grey as my base color. Sinful Colors Snow Me White, and Milani Art of Silver for the snowflakes, stripes, and dots. And Sally Hansen Triple Shine Sparks Fly for the glittery accent nails. I finished the design off with a coat of my Essie Matte About You top coat on the stripes and snowflakes, and my Revlon top coat on the glitter polish.

From Instagram
I made this manicure using four coats of Maybelline Clearly Spotted over NYC Black Lace Creme, then two coats of Essie Matte About You top coat.
From Instagram:
Instagram


From Instagram
I applied two coats of Wet n Wild I Won't Repel You and Drawn Together by Force, followed by my Revlon Quick Dry top coat.
From Instagram:
Instagram


Thanks for reading! To check out November's manicure round up click here
I think my favorite look from December is a toss up between my manicure using Clearly Spotted from Instagram, and my Mustache nail art. I can't decide!
-xo Brittany

Which one was your favorite? What was your favorite manicure that you did in 2013? Let me know in the comments!

Follow on Bloglovin


Let it Snow...

I can't believe this is one of my last posts for 2013!

And what better way to end the year than with a nail design!
I missed making a Christmas themed design because of work, but I still wanted to celebrate my favorite season. And one of my favorite parts of this season is snow, so why not make some winter/snow themed nail art. I made a snowflake design last year, before I had this blog, so I already knew how to make them, so I just expanded on that design. -I'm thinking about making a tutorial on how to make the snowflakes, since I haven't made a tutorial in a long time. so hopefully I actually remember to do that! :p -


For this design I used Sally Hansen Gray by Gray as the base color for all my nails. For my striped nail I applied some striping tape, two coats of Sinful Colors Snow Me White, then quickly removed the tape. I used the same white polish and a fine nail art brush to free hand the snowflakes on my ring finger, then applied some accent dots using Milani Art of Silver and Snow Me White. I finished both nails with a coat of my Essie Matte About You top coat for some interest next to my super glittery index finger and pinkie nails.
For those I used my new gorgeous Sally Hansen Triple Shine Sparks Fly. I used three coats over a coat of my Sally Hansen Gray by Gray. I finished both nails with a coat of my Revlon Quick Dry top coat, which I am retiring soon! It chips like mad, so I replaced it with an essie top coat from Ulta. Hopefully it's an improvement. If you have any suggestions for a good top coat, please let me know in the comments! I have been on the hunt for a good one Forever, and keep getting disappointed.


In natural light.
I like this design, though I was mad that I smudged my snowflakes a bit when I got too impatient to apply my top coat. And then when I tried to fix it, I just smudged it more! So I basically had to step away from the nail art brush and live with it, painful as that was... I was also thrilled to get to use my new Sally Hansen Sparks Fly, which is a beautiful blue based glitter that was just perfect for this design. It's just so cool and wintry.

I will have a post up tomorrow, so this is technically not my last post of the year, but I just want to wish you a Happy New Year, and thank you all for reading my blog! I know I don't have thousands of readers, but the fact that anyone finds my ramblings interesting is awesome, so thank you! Hopefully my blog will grow even more in 2014, and I can meet some more awesome bloggers along the way.
Though 2014 hasn't even started and it's already big for I Heart Nail Art, because later this week -Jan 3rd.- I will be posting my first PR review! -Eek!- I'm very excited, and I hope you like it.

Ok, I'm done being a soppy mess, I swear. Thanks for reading! To check out my previous nail designs click here.
- xo Brittany 

 Follow on Bloglovin

I Mustache You a Question...

Hello! Today I will be sharing my first nail design for December!
I've been doing a lot of Swatch & Reviews lately, which is fun, but I have missed doing designs. So when I had some free time last week I knew I had to do one. Especially because work is going to be crazy now that Christmas is right around the corner, and I don't know if I'll have time for designs in the coming weeks.

I mustache you a question... But I'm shaving it for later.
OK, no more mustache puns, I swear! But yes, while this isn't Movember, I couldn't resist creating some mustache nail art after I discovered these adorable stencils at a local store for only $1! I also bought some spider ones which I was going to use for Halloween, but didn't have time. I might create some nail art with them anyway, and just make it into something Gothic. I used to be goth during my awkward teen years, so maybe I could create some chic, spider, Gothic nail art... Maybe.

Anyway, for this mustache nail design, I decided to make facial hair a bit girly...HA! By using my dusty rose colored Milani A Rose My Lady as my base color. Then I used NYC Black Lace Creme for most of my mustaches. Of course I wanted a little sparkle, so I used my new obsession, Zoya Tomoko (Click here for swatches.) , to create a glitter 'stache on my ring fingers. I finished the design off with a coat of my Revlon Quick Dry top coat.
The awesome thing about the stencils is that they are self adhesive, so they won't slip on the nails, and they are also reusable! So I can have cute mustache nails anytime I want.


I really love this design, and actually got a few compliments on it.
It makes me think of my favorite fictional detective, Hercule Poirot. I just need a murder case, and some hot chocolate... Maybe just the hot chocolate will suffice.

Thanks for reading! I'd love to stay but I really Mustache...OK, now no more mustache puns...
To check out my previous nail designs click here.
Happy Holidays, Brittany

Follow on Bloglovin

The Wizard of Oz

I have another TV/Cinema inspired design today! I'm addicted now! I have even more planned, so I hope you like them.

For this design, I was inspired by the classic 1939 film The Wizard of Oz. I actually never liked the movie when I was a kid, and hated when my mother would try to get me to watch it. But now that I'm older, wiser, and not a bratty teen, I truly love this movie. I've watched it quite a few times, and still have not tired of it. My favorite character would have to be the cowardly lion, the costume is just too cute. And yes, being the nerd that I am, I also own the book The Wonderful Wizard of Oz by L. Frank Baum.
I think another reason why I love The Wizard of Oz now is the Syfy miniseries Tin Man with Zooey Dechanel - I think that's how you spell her name. -. I LOVED that series, and currently own it on DVD. Obviously, since it is based on the classic movie, it inspired me to watch the original again.
And, side note, can I just say, the clothes the evil sister wears in Tin Man were Amazing! I wanted to be an evil queen just to wear them! Just, you know, minus being possessed by an ugly, creepy, witch... Spoilers!


I decided to do a Skittle manicure, - A different design on each nail.- so I could showcase different memorable parts from the movie.
I picked the places and characters that really resonated with me, and what I pictured instantly when I thought of The Wizard of Oz.


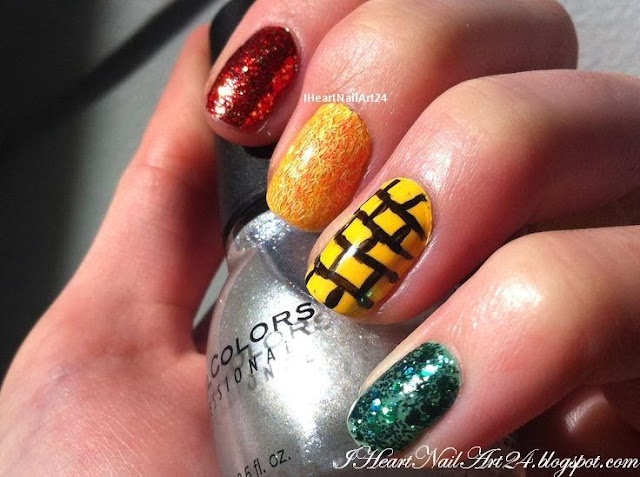
For my thumb, I used two coats of Sinful Colors Out of This World over a base coat of white polish to represent Tin Man. 
To represent the iconic ruby slippers, I painted a coat of Milani Rapid Cherry as my base, then two coats of Milani Red sparkle.
For my favorite character, The Cowardly Lion, I used a base coat of Sally Hansen Lightening, then four coats of Sally Hansen Fuzzy Coat Peach Fuzz to get the full furry effect. Like the Lion's fluffy mane.
Of course, when I think of The Wizard of Oz, I think of the yellow brick road. So I applied three coats of Sally Hansen Lightening for full opacity, than I used a fine detail nail art brush and painted on a brick pattern using NYC Black Lace Creme. 
And finally, to represent the beautiful Emerald City, I applied a coat of Avon Sea Breeze as my base, then four coats of Wet n Wild Emerald the Crown Jewel for a bold, glittery look.
I finished the whole manicure with a coat of Revlon Quick Dry Top Coat.


In Sunlight.
This design was super fun to do. I am really starting to like skittle manicures! Especially inspired ones, so don't be surprised if I get stuck on them for a bit... Like in the next few weeks...
I wish I applied a base coat of white underneath all the polishes to make them more vibrant, and to also save me from all the countless coats I had to apply. But I was being lazy, and it backfired.

Thanks for reading! To check out all my past designs click here.
- Brittany

Do you love The Wizard of Oz? Who is your favorite character? Am I the only one who loved the series Tin Man? Let me know in the comments!

Follow on Bloglovin

Gold Stripes & Flowers

As I mentioned in a previous post, I had ordered a large quantity of nail art striping tape from Amazon. The only problem was that my order was from China, so obviously it was going to take some time to get here. But it's here, and I'm so excited! I knew I wanted this weeks design to incorporate my new purchase, so I decided on some thin stripes.
When I do a design on every nail I prefer to go a bit more subtle, so I wanted a more subdued color for my stripes. I hunted all around my stock pile of polishes, then I remembered one of my favorites, It is this gorgeous gold color, I just love it. So I hunted it down and paired it with a nice simple white polish. For a little dimension I also added some free-hand Hibiscus flowers on my ring fingers and thumbs. It was my first attempt at making them, so don't judge! :p


I started with a base of NYC French White, applied my striping tape, then two coats of the beautiful Complete Salon Manicure Gilty Pleasure, then quickly removed the tape before the polish could dry. Next I applied a layer of top coat, let it dry, then I used a detail nail art brush and Milani A Rose Mylady -One of my favorite pinks, it's just so elegant looking.- to paint my hibiscus flowers. I also used a small dotting tool to add some accent dots around my flowers using the same white polish I used as my base. Afterwards I applied another coat of Sally Hanson Double Duty base & top coat in one.


Thanks for reading!
Brittany

Sorry if the pictures are too big, I've been toying with my picture taking methods, trying to find the right look for me & my blog. A blogger's work is never done!


(To see other nail designs I've done, click here.)

Follow on Bloglovin

Neon Pink Stripes

It's about time I show some nail art on I Heart Nail Art! So I decided to post what's on my nails in between my nail polish Swatch and Review posts. Plus I need to be doing something productive because I spent all yesterday in a PewDiePie watching marathon on YouTube and I don't want to get lost in it again!
If you don't know what PewDiePie is, he's a really funny guy who makes video game walkthroughs and reaction videos. I am currently watching his The Last of Us series of walkthroughs and I'm addicted.

OK, back to productivity!:


 I used Milani Neon Pink Hottie and Avon Nail Art Delicate White. with a top coat of Sally Hanson Double Duty base and top coat in one.

It came out pretty good. I usually can free hand stripes a bit better but my Brand New unopened nail art polish was just GOO when I opened it. I was so mad! But I tried to make the best of it.


I made the stripes different sizes to make it more interesting, and because I was inspired by a dress I saw in a fashion magazine.

I also chose the stripes to tone down the neon pink, which is really bright.


Thanks for reading!

Brittany